Category: featured

  • Installing and running Microsoft Visual Basic 6.0 On Windows 7/Windows 8 [x32-x64 : 32bit-64bit] with all features!

    Installing and running Microsoft Visual Basic 6.0 On Windows 7/Windows 8 [x32-x64 : 32bit-64bit] with all features!

    Hello Friends,recently i had to do some college Project in Microsoft Visual basic 6.0 + Oracle SQL Connectivity, but the hell Microsoft Visual Studio wasn’t simply installing on my Lappy, so after a few hit and misses at the goal, i have found the Foolproof Method for installing Microsoft Visual Studio on your Windows 7 and Windows 8,Windows 8.1 installations that too on both the 32 bit and x64:64-bit releases of Windows 7 and Windows 8 There are a lot many reasons which are responsible for installation of Visual Studio/visual basic 6, prominent of which are

    • Compatibility Issues
    • Microsoft Java Machine issues
    • Installer/Setup run-time issues
    • and some problems which ares pecific like unable to use visual Basic components such as ADODC,OLEDB,ADODB,RDO Connection problems etc

    Lets solve each of them one by one in Detail.. 🙂 but before that , there are some prerequisites which we must implement so as our setup will be much smoother… Prerequisites

    • During visual studio 6 Installation, it may ask you to install Microsoft Virtual Machine For Java,etc..and it may restart your computer continuously..so as a fix, simply Download the Following Ms-Java.bat file,and simply right click on it,and “Run it as administrator”,it will ask you for a confirmation,please select yes,it will open a box,and close that’s it!
    • Now,The visual Basic 6 Setup wont prompt you to install virtual machine for Java,thus removing a hurdle!
    • Click here to Download Ms-Java.bat  file for bypassing Microsoft Virtual Machine For Java..
    • Now lets look at the Setup! The link to torrent file of vb6 setup if you do not have it is here..>

    The First Problem which we encounter during setup is compatibility issues

    • This Problem can be solved by running the setup.exe of the visual basic 6 setup,by right click and selecting “Run as Administrator”  option..
    • it may show a dialog box like this — > fortunately,this Problem will Be Solved by simply clicking the Run Program and the Setup Started.. 🙂 , as you are running the setup,its possible that setup might become too very slow on places such as “searching for installed components” , “finishing installation” etc..dont worry its,totally normal! just wait for the setup interface to come up 🙂
    • Now you may simply Enter Serial Number,and Follow Next,Next Method of Installation and install Microsoft Visual Basic/Miscroft Visual Studio on your computer..BUT!!  if you follow this Method your Installation of Visual Studio will work,but on 64-bit (x-64) OS,Windows 7 64 bit,Windows  64-bit when you try to use Visual Basic components such as Data Grid,Active X controls,ADODC Connections,ADODB Connections for VB-SQL Connectivity it will give error..
    • The errors vary to a wide range depending upon the components selected and will be something as — ” failure to initialize provider,error 420,error 482,as well as the printer errors ” blah blah blah
    • So, in order to Make Visual Basic- Oracle SQL Connectivity we must do the following steps..
    • Please Make sure while installation/setup your Visual Basic installation directory is” C:\Program Files\Microsoft Visual Studio 6\common\” or  “C:\Program Files\Microsoft Visual Studio 6\” and NOT“C:\Program Fiiles (x86)\Microsoft Visual Studio 6\common\” or “C:\Program Files (x86)\Microsoft Visual Studio 6\common\”

    Steps for Visual Basic – Oracle SQL Connectivity on Visual Basic 6 For 64 bit OS..!

    • The (x86) suffix at the end of Program files is responsible for the failure of various visual basic components such as data grid,ADODB,ADODC,OLEDB,Active-X,RDO,Printer Connectivity,windows common controls etc..

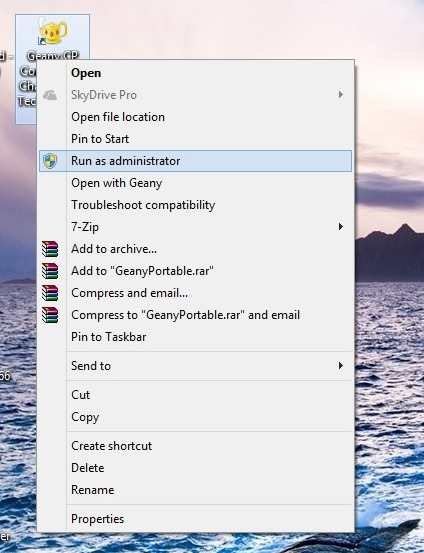
    you can check this figure–> if it isn’t you may change the installation directory by clicking “Change Folder” or “Change Directory” as shown in the figure –>

    • Thus,we can make it Function Properly By Installing it to Default Program Files Folder..And All the Data bound controls,standard controls,added components to VB such as ADODB,OLEDB,Data bound grid control etc properly,Windows Controls,MAPI Controls Properly..!

    Also if you already installed Visual Basic To Program Files (x86) just dont uninstall Please.. simply Perform the Following steps

    • Copy the Complete Microsoft Visual Studio Directory From c:\Program Files (x86)\ to C:\Program Files\
    • Now Go,to the Folder C:\Program Files\VB98\ andtry to run VB6.exe , it will give error as “Failed to register extension and blah blah”
    • Now simply run the “VB6.exe” from the non-x86 folder in “Run as Administrator” mode,. and voila!! Visual Basic Will Start Working,and all the Default Connectivity,Data Components which can be added from tools->components menu such as ADODB etc will start working!! thus , the VB-SQL Connectivity too will start Working!! 😉

    If you Encounter Sluggishness in IDE do the Following Steps 🙂

    1. Using Windows Explorer, browse the location where you installed VB6. By default, the path is:
      C:\Program Files (x86)\Microsoft Visual Studio\VB98
    2. Right click the VB6.exe program file, and select properties from the context menu.
    3. Click on compatibility tab
    4. Check the following check boxes: For Windows 7:
      • Run this program in compatibility mode for Windows XP (Service Pack 2)
      • Disable Visual Themes
      • Disable Desktop Composition
      • Disable display scaling on high DPI settings

      For Windows 8

      • Run this program in compatibility mode for Windows XP (Service Pack 2)
      • Reduced Color Mode (16-Bit Color)
      • Disable display scaling on high DPI settings
    5. After saving open up VB6, It should work normally

    That’s all! a quite-lengthy tutorial indeed! 🙂 But Totally Working! if any Doubts/Problems Just drop a Comment below 🙂 thanks!

  • ByteBX Zip And Download Trick! Enable Premium Zip And Download Feature your free account using this Script 🙂

    Hello All,

    You Must be Knowing ByteBX, The Online torrent leech/torrent caching,remote url uploading service ,
    its a great service to say,but its free account has some limitations 🙁
    like 100kB/s speed limit,which literally sucks ! 🙁

    so to overcome the same,we launched Bytzo Browser Series,and they are working too perfectly!
    but unfortunately some jealous and unehtical guys copied our script and were re-distributing the same,with changed browser name/rebranding it under their name..that really hurted me 🙁
    so am deciding to publicly share the script atleast the users will come to know what kind of hack it is,as well as they could enjoy it on their own personal browsers google chrome,firefox,internet explorer etc, and you can use them on any os e.g linux,windows,mac unlike bytzo browser which was windows specific…

    Prerequisites :

    Now After you have installed these extensions simply Navigate to this URL of Userscripts.org

    And install the extension ByteBX Premium userscript,

    Now after you install the userscript,simply Go to www.bytebx.com and  log-on to your free account,The Zip and Download Option will be enabled for full-speed on your browser! 😀

    Enjoy This ByteBX Zip and Download trick and do share our page with your friends too,so that they too will Enjoy ! 🙂

  • GNU Octaves Installer For Windows XP/7 And Windows 8/8.1 [32bit and 64bit variants]

    Hello Guys, You must be knowing about GNU Octaves – A High Level Programming Language Generally Used For Numerical Computations, it Provides a Command Line Interface so that Mathematical Functions can easily be performed..
    But Alas! The Recent packages of the gnu octaves are only built For Linux,and when it comes to windows, there isn’t an installer Package available,but Rejoice.! We have Created one Gnu Octaves installer for Windows with Inbuilt MinGW libraries required for the Soft : GNU Octaves For Windows

    You Can Download it Here —>

    Click here to Download GNU Octaves For Windows Installer

    Alternative Link : To Download GNU Octaves For Windows Installer

    Features Of The Installer : – >

    • Works On All Versions of Windows – Windows XP,Windows 7,and Windows 8 too [Both 32 bit and 64 bit Variants of all Windows 🙂 ]
    • All the MinGW Libraries inbuilt 🙂 so no need of any installation of Linux/cygwin to run GNU OCtaves
    • In-built GNU Plotter, so that the you can plot automatically Graphs,Waves And Functions
    • in-built Notepad++ as Default Text Editor 🙂
    • Notepad++ provides a colorful GUI so that you can type the program with ease,and silly mistakes are reduced…
    • Provides Command-Line Interface same as Terminal in Linux 😀


    Instructions For Use :

    •  If You are using Windows 7 or Windows 8  Please run the Executable as “Run as Administrator” by right -clicking on the program icon and selecting run as admininstrator option in the menu,it is shown in below figure
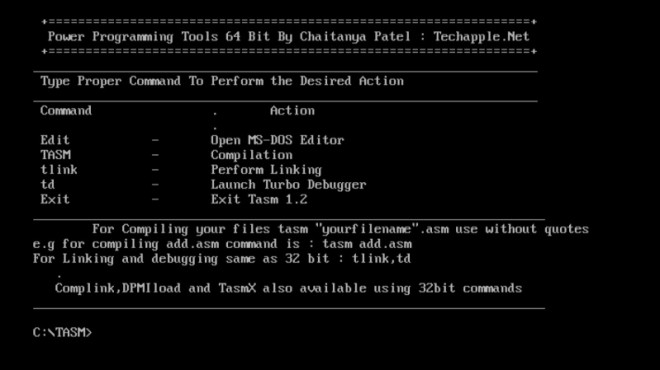
    • Now you will see a black terminal as shown in the below figure,now for writing the program in gnu octaves, simply type as”edit <your program name.m>”
      without quotese.g if i want to create a program ucos.mi will write –> edit ucos.m
    • Now Hit Enter, you’ll see Notepad++ firing Up on your screen, Now You can type your program between the function name and enfunction tag, it as shown below — >

      Writing A Program in GNU Octaves
    • The GNU Plotter too works so that you can view,Graphs And Waveforms of Functions.. it is as shown below –>

      GNU Plotter inbuilt
    • Hope,This Works For you too, It worked For Me on Windows 8!!
      Do Keep Commenting and Sharing this post To Your Friends 😀
    • Any Problems/Doubts Do Comment here 🙂
    • You Can Download it Here —>Click here to Download GNU Octaves For Windows InstallerAlternative Link : To Download GNU Octaves For Windows Installer
  • [Tutorial] How to use zBigz Premium Cookies To remove Download Restrictions and Get Unlimited Speeds For Torrents!!

    Hello Friends,

    First of All , Let me Introduce zBigz : zBigz.com is a cloud based sites,where you can upload your torrents/magnet links and download them as HTTP links 🙂

    Yeah 🙂 HTTP , But the Con is that zbigz.com free account provides only 8GB Filesize,and Limited speeds of 150kBps , but yes it can be bypassed by Our Cookies
    So Let’s look What Methods/Tools We Are Going to Need

    I > An Internet Browser Google Chrome And Mozilla Firefox Preferred..

    II > A .Torrent File/s which you want to Download,or A Magnet URI of them..


    Now Before We Move to Premium Cookie Lets First Understand How zBigz Works

    I > Open http://www.zBigz.com The Index Page Opens As Shown..

    zBigz Index Page

    •  Now,in the Box Simply Paste Your Magnet URI of Torrent OR  Click on Upload Torrent and Select the torrent file you want to download and click on “GO”
    • Now A Message Appears Asking you for Free/Private Click on Free
    • Your Torrent Will Be Uploaded On zBIgz , you can see the status
    • Now Click on zip or Download Button to Download

    Now This was the Basic Functioning but Here’s the Method How to Download UNLIMITED with Blazing Unlimited Speeds

    Tools which we are Going to Need (more…)

  • Geany CP : A Customised Geany IDE Installer as a C/C++ Compiler for Windows |Geany Compiler for Windows

    Geany CP : A Customised Geany IDE Installer as a C/C++ Compiler for Windows |Geany Compiler for Windows

    Hello Guys,

    There is a dearth of Proper C/C++ Compilers when it comes to Windows OS..especially except TurboC/Dev-Cpp none are upto the Mark Really..!!

    But TurboC also doesn’t Run on 64-Bit Environments..like Windows 7,Windows 8

    But it has a solution too.. Check The 64 Bit TurboC Solution,Click here..!!

    although when it comes to Linux OS Geany IDE performs the Task Beautifully..!! also it uses the inbuilt gcc/g++ libraries but these Geany doesn’t run like that in  Windows OS due to missing libraries..

    also you must have liked to use Geany as a C/C++ Compiler in Windows, so here’s the Solution

    Geany CP : A customised Geany Installer as a C/C++ Language Compiler for Windows 

    Here are some of its Salient Features

    • Popular Geany IDE as a C/C++ Compiler on Windows..That too a Single Click Installer
    • No Need Of Installing Linux Thingy..every component is built-in 😀
    • Includes The minGW Libraries used by Linux i.e gcc/g++ library inbuilt 😉
    • No need to Alter The Environment Variables / System / Path.. The Installer Does that all itself 🙂
    • One CLick Installer : Geany + MinGW + System Variables.. All you have to do is simply Run The Compiler and Code  your desired source 😀
    • Works on Any Version Of Windows [Windows 98,XP + Windows 7 and Windows 8 too] both 32 bit and 64 bit Environments

    So, You can Download and Get it from here –>

    Click here to Download Geany CP : Geany IDE on Windows with c/c++ programming Support inbuilt

    Procedure :

    • Install,it using the Normal next,next method and run it from the Shortcut on the Desktop
    • Important Note : Windows 7 and Windows 8,users must Run it as an Administrator, you can do this by right clicking on the Geany icon and selecting Run as Administrator option..[Shown in this screenshot–>
    • Geany Run as Administrator Option for Windows 7/Windows 8
    • Enjoy !! Happy Programming 😀 with Geany as C Compiler on Windows

    Mirror Link #1: Click here to Download Geany CP : A Customised Geany IDE as a C/C++ Compiler for Windows

    Mirror Link #2: Click here to Download Geany CP : A Customised Geany IDE as a C/C++ Compiler for Windows


    Here are some screenshots–>
    (more…)

  • Turbo C/C++ For Windows 10 / 8.1 & Windows 7 [32bit/64bit] FullScreen Installer [PC & Laptop]

    Turbo C/C++ For Windows 10 / 8.1 & Windows 7 [32bit/64bit] FullScreen Installer [PC & Laptop]

    Hello Friends In my last article , I had Published Tasm or Turbo Assembler For Windows 7 / Windows 8, Full Screen 64bit, then after that I received many requests from our Users to Prepare an installer for TurboC/C++ too on that algorithm, so here it is.. TurboC/C++ By Borland is a Popular C/C++ Compiler,but finding its installer is a headache plus it doesn’t directly work on Windows 7/Windows 8.1 & Windows 10 64 bit..so here is the Modified TurboC/C++ 4.0 Installer For All Windows Versions

    Salient Features of Turbo C by TechApple

    • World’s most preferred Simple C/C++ Language Compiler..that too on a single click installer !!
    • Works On All Versions of Windows, Windows 98,Windows 2000,Windows XP,Windows 7 [64 bit as well as 32 bit] As Well as Windows 8,8.1 and Windows 10 too [both 64bit and 32 bit]
    • Works Full-screen even on Windows 7 ,8 and Windows 10..!!
    • C/C++ Graphics[graphics.h] supported .. even on Windows 7 and Windows 8 again fullscreen..!!
    • Header files Snap.h and dos.h also supported for Screen-capture and Delay timer, again full screen..
    • Single installer,no Need of Configuring anything.. even a single line 😛
    • No Need Of Mounting anything on DosBoX , everything is already mounted 😀
    • Alt+F9 Key For Compilation and Ctrl +F9 Key for execution both Combinations Supported, No other DosBox Turbo C++ supports this..!!
    • Very Much Stable Operation. Same installer works for all Windows OS’s 32 bit as well as 64 bit

    You can Download it from here

    Updated : Click here To Download Turbo C/C++ 4.0 For Windows XP/7/8.1/10 [64bit/32bit] Fullscreen Single Installer

    Mirror Link # 1 Click here To Download Turbo C/C++ 4.0 For Windows XP/7/8.1/10 [64bit/32bit] Fullscreen Single Installer Updated..


    Installation Guide :
    Its rather pretty simple, Just Open the installer and simply keep on clicking Next.

    Just Don’t change the default installation
    directory “c:\TurboC4\”


    Screenshots – >

    Successfull Compilation using the alt + f9 key combination Successful Use of Graphics- Graphics.h and ScreenCapture – > snap.h in TurboC

    Support –

    • Double click the Turbo C/C++ icon on the Desktop for Execution
    • If it Doesn’t run Full-screen simply give the commandAlt + Enter” To Open in Full-screen
    • We have also launched Turbo C for Android – You can download & use Turbo C for Android by following tutorial .

    Mirror Link No2
    Click here to Download from Mirror : TurboC/C++ For Windows XP/Windows 7/Windows 8 64bit-32bit Edition Updated 4.0

    Please do let us know if there are any problems while installing the package – Turbo C for Windows 10 in the comments section below.

  • Tasm Windows 7|Windows 8|8.1 Full Screen 32bit-64bit Version Single Installer Updated Fullscreen

    Tasm Windows 7|Windows 8|8.1 Full Screen 32bit-64bit Version Single Installer Updated Fullscreen

    Hello Guys,

    Tasm,or Turbo Assembler/Turbo Debugger By Borland , is one of the most popular assembler used in the world today. it’s used to study the architecture and working of various Microprocessors such as 8085,8086,8051,Pentium Series etc..

    But However it doesn’t work / supports the 64 bits of Windows i.e Windows 7 64 bit / Windows 8 Version, so i have created a separate configured Version of the software for the same purpose.,it will run smoothly,with fullscreen mode and has many features such as

    • Full Screen Mode Operation On Windows 7 as well as Windows 8 | 8.1 & Windows 10  for Tasm [Turbo Asssembler,TD,turbo Debugger]
    • edit option of Microsoft Dos editor integrated [ You can now write your program directly with the dos editor  edit in Windows 7/Windows 8 ]
    • Inbuilt MS-Dos Editor 2.026 within DosBox
    • Auto Mounted the Tasm Files such as tasm,td,and tlink [so that there is no need to mount them everytime , not even one time !! 😀 you open DosBox]
    • Mouse Pointer Support
    • One Click Installer,No Need of configuring anything,installs in seconds and the Shortcut placed on your Desktop!
    • Useful For Students as well as Teachers and Professionals..
    • You can save the program directly within it,and open it next time From the Software itself for editing/Use.

    Click here to Download The Installation Package Tasm 1.4 Windows 7|Windows 8|8.1  & Windows 10 64bit Version [2-3 MB]

    Installation Guide

    First of all You Need To Download The TASM from above link- >

    Click here to Download The Installation Package Tasm 1.4 Windows 7|Windows 8|8.1 & Windows 10 64bit Version [2-3 MB]

    Then , Its Pretty Simple,Just Keep on Clicking Next,Just Don’t change the (more…)

  • How to Port your Mobile number from one State/Circle to other | Change mobile number circle & Avoid/No Roaming Charges 🙂

    Yes !!  You heard it right 🙂 Telecom / Mobile Subscribers or mobile users in India can get cancellation of their intra-circle roaming charges or avoid them totally ! as per the NTP [ National Telecom Policy] To be adopted by TRAI by 13 th May 2012 

    According to the NTP, a subscriber would be able to change his operator and at the same time retain his number, even if he moves to another state/circle. Thus the Mobile Number Will be Same but
    its Base/Home Circle Will be Ported resulting in cut off of roaming .

    Here’s how you can port your existing mobile number from one state/circle to another –

    1. To begin with, you need to generate UPC (Unique Porting Code) by sending SMS to 1900. UPC is an alphanumeric code allocated, upon request, by a mobile operator to its subscriber for the purpose of facilitation of porting of his/her mobile number to another operator.

      • SMS to be sent : PORT <your Mobile Number> to 1900. Operator SMS charges will be applicable.
      • Eg. SMS PORT 98XXXXXXXX to 1900
    2. After sending SMS to 1900, you will receive UPC (Unique Porting Code) as a SMS from 1901 giving 8 digit alpha-numeric Unique Porting Code (UPC) and UPC expiry date in MM/DD/YYYY format

    3. Visit your nearest Simcard outlet / showroom and submit a new card if you’re switching operator .

    4. Now , Fill up Mobile Number Porting (MNP) form providing details like

      • Current Mobile Number
      • Current Operator name
      • UPC code
    5. Submit Address & Id proof documents, self-attested photo and last bill copy of postpaid connection (if applicable) along-with filled MNP form and Customer Agreement Form.

    6. That’s it!

    Considering the Large success of MNP, Till the end of March, close to 42  million subscribers had opted for MNP, according to TRAI .. its quite a big step.. because now a subscriber can not only change his mobile operator/ but also his circle to avoid the roaming Charges

    Last Time MNP infused a tariff war / race to pull up each others subscribers into own Operating services.. NTP implemented MCP [Mobile Circle Portability] Or MNCP [Mobile Number Circle Portability] will surely ignite a new war between operators , I Hope this results not only in Lowering of tariff Rates , but Increase in the Quality Of Service Provided such as Network, Congestion Free Nature etc .. Let’s keep our Fingers Crossed Upon it 🙂


  • Tips and Tricks To Get More Likes On Your Facebook Photos 😛

    One of the Most astonishing Features Of Facebook : World’s Largest Social Networking sites is that it allowes users to “Like” Other Fellow users Contents.. but sometimes there begins a feeling or a competition between Users to Get More “Likes” :p so here are some times which will surely be useful to Get More Likes On Your Facebook Photos

    1. Photo Quality : This is One of the Most Important Reason which drives Users to click on “Like” offcourse super-clarity Photos speaks for themselves with their clarity 🙂

    2. Photo Subject : The Main reason Users use Social Networking sites isto get rid of their boredom, hence Genuine Funny/Comedy Photos are Sure to Get More Likes 😛

    3. Caption Line : This is Probably the Most Catching thing in some cases , A Good Caption can Earn you likes on its own Merit even if the photo isn’t too good.. A Caption should be short,sweet and Witty and must not be Long!!

    4. Tagging : Generally , (more…)