Youtube is one of the most-used web services and is the single-largest video consumption platform across the World. One of the only bad things about Youtube are its inappropriate ads, sometimes they are totally irrelevant or sometimes they ruin your Video or Music experience. Here we share you 3 Simple Methods which will block all youtube ads on Android, be it Youtube app or Website in Chrome.
Top 3 Ways to Block Youtube Ads in Android (Remove Skippable as well as non-skippable ads)
Method # 1 – Use an Adblock enabled Browser
Adblock Browser can block Ads on Youtube too!
This is one of the most favourite and simple methods to block ads in Youtube. Incase, if you are not loyal to the Youtube app, you can simply install an adblock enabled browser and browse the Youtube mobile site through it.
This will help you not only save your data, but it will automatically Block Youtube ads.
This Method is the most simple to use, and can be easily used by anyone.
This method is more suitable for more advanced users, or users who like viewing Youtube videos inside the Youtube App.
The Process is fairly simple, but gives more control over all the ads in all the apps in your Phone. Thus, allowing you to block all ads inside all apps in your Phone.
It consists, of installing DNS 66 – A DNS Based Adblocker, Configuring it. And starting it before your Youtube session.
This is the most riskiest of the methods, as this involves installing external Youtube Modded APKs which may hamper your device.
Since, the app apk can malicious we won’t recommend you to try this method. However, if you are still curious to try it. You can refer this XDA Thread or install third-party Youtube apks such as OG Youtube.
That’s it! We have covered all the 3 methods to block Youtube ads in your Phone, incase if you encounter any issues or have another cool method, we will like to hear you 🙂
In-app & Pop-up ads are a necessary evil, as they sponsor the free price of any app. But, sometimes the app ads are very much overdone and the pop-up ads are followed by vibration ads, and then sticky ads and the ads never seem to end. Also, the extra data consumed by the ads and malware advertised put our phone’s security at high risk. So, in order to avoid all this We bring you How to Block Popup and Inapp ads in all Apps on Android so that you can enjoy your favorite games and apps without ads.
How to Block and Stop Pop Up & In App Ads on All apps in Android Phone (No Root Required) –
Pre-Requisites –
An Android phone which allows “Installation from Unknown Sources” . To enable it navigate to “Settings – > Security – > Installation from unknown Sources” and toggle it “ON” as shown in the Screenshot below –
Enable Installation from Unknown Sources
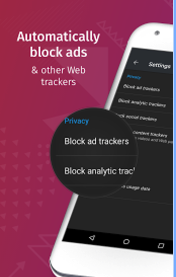
Now, We will need to install an Adblocker app – We will use “DNS 66″ for this purpose because its Free, based on DNS and hence doesn’t consume more battery either. Unlike Other VPN based adblockers such as AdGuard which consume a lot of battery . Click here to Download DNS 66 .Apk file for installing the DNS 66 App.
Tutorial to Set-Up DNS 66 App in Android (One-time Procedure) –
Considering, that you have installed the DNS 66 App from the link given above. Launch the DNS 66 App. It will show you a screen as shown below –
First Screen of DNS 66
Now “Toggle On” watch Connection and “Toggle Off” iPv6 support section from the above screen. And Navigate to the “Hosts” Tab as shown below –
In the “Hosts” tab – “Turn On” Filter Hosts and “hp Hosts Ad & Tracking Servers” as shown in the following image .
Turn On hp Hosts Ad & Tracking Server
Once you turn on hp Hosts ad servers , it will show a shield as opposed to blank shield. The enabled shield is shown below –
Ad Blocking Active
Now again navigate to “Start” tab and click on the “Start” button as shown in the below image –
Click on the Start Button to Start AdBlock
It may ask you for permission to start AdBlocking. Do not worry this is just a dummy VPN connection and your Speed won’t be compromised at all. infact, it will be faster since the Ad servers DNS won’t be resolved. (Its only a one-time process)
Click on OK (One-time Process)
That’s it ! Your DNS 66 App Setup is Complete ! .
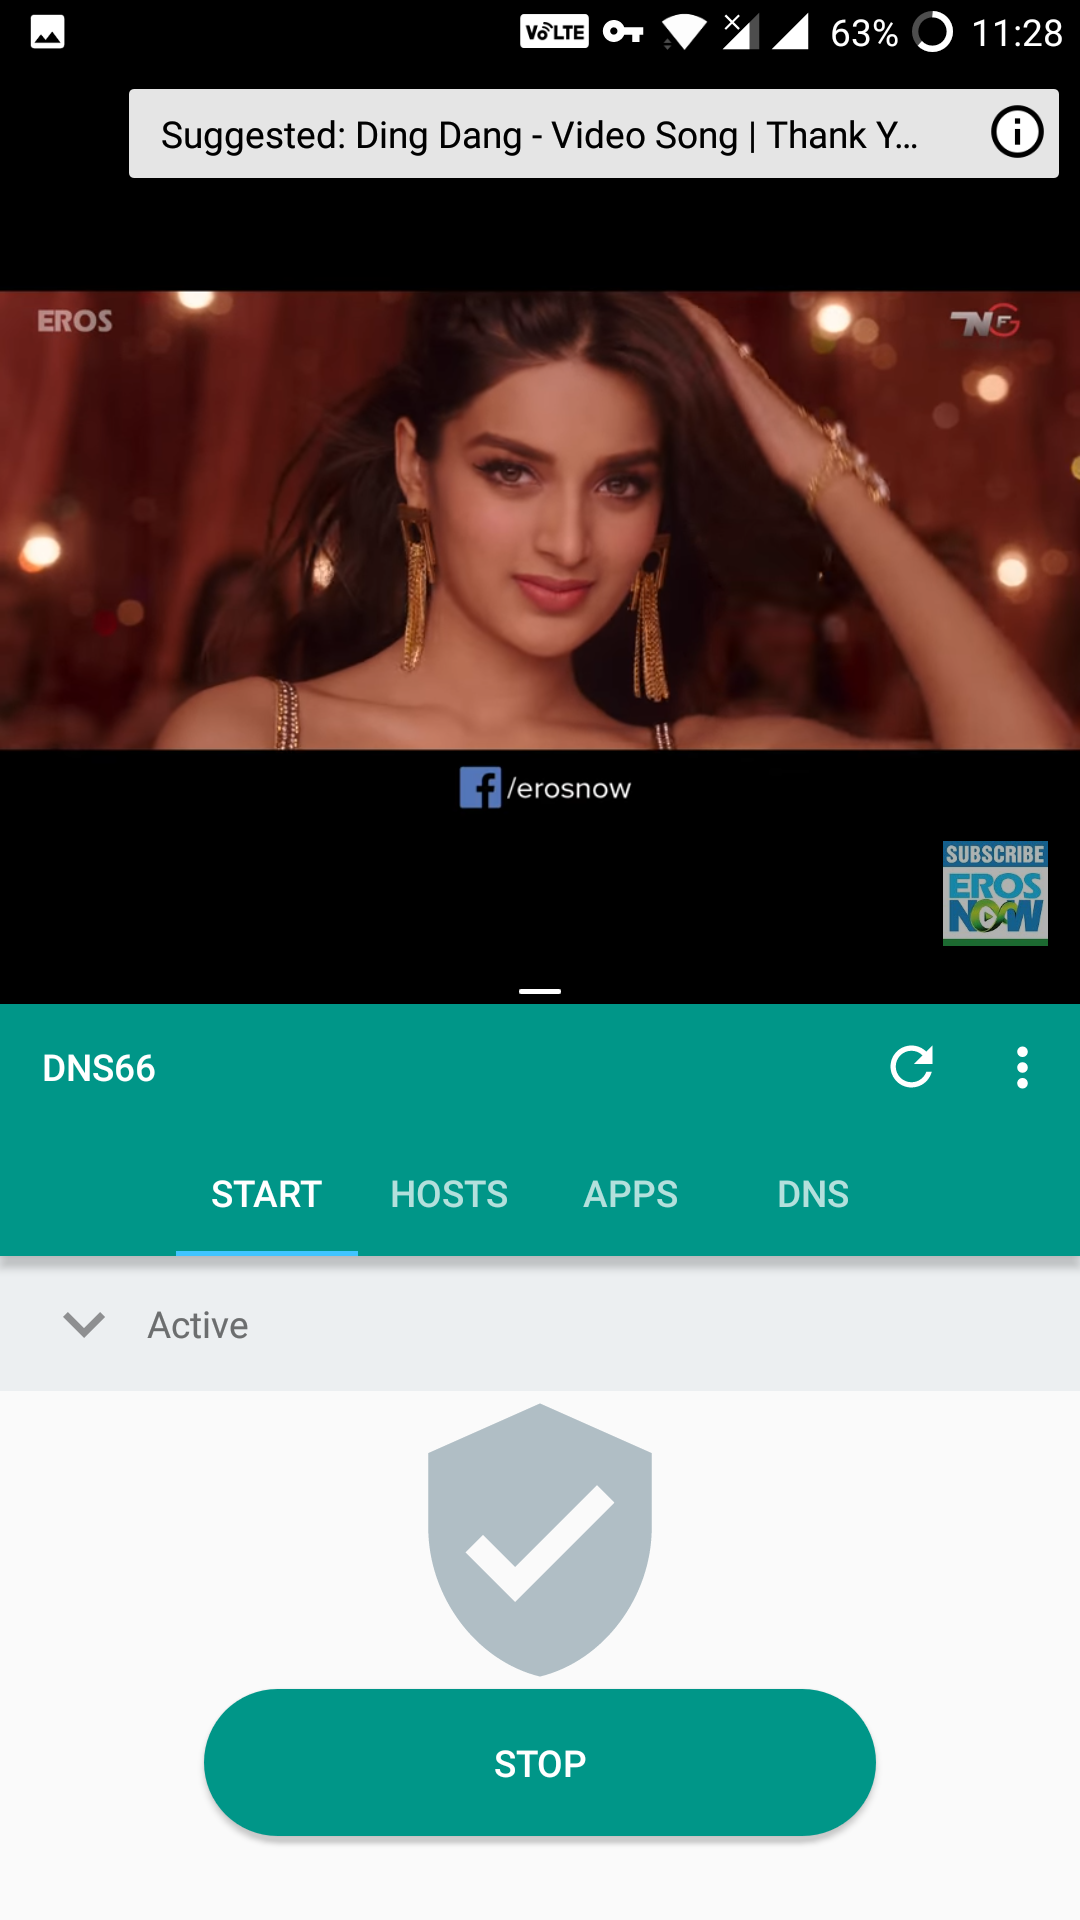
From , next time Simply Start or Stop your Pop-up & In-apps Adblocker from the “Green Start or Stop” button on start screen. No need of repeating full procedure again 🙂
Start or Stop System Adblock by Single Button
Blocked Ads in all Apps on Android –
Once you’re VPN is up and running , You can now Open any app, and browse anything . No Ads will be shown anywhere ever!.
Ad free experience on Google Chrome!
Enjoy the Ad-free experience across all apps on your Android.
Incase if you face missing Hosts file error, please refresh the app by clicking on the reload icon as shown –
Reload Icon for Hosts
Feel free to Comment any issues or Queries if the Ads aren’t blocked in the comment section below .
With the growing number of Android smartphone users, the internet usage on Smartphone is on the rise. One bad aspect of Google’s Android Operating System is that the default browser chrome doesn’t block ads and this causes a lot of issues such as slow speeds, website pop-ups with adult ads, phone vibrations etc. Thus, these ads not only hinder your browsing experience but also can steal sensitive information using tracking cookies. In this article, we bring you the Best 5 Free Adblock browsers for Android which will not only enhance your browsing experience by not loading ads-making browsing faster but also protect your data and keep you more secure.
Top 5 Best Free Adblock Browsers for Android Phones and Tablets –
Browser # 1 – Firefox Focus
Firefox Focus on Android with Adblocker
Firefox is our favourite browser when it comes to PCs and considering it has an Android version available that too with inbuilt ad-block it made sense to test it out. We have kept Firefox Focus on the first position due to the host of features it has viz –
Inbuilt ad block and tracking protection
Ability to clear history each time you exit
Its a privacy focussed browser so no data is sent about your previous visits.
Completely open-source and comes from Mozilla!
Besides, it has so much privacy options that we couldn’t even take a screenshot so this is the most secure browser ever we tested on Android that too with Adblock
Though, we love firefox and Chrome. We have purposely kept Orbitum browser before Chrome-based Brave just due to the sheer functionalities it has.
Orbitum is not a popular browser but its a neat browser which surely deserves a space in your phone due to its salient features such as –
Inbuilt Adblocker
Desktop View Support
Ability to change the color and themes!
And the best part is Torrent Downloading support! . Yes , Orbitum comes with an in-built torrent downloader so that you do not need to download a separate torrent client for downloading p2p files. Saving not just data , but also disk space too!
Incase you are a Google Chrome user and using any other browser is inconvenient for you, then you can use Brave Browser.
Brave browser is based on Google Chrome engine with the same User interface and comes inbuilt with a “Brave Shield” which can –
Block Ads and Trackers
Block External Scripts such as Anti-adblockers
Block 3rd Party cookies
Also, you can use force HTTPS , which will force open the https version of any site you’re visiting to ensure you’re data cannot be seized and tracked by any other hijackers. (Very Useful for Online Payments & transactions)
Adblock the de-facto Ad blocker for Chrome has a standard alone browser for Android users. The Adblock browser is developed by the same company that has built the Adblock extension and is also speedy to use.
Though, it has less features as compared to other browsers featured in this article. It does what it says and blocks those annoying vibrating ads on your Android.
It is for the 5th position in this list that we really had to stretch and select a particular browser as there was a healthy competition between Maxthon, Ghostery, Opera Mini, Dolphin, Halo etc just to name a few.
We selected Opera Mini purely based on the way it transformed browsing by its Server and its lightning speed on 2g Networks.
Combined with the compression, and Adblock Opera Mini does blocks ads and help you really save data and loads page faster.
But the revamped news section, does take away the old charm of Opera Mini which now has a bit of commercial money making touch. But still Opera mini, is the browser which can be used on any 2g or 3g networks where speeds are low.
Thus, these are the Best Adblock Browsers which are Free. We have tested over 16 Different browsers before finalising on these. Still, if you face any issues or would like to recommend any other browser feel free to comment below!
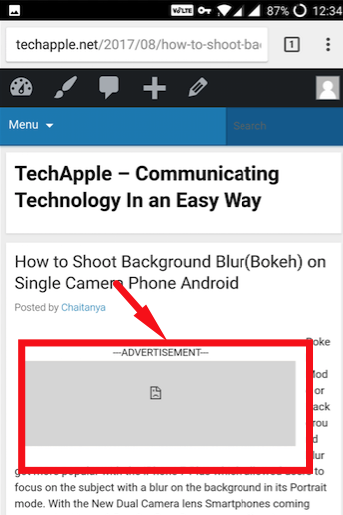
Bokeh Mode or Background blur got more popular with the iPhone 7 Plus which allowed users to focus on the subject with a blur on the background in its Portrait mode. With the New Dual Camera lens Smartphones coming around like Honor 8 Pro, OnePlus 5, the bokeh effect is becoming even more popular. There’s literally no need to purchase a new phone just for the sake of getting the Background Blur effect, in this tutorial we will show How you can Capture Dual Camera-like Bokeh effect photos with Background Blur on your existing single lens / single camera Smartphone.
Tutorial to Capture Bokeh Effect / Dual Camera like Photos on Single Camera Phones Android –
To simulate Bokeh effect or lens blur, we will be using the Google Camera App for Android. We cannot capture Background blur or Portrait mode photos with the Stock camera app.
Once you have installed the Google Camera app from the above links, launch the app. It will now show a shoot mode screen as shown below –
Swipe from left to right to bring the Options panel
Here Swipe from left to right to show all the shooting options available, as shown in the image above. In the options, available Tap and select the “Lens Blur” option as shown in the image below –
Select the Lens Blur Option in Google Camera
Once, you select the Lens Blur Option , it will show you a small tutorial on How to use the Lens Blur option to capture Bokeh effect photos as shown in the following image –
Here click on the “OK, Got It” button. Thus, basically all you need to do is select the Lens Blur Options, and then shoot the “Object” you want to focus on while raising your phone in an angle. Let’s see how it works –
In the Lens Blur capture screen, first tap the capture button as shown in the figure below –
Click on the Capture Button
Now , Keep on raising your phone until the indicator shown below is full. Be as slow as possible while raising the phone, so that your focus on the object remains constant. Try not to be too fast neither too slow . Check the below screenshot for Indicator –
Indicator Box of Google Camera Lens Blur
Slowly raise the phone until the above image highlighted box goes upwards as shown in the next image –
Indicator Box going upwards
This takes a lot of time to get used to, hence we recommend practicing it on a stationary object before moving onto moving objects. We tried this on our Deodorant can and once we finished the tilt mode. It started focusing our captured photo as shown below –
Processing the Captured Tilt Image
At first, you might think that it hasn’t captured the bokeh background blur, but please wait until the image has been processed. Wait until the “Processing image” marker finishes.
Wow! You’re in for a surprise, the Google Camera will now display your captured Bokeh and it will look absolutely stunning as shown in the following image
Bokeh Effect on Single Lens Redmi Note 3 ? Done!!
As seen in the above image the image looks stunningly beautiful and at par with the OnePlus 5 Depth effect or iPhone 7 Plus mode! . Besides, you can even change the refocus by the highlighted option.
So, this is how your Normal Single camera phone also can take beautiful bokeh background blur pictures just like Dual lens camera phones. Incase, if you have any queries or are unable to use the app feel free to comment below!
There are only a few working emulators for Mac OS X right now , and one of them is Andy OS Emulator. Andy is based upon VMware and hence can work even on older mac’s such as Macbook Pro 2011 , iMacs with even 4gb of ram and Intel HD Graphics. Thus, if you intend to play android games on your macOS device Andyroid is a good option. In this tutorial, we will cover how to Download & install Andy OS for Mac OS X .
Tutorial to Download & Install Andy OS on Mac OS X | El Capitan, Mavericks, Yosemite, Sierra, Mountain Lion supported!
Once you have downloaded the .dmg file, click on it to open. The installer will now ask you to start the installation by double-clicking the “Box” icon as shown in the figure below –
Double click on the installer box to start installation
Once you have double-click on the box icon, it may ask you for account password to finish installation as the android drivers require admin privileges.
In the new Installation window, Click on “Continue” to proceed with the Andyroid installation as shown –
Click on Continue to Start Installation
Once you click on “Continue” , Andy will now download the necessary android libraries from the internet, this is done to ensure that the android version has latest security patches installed .
Wait until the Android libraries are being Downloaded
Once the latest Andy files are downloaded, it will start installing the Android emulator as shown below, please wait as this process may take some time –
Andy Installation on Mac
Once Andy is successfully installed, it will show “Installation Completed” message as shown in the following image –
Andy Installation Successful on Mac OS X
Click on Finish to complete the installation.
Now, launch Andy via the launchpad to Enjoy playing Android games and apps on your Mac OS X device – mac mini, iMac , Macbook Air / Pro . Andy also has inbuilt Google Play Store so you can easily install Android apps from Andy emulator itself!
Macbook running Andy OS Android Emulator
Reliance Jio TV has changed the way we use our mobile phones. Jio TV lets you use your mobile phone as a live TV without requiring a DTH Connection. In addition to streaming live Indian channels , Jio TV also lets you watch catch-ups or previous episodes of your favorite TV Serial (series) and live sports channels too. Now, using your mobile phone as TV has few issues such as inability to chat and watch live TV together, or the small screen issues which don’t give the feel of a TV. But not anymore, in this tutorial we will show you How to Download & install Jio TV for PC / Windows 10 / 8.1 / 7 so you can watch your favorite Jio TV on Laptop / Desktop.
How to Download and Install Jio TV for Laptop / Desktop –
In order to install Jio TV on your laptop or Computer. We will be using – Nox Android Emulator. Nox Android emulator simply installs a Virtual android device which you can use to run Android apps full screen on your laptop / Windows 7 / 8.1 / 10 PC. Nox supports whatsapp and Jio TV too.
Also, we will require a Jio TV apk which will be loaded , installed on Nox . Its free to download and can be downloaded from the link below – Please do not update jio tv app else it won’t work Click here to Download Jio TV Apk for PC / Windows
Update – Incase if you do not have a Jio Sim or Jio Username / Password – You can even use Nush TV as its perhaps the best alternative to Jio TV – Click here to Download Nush TV App
Tutorial –
First of all, install the Nox App player by double-clicking the installer file. Click on “Install” as shown in the image below –
Click on Install to install Nox
Now, after we have installed the Nox Player, we need to install / add Jio TV to it as it is not pre-built. To install Jio TV there are 2 methods –
Method 1 –
Click on the “APK” icon in the right hand side menu of the Nox Player , and in the dialog box – select the Jio TV Apk we downloaded before and click on OK. If you haven’t downloaded the APK , you can download it here – Click to download Jio TV apk for Nox.
Jio TV Apk Install on Nox
After selecting the APK file , click on Open to install Jio TV as shown in the above image.
Method – 2 – This method will work only when No Other Android Emulator is Installed except Nox (incase if you already followed Method 1 skip this step –
Simply drag and drop the Jio TV Apk onto Nox Player window, or double-click the “.apk” file to automatically install it in Nox App Player as shown below –
Double APK or Drag and Drop inside Nox Player to Install Jio TV
Once, you have finished installing Jio TV , it will automatically launch as shown in the image below –
Jio TV Sign in on PC / Windows
Jio TV will now ask you to sign-in to use Jio TV App . Here enter the details as follows – “Jio ID” field – enter your Jio Number without + 91
“Password” field – enter your My Jio account password. Skip Sign In won’t work even if you’re on Jio Network.
Click on “Sign In” button, to log-on to Jio TV.
Incase, if you don’t remember the password, or have forgotten it. Simply use the “Forgot Password” option to get a new password for your jio mobile number.
Now, it will redirect you to Jio TV interface, simply tap on any channel icon to start your live stream of channel as shown –
Jio TV for PC Menu
You can watch streaming of your favorite live channel or serial in either Portrait mode –
Jio TV Live Streaming on computer Vertical Portrait mode
Or you can even Go Full Screen as shown in the image below –
Jio TV Fullscreen live on PC / Laptop
Congratulations! You have now successfully Run Jio TV fullscreen on your PC / Laptop or Computer. In case of any queries/difficulties feel free to comment below.
Uber and Ola with their incentive based marketing have changed our habits of travel . Now, we mostly prefer calling Cabs at our places and then travel. The companies with their lucrative offers such as “First Ride Free”, “Refer a Friend and get free ride” have got us hooked to discounts. With the recent drying up of offers especially for Regular users – we are now left searching for Promo codes or Offer codes for old users. Not anymore, in this tutorial we will show – How to get Cashback & Discounts on Uber using Promocodes for Old and existing users in India!
Tutorial on How to get discounts for Uber Rides for Old and existing users –
We will be using an all services aggregator app – Tapzo for the same. Tapzo allows you to book Cabs, Movie tickets, order food all features in one app! and it even provides you Tapzo Cash in cashback for each services you order. The tapzo cash thus again can be used to do Recharges, Cab booking, Order food etc.
How to use Tapzo App to get Cashback for Uber Rides (Existing User)
While you can download the Tapzo app directly from Play Store, doing via our link gives you directly 25% cashback on your first 3 Cab bookings as shown in the image below –
Tapzo Cashback for Uber Existing Users
Now, once you have downloaded Tapzo, getting Cashback on your Uber rides is really easy. First on the homescreen , select the “Cabs” option. You will now be navigated to a screen as shown below –
Uber Screen on Tapzo
On the screen please enter the Destination, Source and time of the pick-up / cab . you will then see a list of all available options right inside the Tapzo app!
Select the type of Cab, you want to book. Once you have selected the type of Cab to book you will be redirected to a Confirm Booking Screen! as shown below – (Important Step!)Confirm Booking Screen
On the confirm booking screen shown above, tap on the “Apply Coupon” section.
It will now show you a list of all available coupons for your Uber rides and the best part being all the coupons can be used even by existing or Old uber users as shown in the following image –
Uber Coupon Apply Existing Users
After tapping on the coupon , select the apply button as shown –
Apply Tapzo Uber Coupon
As soon as you click on Apply you will be redirected to the Cab Booking Confirmation page with the coupon applied message as below-
Coupon Successfully applied!
Voila! you will now earn discount / cashback on your Uber rides , which you can use not only for next cab rides , but even for Food, Recharges etc. Great isn’t it!
Capturing Packets or Sniffing URLs may sound a bit of hacking related stuff, but it isn’t. Capturing Network Packets may help you analyze why is your Data Pack running out, or which apps keep sending data in the background without your consent so that you can stop using them and enhance your Phone Security. Besides, Capturing packets will also help you get that streaming link of a stream, download links which again open up more possibilities to optimize your Cellular or Wifi data usage on your phone. So in this tutorial, we will show you How you can Sniff URLs or Capture Packet Data on your Android with No Root Priveledges required.
How to Capture Packet Data Network Packets on Android
Pre-Requisites :
An Android phone with either PIN / Pattern / Fingerprint lock activated . (This is required to Sniff HTTPS requests) without this active the app won’t be able to sniff HTTPS Packets.
After downloading the Packet Capture App from the above Play Store link, install and Open it.
It will now ask you for permission to install SSL Certificate as shown in the image below –
Packet Capture Install Certificate SSL
Here tap on “Install Certificate” option, it will now ask you permissions to save the certificate . Click on the “OK” button in the pop-up box that prompts out as shown in the following image –
Click on OK Button
Now, the SSL capture Certificate will be successfully installed to your Phone. It will now redirect you to the main app screen. Note – The Certificate Installation is only a one-time step required, until you uninstall the app. So no need to install certificates multiple times!
To start the Packet capture, Simply launch Packet Capture app and tap on the “Triangle (green) icon” as shown below –
Tap the icon to Start Packet Capture on Android
Now, it will ask you to set-up a VPN (If its your first capture), here simply tap on “OK” to allow it to create a VPN connection –
Allow VPN Connection to Packet Capture Android
It will now start capturing Packets in a date_time format on the main screen. To stop capturing packets simply tap on the “Stop” red square icon as shown –
Press to Stop Packet Captures
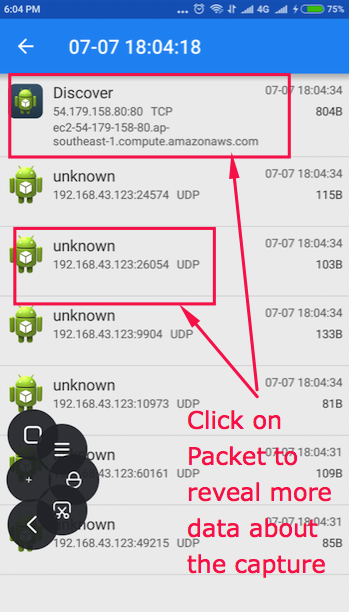
Phew! You can now access the captured packets data by tapping on the filename on mainscreen –
Listing out the Captured Packets Data
Simply tap on the file name to reveal the packet data. It will show you a list of all the packets data sent or received by your device.
To reveal more information about the data e.g URL, type of request, Hex etc click on the logged packets as shown in the image below –
Packet Capture Logs Android
Thus, you can now successfully capture packet data, sniff URLs on your Android phone . Plus, it will also help you keep a track whether the recently installed apps are causing more data usage etc.
Nintendo 64 or N64 is the first gaming console with 3D Graphics Rendering and 64-bit architecture. It is considered as one of the best gaming consoles ever produced by Nintendo.
Nintendo 64 has many great games such as Legend of Zelda, Super Mario 64 which are playable even today. Now, since the console is discontinued ; the only way to re-play the old game classics is by emulation.
Thus, we present you the Best 5 Free N64 Nintendo 64 Emulators for PC and Windows 10 which will let you play N64 games on your Windows PC or Laptop.
Note – All the emulators below do not come with any game (ROMs) as those are copyrighted. however, a simple google search with game name + n64 rom will give you the game ROMs which can be used to play games in any of the below emulators.
Top 5 Best N64 Emulators for PC – Windows 10/7/8.1
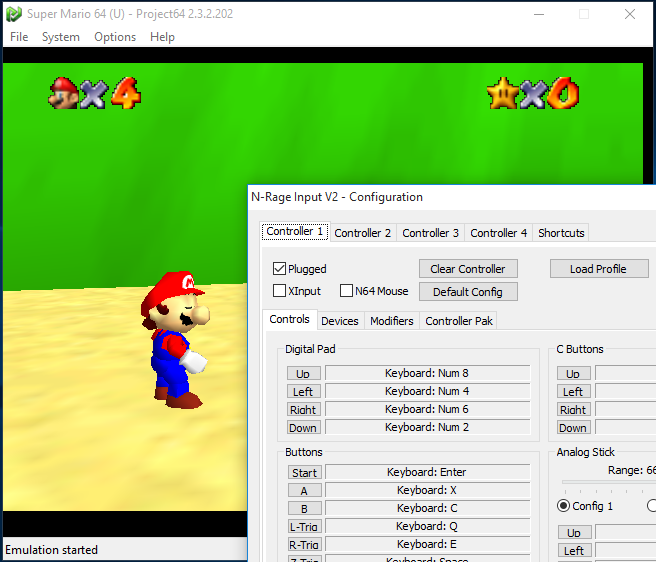
1. Project 64
Project 64 Nintendo N64 Emulator
Project 64 is perhaps the most actively developed N64 emulator , and also is the most easiest to use too.
Project 64 has fast and speedy Nintendo 64 emulation as well as it contains unique features such as –
Gamepad / Joystick Controller Support.
One-click installer (Either install and run or Run Portable version)
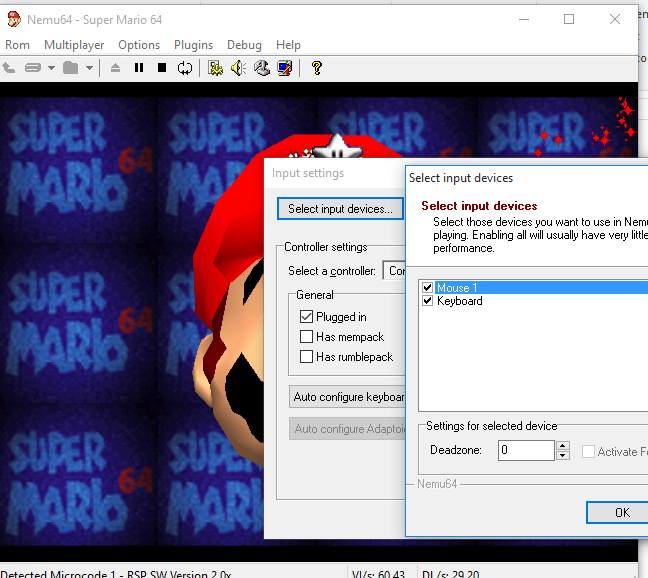
Nemu 64 is another compact yet unknown N64 Emulator for Windows OS. It didn’t require any installation and ran smoothly with good emulation. Besides, that Nemu 64 has some salient features such as –
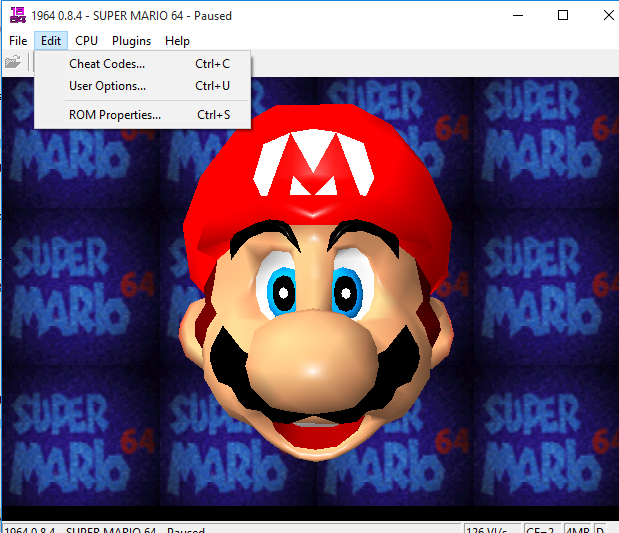
1964 is a popular Nintendo 64 emulator for PC , which is available for Android as well. 1964 has all the standard features like the previous two, but it also has support for additional ROM customization, and custom ROM support. Thus, you too can create your own cheats and customization for games while using 1964.
However, the User Interface sometimes stops the game and causes the played game to crash unexpectedly , however it can be resumed by clicking the pause button from the menu bar, and then tapping the play button.
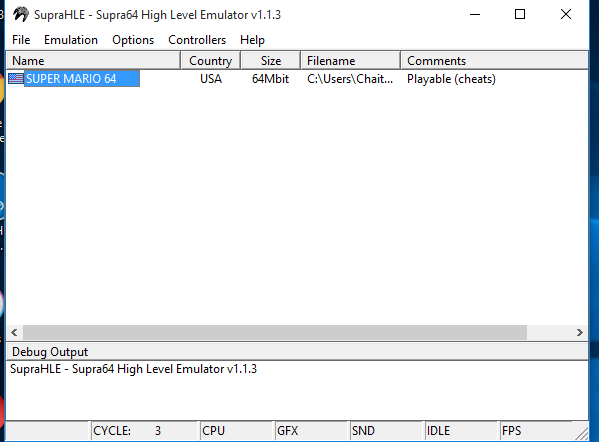
While the above emulators are easy to use for general public, the Supra HLE and Ultra HLE are for the pro users.
HLE – High Level Emulators offer advanced Configuration options, right from the Video plugin, audio plugin to be used to RAM and buffer size. However, we failed to get any game running on both the HLE emulators on Windows 10, but they worked smoothly on Windows 7
Note – Use the packaged application – Supra Configurator 2.o to configure Supra before running the emulator.
Like mentioned above, Ultra HLE is another High Level Emulator with advanced options. Infact Ultra HLE also comes with in built debugger to debug game errors. But like Supra, it too failed to work on our Windows 10 system due to absence of old gfx video plugins which are absent in newer versions of Windows.
Thus, these are currently the latest Best free N64 Emulators for Windows Systems (PCs & Laptops) which will let you play your favorite Nintendo 64 (N64) games on PC with Joystick and save / load game support. If you know of any better emulator or encounter any issues while using them feel free to comment.


![[Guaranteed] Download & Install Jio TV for PC / Windows 10 / 7 / 8.1 [Laptop & Desktop]](https://techapple.net/wp-content/uploads/2017/07/ocyY5UQNTYG8j9VqECEDrg.png)