Author: Chaitanya

  • How to Check Jio Data, SMS & Call Balance without My Jio App by SMS

    Jio has become India’s leading Mobile service provider by its extensive use of high-speed data network and the latest 4G LTE technology. Though, this technology has good benefits when it comes to high-quality HD calls by VoLTE (Voice Over Long Term Evolution). It has a few drawbacks too, such as we cannot dial USSD codes example *123# type numbers by phone. Thus, we need to be dependent on My Jio App to track our Data usage.

    But My Jio App also has drawbacks such as the Data remaining isn’t shown instantly, as well as the app is too slow to load. Hence, in this tutorial, we will cover How to easily check Jio Data Balance, (Internet), SMS and Call balance without My Jio app by sending a simple SMS. This method is also helpful if your My Jio app isn’t working or gets hang.

    Tutorial to check Jio Internet balance (data), call minutes without using App [ My Jio ]

    • We just need to send a free SMS to check the Balance on Jio.
    • Go to Messages and Create a New Message.
    • In the Sender field, the number to whom we need to send SMS is “199”. i.e We need to message 199
    • The Text to get Balance details is “BAL” .
    • Thus, you need to type the message as shown in the following image
      SMS Text to Send to Jio to check balance Validity
      SMS Text to Send to Jio to check balance Validity

      Once you have typed the message “BAL” in the capital letters. Simply Tap on the Send button.

    • You will soon receive a SMS showing your Balance validity, and Data Remaining for the day as shown –
      Jio Data Balance Message
      Jio Data Balance Message

      Note – Unlike My Jio app, the data remaining shown here is instant and thus you can effectively track your data usage better.

  • How to Do Reverse Image Search from your Mobile [ Android & iPhone ] | Perform Google Photo Upload Search Solution

    How to Do Reverse Image Search from your Mobile [ Android & iPhone ] | Perform Google Photo Upload Search Solution

    Reverse Image Search is one of the best features of Google Image Search which lets you find the source/origin of photo, or other similar images. The Reverse Image Search option is easily visible on the Google desktop site, but is absent on the mobile site.

    There are various third party sites such as http://reverse.photos which let you perform Reverse image search on mobile. But these sites are less secure as they store your photos on their own servers thus vulnerable to misuse. Hence, to keep your search more secure we will cover – How to Perform Google Reverse Image search on Official Google Site on Mobile.

    Tutorial to Perform Reverse Image Search on Mobile (Android + iPhone + Tablet)

    • We will be using Google Chrome Web browser for this purpose as its more speedy while accessing Google Services.
      Now , in order to perform reverse image or photo upload search perform the following steps-
    • First, of all Navigate to the Google Images site on your Chrome browser –
      Click here to Open Google Images site in a New tab – http://images.google.com .
    • Now, after the Site is loaded – Click on the “3 Dot icon” at the top-right hand side corner of your Screen as shown in the image below –
      Tap on the 3 Dots Icon
      Tap on the 3 Dots Icon

      Now, it will open a menu as shown in the following image .

      Google Chrome Menu - Tap on Request Desktop Site
      Google Chrome Menu – Tap on Request Desktop Site
    • Now , Tap and select the “Request Desktop Site” option as highlighted in the above image.
    • It , will now load the Google Images website in its full Desktop view as shown below.
      Google Images Desktop Site - Tap on the Camera Icon
      Google Images Desktop Site – Tap on the Camera Icon

      Here tap on the “Camera” icon as highlighted in the above image to enter Reverse image search.

    • Here you can either enter the image URL you want to search or “Upload an Image” by using the “Choose File” button. After clicking on the “Choose file” button it will ask you to upload image from camera/files gallery.
    • Once you click and select the image , it will be uploaded to Google server and you can access the search results as shown
      Successful Google Reverse Image Search on Mobile Android & iPhone
      Successful Google Reverse Image Search on Mobile Android & iPhone

      We hope you found the tutorial easy & useful . Incase of any doubts or difficulties feel free to comment below.

  • How to Open & Extract – Unrar Rar Files on Android | Unlock Rar Archives on Android

    How to Open & Extract – Unrar Rar Files on Android | Unlock Rar Archives on Android

    Rar file archives are now widely used to send across multiple documents in a single file. Though, zip archives also do the same thing. RAR archives can save more space by higher compression levels, ability to split big files into multiple ones and so on. Android OS by default, doesn’t support extraction of RAR files, and hence we need to use other app. Here’s an easy tutorial on How to extract Rar files on Android.

    Tutorial to Open Rar archives on Android | Unrar Rar files on Android Phones & Tablets –

    • We need to install RAR app developed by RARlab – the official owners of Rar compression algorithm. We can use other apps but since the app is official, plus is free, we will go with the official one.
      Click here to Download RAR app from Google Play Store
    • After the app is installed, launch the app. Then it may ask you a one time permission to access files depending on your Android version. Tap on “Allow” as shown in the below image –
      Tap on Allow to give file storage access
      Tap on Allow to give file storage access


    • Now, navigate to the downloaded / stored RAR file location which you want to Extract or Open.
    • Here, we have two options – Either to extract all files of the Rar archive or to extract specific components. Thus, we will cover both the parts .
      • To extract all files – Select the Rar file by marking the arrow next to Rar files and click on the “upward arrow” extraction icon as shown in the below image –
        To extract complete RAR Archive
        To extract complete RAR Archive

        Next you will be redirected to extraction options screen.

      • To Extract only selected or Particular file of the Rar Archive –  First of all tap on the file name of Rar archive. Then it will show all files present inside the Rar Archive as shown below
        Files present in the Rar Archive select the files to extract
        Files present in the Rar Archive select the files to extract

        Now, here select all the files you want to extract and tap on the “Upward Arrow” / extract button. You will be directed to extraction options screen.

    • In the extraction options screen as shown below, Select the destination path or location where you want to extract files. Then Tap on “OK” button .
      Select the Path to Extract Files and tap on OK Button
      Select the Path to Extract Files and tap on OK Button

      That’s it! . You have now successfully extracted and unlock password protected Rar Archives on Android. If the Rar file has password it will prompt you to enter at screen during extraction. Incase, if you face any problems or have any queries feel free to comment!.

    • We have tested the app on Android KitKat, Lollipop, Marshmallow, Nougat and even Oreo. The app works perfectly fine, and with speed. Incase, if you find any other good RAR extractor we will like to know about it.


  • How to Extract & Unlock Password Protected Zip File on Android | Open Password locked Zip file on Android

    How to Extract & Unlock Password Protected Zip File on Android | Open Password locked Zip file on Android

    Zip files are a great way to send across multiple files easily and via mail and other media. But, with the recent advent of Data Sniffers and security threats coming up, sometimes zip files are encrypted with a Password so that only the intended recipient can access and open the file. The bad thing is that Android natively doesn’t support extraction but it can be easily enabled by an app. So, in this tutorial we will cover How to unlock Password Protected zip files for extraction on Android so that you can open the files inside them.

    Tutorial – How to Open & Extract password protected Zip files on Android

    • Considering, that you have already downloaded the zip file, we will start with the first step of installing Xplore. Xplore is a file manager app for Android (5 Mb in size) which can easily extract any password protected zip file. Thus, essentially a two in one app.
      Click here to Download & Install Xplore app from Google Play Store.
    • Now, depending on your Android version it may ask you permission to access your Storage, here tap on “Allow” as shown in the image below –
      Xplore Permission tap on Allow
      Xplore Permission tap on Allow

      Now, navigate to the directory where you have stored your zip file. Generally it will be the “Download” directory in the “Internal Storage”

    • Once you have located your downloaded zip file, simply double tap on the filename as shown below –
      Double tap on password protected zip file
      Double tap on password protected zip file


    • Now, it will prompt you a text field to enter the zip file password as shown in the next screenshot. Here, enter your Zip file password and tap on the OK button highlighted below –
    • Enter Password & tap on the OK Button
      Enter Password & tap on the OK Button

      Now, after entering the password. Your Zip file will be easily unlocked!. Thus, you can now copy, move, open, edit , unlock the contents of the password protected zip files as shown in the following image –

      Successful Unlock of Password Zip File on Android
      Successful Unlock of Password Zip File on Android

      That’s it you have now successfully unlocked an encrypted zip file on your Android device. This method works on all Android versions right from Kitkat, Lollipop, Marshmallow, Nougat and even Oreo too.

  • Why Plagramme is the Best Plagiarism Checker on the Market [Review]

    Why Plagramme is the Best Plagiarism Checker on the Market [Review]

    Plagiarism is the wrongful copying of an author’s thoughts and ideas. The internet allows free expression of thoughts and an ample amount of resources to serve as a source of information and inspiration. Unfortunately the ability to freely read and write anything has lead to a major problem of plagiarism across the internet.

    Websites often plagiarise content directly from one another, and it becomes difficult to ascertainthe original source of that information. This is true for students as well, as they have no way of knowing the originality of a paper they may have written, especially the ones that they have to submit to an educational institute where they are heavily scrutinised.

    This is where plagiarism checkers come in. my.plagramme.com is one of the best plagiarism checkers for students who want to check their papers for potentially plagiarised content before submitting them to an educational institute. 1

    A simple to read Plagiarism Checker

    Plagramme is a plagiarism checker that checks for similarities between your document and other documents across the web, mainly through two scores – Similarity Score and Plagiarism Risk Score. Similarity Score shows the percentage similarity between your document with other documents and pages on the web.

    Plagiarism Risk Score indicates the concentration of those similarities in your document. Together they will either give a positive or a negative result. A positive result means that your paper is original enough to be submitted and vice versa. This makes it easy for you to read the result.

    Transparent Results

    There are even more factors you may consider important to deduce whether your document is considered plagiarised and for that, there are a few more scores provided by Plagramme that you can look at. These are Paraphrase Score, Bad Citation Score and Matches.

    In case your institute requires certain other factors to be checked before accepting your paper, these three scores will cover all bases and you can decide for yourself based on scores in each individual test. This transparency of results makes it a viable software for application across many different institutes.

    Plagiarism report can be downloaded by any user but you may share your documents only with your professor. That is entirely upto you.
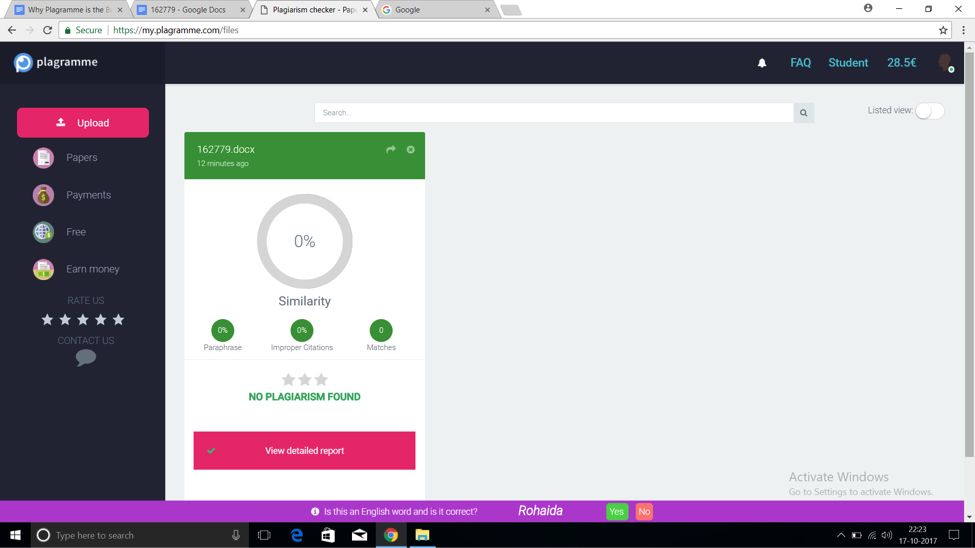
2

    Easy Upload

    Microsoft Word as well as DOC and DOCX formats are supported, covering a vast number of bases as most papers are written in these formats.

    Security

    Plagramme is a very secure software which uses SSL security technology to connect you to a server through an encrypted link. Encryption is a modern technology used in various applications such as Whatsapp to protect data, in this case your document, from being accessed by an intermediary, such as your Internet Service Provider. It works by encrypting your data as an arbitrary code which can only be accessed by you and cannot be read by anyone else. Encryption is one of the best security measures available now.

    Uploaded documents will be anonymously compared to other pages and you can delete them from the servers. This maintains the privacy and ownership of your document.3

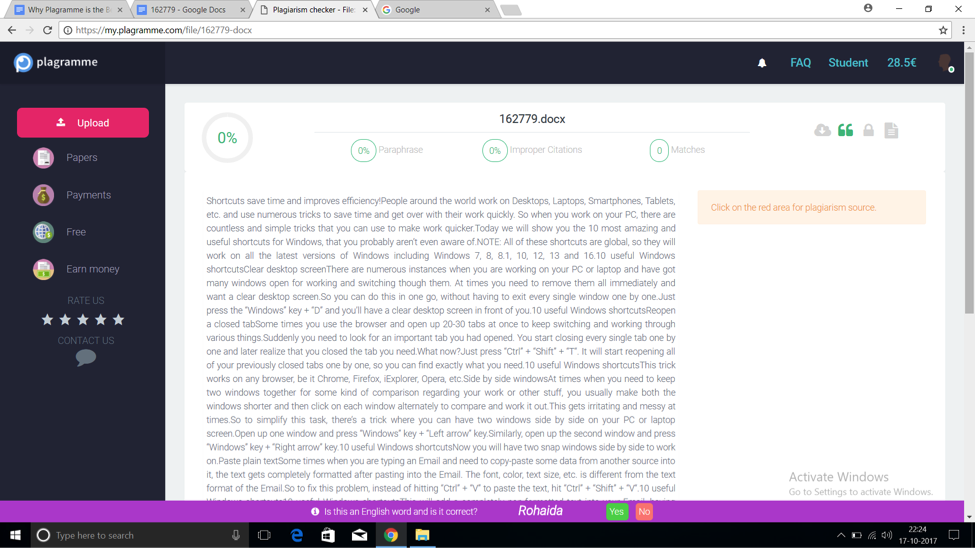
    Simple User Interface

    The User Interface of my.Plagramme.com is as simple and easy to use as it gets. After logging in there is a bar on the left side of the screen allowing you to upload your desired document, submit payments, earn free credits and earn money through protecting your own document and RUI.

    On the top bar of the screen there is an option to read an FAQ or Frequently Asked Questions, with an in-depth look at the various tools the website has to offer and how to access them. It is a simple and fast UI that enables you to quickly access all the tools you need.

    Earning by Protecting your Documents

    A fact unknown to many is that most of your work can be legally protected by marking them as your Intellectual Property. There are some requirements to declare them as your Intellectual Property of course, and Plagramme processes that information and protects your work for you.

    So how do I earn from that, you may ask. As an IP owned by you any citation or use of your documents, thesis and other forms of writing will require licensing through you. You can charge for these licenses, and the amount you charge is upto you. What’s more, once you’ve protected one of your documents you can keep earning from its licensing throughout your life making it a valuable additional source of income.4

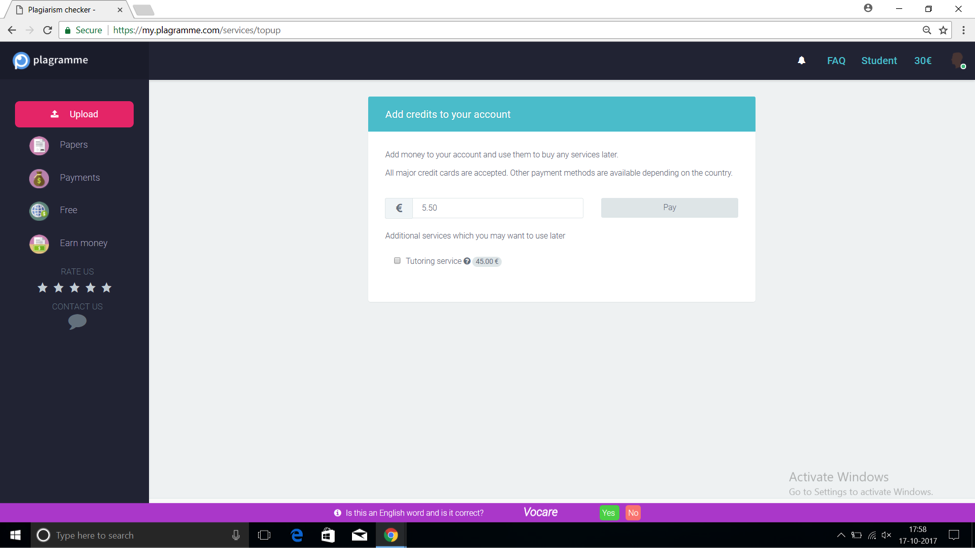
    Easy Payment Options

    Payment is simple. You can add money to your account via credit cards. All major credit cards are supported. There are also other payment options available depending on your country. For example in India you can pay through online banking and PayPal. Most developed countries have multiple payment methods available.

    After adding credit to your account you can purchase any service on offer. It is simple, cheap and convenient and better than having to use your card everytime you want to purchase a service.

    Great Service

    It is very easy to contact support. Rather than going through the hassle of email you can contact them directly though the site. What’s more, instead of an automated reply an administrator will return to you so you can communicate your problem and find a solution.

    So these are the reasons why Plagramme is such a great plagiarism checker. Its easy to use, it offers fantastic services, it gives detailed reports and is as secure as it gets. As a student and researcher there is little alternative to Plagramme, and as a student who uses it myself, I can vouch for it as being instrumental in cross checking my papers for similarities that I cannot find myself. 

  • Get the most accurate update on the weather condition with WeatherBug

    Gone are the days when weather prediction was made just by looking outside. It is the time when with the modern technology it has become very easy to get an idea about the weather condition and then to act accordingly. With such blessings of weather apps, you can be saved from a number of weather mishappening. Thus, if anyone makes fun of you for checking the weather on your phone, let them not bother you in any way as you will be getting a lot of help for making the right choice according to the weather condition.

    To enhance the entire process of checking and verifying the weather outside, the whole new app has made the perfect and accurate buzz in the market. The latest launch in the market that has made the weather checking super easy is WeatherBug. The weather app has been a great sensation ever since it has been launched in the market.

    This amazing weather app is available on both the leading OS versions, which are Android and iOS. Both the operating system has its own pros and cons. Let’s have a look:

    22292107_10212844653685130_1624060078_oPros of WeatherBug (Android):

    • Live cameras
    • Detailed weather information
    • Lightning detection facility

    Cons of WeatherBug (Android):

    • Not organized properly
    • Contains lots of ads
    • Few widgets

    Pros of WeatherBug (iOS):

    • Live cameras
    • Better quality
    • Amazing video quality

    22281054_10212844652245094_1650312492_oCons of WeatherBug (iOS):

    • Non-intuitive search
    • Prone to sudden malfunction for temporary basis

    Review of the WeatherBug app:

    WeatherBug is one of the most popular weather apps that is being used by most of the people as it offers an ample number of benefits and features to its users. Other than being freely available for both the operating system, it also works well with all the size devices. It gives reasonable interface on almost all the size of devices. The app has been appealing to the users as they don’t have to face any difficulty or blurring effect with the image or video quality of the weather information. Excellent is the word that best describes its ability to provide ease to the users to access it. You don’t have to have any technical minds to operate the app or its features and functionality as it gives an easy to use interface along with easy to operate options.

    22281140_10212844656685205_439981148_oUnlike many other weather apps which put all the information together making it difficult for the users to follow and understand it, WeatherBug uses a simple layout where all the collected data and weather information can be easily followed for getting the most accurate results. The app can be customized according to the needs and wants of the users. Along with all this, the professional design of the app makes it stand apart.

    The app is capable to provide you with the weather information as per the location set up. You can either set your location manually or can allow the app to get an access of your location automatically. Which out of the two options you choose, the results will simply be amazing. To be specific, the app will deliver the information about the weather in 7 major categories to provide you with the most accurate information. The following are the categories that you can see for the information:

    • Now: it depicts the present weather condition
    • 7-days: it shows the weather conditions in the following 7 days
    • Hourly: it will give you the weather details on the hourly basis
    • Detailed: it will portray the detailed description of the weather condition emphasizing more on the information like temperature, pressure, etc.
    • Radar: to get additional information for your location
    • Alerts: provides you with the weather alerts
    • Spark: provides you with the lightning information in your location

    Overall, the app is a must-have if you want to enjoy the weather rather than falling into any trouble due to the weather condition.

  • Torrents VPN – The Safest Way to Download Torrents!

    Have you ever been called by ISP for using illegal websites? Probably, not, if you didn’t use them in your life. But if you want to attend torrents websites without any protection, one day you will receive this call. Sanctions vary from turning off the Internet to administrative fines but you can avoid it all by using a reliable VPN for torrents.

    Does Torrents VPN differ from usual one?

    Although downloading appears one of the simplest tasks VPN provides, not every VPN can do that perfectly. It should be fast, have no logging policy and have servers operating both in user’s country and in a country where there is no strict no-downloading policy. Although all the most popular VPNs can satisfy these requirements, bestvpnrating.com lists 5 services, not only fitting them but having special features for safe downloading:

    1. ExpressVPN, one of the best providers when it comes to speed, website usability, and privacy protection with no logs policy. This provider has servers in various countries and provides support for all possible devices (so safe downloading with tablet is still possible);
    2. NordVPN, Panama-based service which is out of control for any censure and government spying agencies. It’s speed is enough for P2P sharing and its built-in kill switch enables you to work even with torrents, which use geo-filtering;
    3. BufferedVPN, the provider, for whom security is of the highest priority. Incorporating the latest encryption technologies, this service provides the greatest level of protection for files sharing. It also enables using VPN simultaneously on 5 devices;
    4. PureVPN, Although access to files is open through the split channel rather than a common one, this service incorporates NAT firewall protecting from unnecessary packets of traffic and remains one of the most professional among World providers;
    5. Hide My Ass incorporates the most relevant encrypting mechanisms and has no logging policy, so it remains one of the best providers, which are worth relying on.

    Do I need to use only them?

    Although these 5 services are chosen because of their special features for safe downloading with torrents, they are not the must. You can still find more affordable service and result only in a little loss of speed. If you want to use VPN only for downloading 5 songs per month, you don’t need really complicated providers with high capacity. What you really need to pay attention to is does anybody else has an access to your online activities.

    If you have any doubts about any VPN you want to try, read clients’ reviews first and then download the free trial version. Don’t be afraid of a free cheese, everybody understands that it is only for trial purposes. Your task is to use this monthly period to try its capacity using all possible tasks you may need to do. If you are satisfied then you will not refuse to pay for such level of protection.

  • Get Pendrives @ 100 Rs , Free Mobile Cases & Laptop Skins from CashKaro!

    Get Pendrives @ 100 Rs , Free Mobile Cases & Laptop Skins from CashKaro!

    Couple of years back we wrote about cashback websites in India, and how they can really help save more money while shopping online. Today we want to talk about CashKaro is India’s No.1 Cashback, Coupons & Price Comparison website with a comprehensive listing of Latest Deals, Offers, Coupons, Promo Code and Cashback at 1500+ online retailers. They are your one-stop savings destination for all online purchases. Save huge with a wide range of Discount Coupons and Cashback offers on top retailers. You can find working Amazon India Coupons, Flipkart Offers, MakeMyTrip Coupons, Paytm Promo Codes, Dominos Codes, Myntra Sale Offers and more.

    image001Cashback websites like CashKaro work on the affiliate business model. They get paid from the ecommerce retailers for bringing sales to their platform and cashback websites divide their profits with their users.

    Cashback that your earn from CashKaro is real money and can be transferred to your bank account or you can buy an amazon or a flipkart gift voucher.

    CashKaro is the leader of the cashback industry. They have paid more than ₹40cr as Cashback and are funded by India’s most famous industrialist Ratan Tata, who’s also the owner of Jaguar Cars.  They have a dedicated team of 80+ people, their headquarters being in Gurugram, India. image002

    CashKaro.com has recently tied with a Singapore based startup Pritnvenue.com. Printvenue was founded in 2010 and ever since it’s inception, it has introduced a robust collection of customizable electronic items like: Pendrives, Laptopskins, Mobile Covers etc. The reason why we’re excited to share this website with you is because there’s a great offer, specially for Indian users, where they can practically shop from Printvenue for free! Yes, you read it right!

    Any user shops on Printvenue’s website via CashKaro is entitled to get Rs. 400 cashback on Rs. 400 purchase. Not just that, new users who are signing up on CashKaro for the first time will get Rs. 100 as a sign up bonus, just because!

    So you can get

    8 GB Customizable Pen drives for Rs. 599 – Rs. 99 after cashback

    Customizable Mobile cases for  Rs. 499   – Free after cashback

    Customized Laptop skins for  Rs. 499   – Free after cashback

    as well as offering online commercial printing services such as business cards, keychains, pens, custom t-shirts etc.

    unnamed

    The process is fairly simple.

    Firstly, go to CashKaro’s website. Signup if you’re not already an existing user.

    Type the name of the retailer, in this case, Printvenue.

    Click on activate cashback and visit retailer button and voila! your click will get tracked and you will be redirected to the Printvenue’s website.

    Over there you can choose any product you wish to buy and make sure that amount should exceed Rs. 400 excluding delivery. (Free delivery coupon code – “SHIP”).


    When you’re done with your purchase, go back to CashKaro’s website and click on “My Account” tab. It takes maximum of 72 hours for your cashback to track but mostly happens much sooner.

    Over there you will see a link that says “My Earnings”.

    Click on that and it will show you your cashback, in this case Rs. 400 + the Rs. 100  sign up bonus)

    The Cashback is real money and can be transferred to your bank account after it gets approved. It takes 30 days, after the refund policy is over.

    If, however you can’t see your cashback being reflected in your CashKaro account, you simply call their customer service on this number +91 8527264999.

    They would be happy to help you.


    Not just Printvenue, CashKaro has tons of offers where they give 100% cashback to their users. Also, on major brands like Myntra, Jabong, Ajio, Amazon, Flipkart etc.

    So always remember folks, when you shop via CashKaro, YOU GET MORE!

  • How to use Split Screen for Apps which doesn’t Support it in Android Nougat & Oreo without Root

    How to use Split Screen for Apps which doesn’t Support it in Android Nougat & Oreo without Root

    One of the best features of Android Nougat and Oreo is that they support Apps to be split into two screens thus enabling you to use two apps simultaneously. However, not all apps support Split-screen mode by default, here’s a simple tutorial which will let you use Apps into Split Screen mode if the app doesn’t support Split Screen.

    Tutorial to Use any App into Split-Screen Mode even if the App doesn’t support it –

    • For our tutorial, we will be using “Instagram” app which doesn’t support Split Screen and the Chrome browser.
    • Now, as we aren’t changing any Developer options or are neither rooting the phone. We will need to “Clone” the non-split screen app into “Parallel Space” app.

    Step 1 –  Clone the Non-Split supported app into Parallel Space –

    • First, we need to install Parallel Space app which lets you use 2 instances of any app on the same phone.
      Click here to Download Parallel Space app for Android from Google Play Store
    • Once you have downloaded the Parallel Space, it will ask you to Clone app, here select the “non-split supported app”, in our case we selected “Instagram” as shown in the image below –
      Select the Non Split Support app and Add to Parallel Space
      Select the Non Split Support app and Add to Parallel Space

      That’s it, now you can add more apps which you may want to use in Split screen and which doesn’t support if required.

    Step 2 – Using the Split Screen –

    • Now first launch , the app which supports split screen . In our example it will be “Chrome” . Once you launch the app. Now, long press the “Intents” or “the recent apps” button as its know.
    • The Chrome will now collapse into a half-screen as shown in the following image –
      Chrome in Split Screen Mode
      Chrome in Split Screen Mode


    • Now, launch the Parallel Space app , from the launcher or menu visible below. It will load itself into the lower half as shown below
      Parallel Space & Chrome Split Screen
      Parallel Space & Chrome Split Screen

      Now, in the bottom Parallel Space menu, tap on the app you want to launch in split screen which wasn’t supported earlier. i.e “Instagram” in our case –

      Tap or Add any non split supported app into Parallel Space
      Tap or Add any non split supported app into Parallel Space


    • Wow! , earlier non-supported split screen app. Will now load and work flawlessly with Split Screen mode too as we can confirm from the image below –
      Instagram in Split Screen View even if it doesn't support it
      Instagram in Split Screen View even if it doesn’t support it

      Thus, you can now use any app or play any game in Split screen such as Clash of Clans, Pokemon Go even if they don’t support it by default.

    • Incase, if you face any issues or have some queries feel free to let us know in the comment section.