Author: Chaitanya

  • How to Get Unlimited Free Jio Tunes (Songs as Jio Caller Tunes) on Jio Number!

    How to Get Unlimited Free Jio Tunes (Songs as Jio Caller Tunes) on Jio Number!

    Reliance Jio never ceases to surprise its customers. After giving away free calls for lifetime, ample of Internet data, it has now come up with Unlimited caller tunes for all its customers. Jio tunes plays a song to your caller every time they call, and its completely free of cost. Here’s a simple tutorial which will guide you on how to select any song as your Jio Hello tune for free. You can repeat it unlimited times to get free jio tunes.

    Method to Set up Free Jio Tunes on your Jio Number – 

    • Inorder, to easily browse through the songs and set them as Jio tune by one click . We will use the Jio Music app. Tap and download the Jio Music app from the links below –
      Click here to Download & install Jio Music app for Android from Google Play Store
      iPhone users use the link below – 
      Click here to Download & install Jio Music app for iOS 10, 11 (iPhones) from Apple App Store
    • Now, once you have downloaded the app launch it. Make sure you are connected to Jio Internet, while opening the app to auto sign-in. On the launch screen select the language of your choice and tap on done as shown in the screenshot below –

      Select the language of your song and tap on Done
      Select the language of your song and tap on Done
    • Now, search for your favourite song or movie name, which you want to keep as caller tune as shown in the following image –
      Search for song or movie name to browse to the song to be kept as Jio caller tune (Jio tune)
      Search for song or movie name to browse to the song to be kept as Jio caller tune (Jio tune)

      Now,  tap on the song name to make it play.

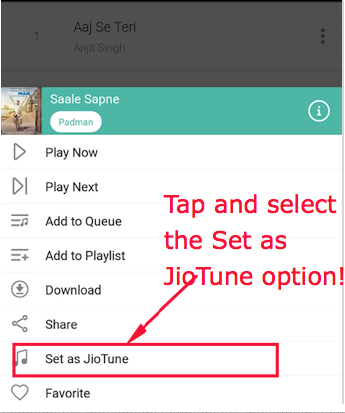
    • On the play Screen , tap on the “Set as Jio Tune” option above the play button . Now again confirm your song as Jio caller tune by tapping the “Jio Tune” option as shown in the image below –
      Tap on the Set as Jio Tune Option to set your free Jio Tune
      Tap on the Set as Jio Tune Option to set your free Jio Tune


    • Congratulations! you have now successfully set your Free Jio Tune on your number . You will get a confirmation message on your mobile number. Enjoy your free Jio hello tune!
      Free Jio Tune Confirmation
      Free Jio Tune Confirmation

      Update (Alternative Method)  – You can even set your Jio Tune without playing any song by tapping on the “3 dots” besides song name, and selecting “Set as Jio Tune” option as shown below –

      Alternative method to set free Jio tune
      Alternative method to set free Jio tune
      Tap on Set as Jio tune Option
      Tap on Set as Jio tune Option

      Thus! you have now activated free unlimited Jio tunes on your number. Incase, if you face any problems or have any queries feel free to let us know in the comment section below.


  • How to add Face Unlock in any Android Phone | Use FaceID unlock on Android apps &  lock screen

    How to add Face Unlock in any Android Phone | Use FaceID unlock on Android apps & lock screen

    With iPhone X Apple made the face unlock or FaceID popular. While, the touch id or finger print unlock is now easily integrated into most Android phones, the face unlock feature isn’t. Only a few flagship smartphones have the face unlock feature. Hence, in this tutorial we will cover How to add and use Face ID lock & unlock on any Android phone or tablet. This method works on older android versions such as KitKat, lollipop, marshmallow and Nougat too.

    Tutorial to Add and use Face Unlock on all Android phones and Tablets.

    • Now, since Face ID lock & unlock algorithms are not present in the default lockscreen security or default app locker. We need to install Iobit Applock app which will allow us to use Facelock on Android . Please use the below link to download IoBit face unlock app –
      Click here to Download IObit Applock : Facelock app for Android from Google Play Store
    • Once, you have downloaded the app launch it for the first use. Now, we will configure the face scan and unlock step by step as mentioned below –

    Step . 1 – Set up a Default Pattern or Pin for Unlock

    • After, launching the app for first time. IObit will ask you to set up a default pattern or Pin for unlock. This step is important as it helps to improve the security of lock. Hence, please set up the default pin or pattern to unlock the phone as shown in the screenshot below –
      Set up a Default Pattern Password or Pin
      Set up a Default Pattern Password or Pin for unlock


    Step . 2 – Adding Apps & Lockscreen lock-unlock permissions to IObit

    • Now, in order to lock or unlock your phone IObit app locker needs to have control over the launcher and other apps. So, that it is launched first before opening the other apps.
    • Hence, we will need to add app to be locked under the IObit face lock. Tap on the “Open lock” beside the Screen lock app, and other apps you want to lock with your pin,pattern or face. Once they are locked with Iobit then we can use all the three methods.

      Enable IObit screen lock for main lockscreen and other apps
      Enable IObit screen lock for main lockscreen and other apps
    • Note – Open lock  will turn to Close lock once the app is linked to IObit as shown in the above screenshot. Please enable screen lock and other app lock for Iobit.
    • If it asks for usage access, please toggle it on as shown in the below figure –

      Usage Access IObit Unlock
      Usage Access IObit Unlock


    Step . 3 – Enabling Face Unlock Feature –

    • Here, we will enable the face unlock feature of the IObit app. To do so, navigate to menu by tapping the “3 horizontal lines at top left hand side corner as shown below –
      Tap and Open Menu
      Tap and Open Menu

      Now, from the drop-down menu select “Face lock” feature as shown in the following screenshot –

      Tap on Face lock feature
      Tap on Face lock feature

      It will now start downloading AI database for face lock as shown. Please wait until the bar reaches 100% and complete data is downloaded.

      AI Data for Face Lock - Unlock
      AI Data for Face Lock – Unlock


    Step . 4 – Enabling the Face Unlock Feature and Adding a Scanned Trusted Face – 

    • Once, it has downloaded the database, it will now ask you to move to a well-lighted area for face scan. Here tap on the “Enable Now” button as shown below –
      Tap on the Enable Now button
      Tap on the Enable Now button to scan face

      Now, your face scan screen will open. Here, place your face in the circle highlighted in the screenshot below. It will automatically scan and save your face –

      Place your face in the circle to finish scanning!
      Place your face in the circle to finish scanning!

      That’s it! After scanning your face in the circle it will redirect you to the “Face lock” screen.

    • Here simply tap on the “Grey face box to enable face lock for the corresponding app. If the face is grey = face unlock disabled, if face is coloured = face unlock enabled. It can be easily toggled on or off by tapping as shown in the figure below –
      Tap to disable or enable face lock for the app
      Tap to disable or enable face lock for the app

      That’s it!. It will now ask you to scan your face to unlock the screen or the added apps.

    • Congratulations! you have now successfully integrated iPhone X like Face ID unlock on your Android phone. Incase, if you face any problems or difficulties feel free to comment.
  • How to Block all Jio Recharge Reminder Calls on Android [Spam Calls by Jio]

    How to Block all Jio Recharge Reminder Calls on Android [Spam Calls by Jio]

    Reliance Jio has brought around a revolution when it comes to the data plans and internet usage in India. However,  they have revolutionised spamming the customers too. Incase, if you own multiple Jio numbers and fail to recharge even a single number, they will keep calling you with spammy calls in the morning, noon, evening and other inappropriate times too. Jio also calls you each time with different numbers so that incase, even if you block a single number they have other number calling you . Thus, here’s a tutorial which will help you block all jio reminder spam calls.

    Tutorial to Block Jio Recharge Reminder Calls on Android – 

    • Although, most phones come with a default blocker (MIUI, EUI etc) there is no option to add a custom string prefix. Hence, we need to use TrueCaller for the same, besides trueCaller even lets you see who’s calling you, even if you do not have the phone number saved.
      Click here to Download TrueCaller App from Google Play Store
    • After installing the true caller app launch it, and now open the menu by tapping the “3 horizontal lines” at the top-left hand corner. The menu icon is as shown below –
      Tap on lines to open the Menu
      Tap on lines to open the Menu

      Now, navigate to the “Settings” option in the menu as highlighted in the following screenshot –

      Tap on Settings
      Tap on Settings


    • Once you enter the “Settings” section, tap on the “Block” option as shown –
      Tap on the Block Option under the Settings panel
      Tap on the Block Option under the Settings panel

      Inside , the “Block” panel, please select the “view my black list” option as highlighted  –

      Select the View my block list option
      Select the View my block list option


    • Now, it will display all your blocked contacts. Here, we need to add the prefix or number series of Jio calls in your region. In Maharashtra / Mumbai the calls generally start with “+91 22 3559″ hence, we will add the above string.

      To do so, tap on the “+” “plus” icon as shown below –

      Tap on the Plus icon
      Tap on the Plus icon

      Now, from the next options select the “Block a number series” option as shown in the below image –

      Select the
      Select the “Block a number series option


    • Now, enter the number series of Jio from which you receive Spam calls in the Enter number field and tap on the “Block” button as shown in the following image –
      Note – In our state its + 91 22 3559 , please enter the series of your state of Jio Spam calls.

      Enter the number in the number field and tap on Block
      Enter the number in the number field and tap on Block

      That’s it! .. All those Spammy calls from Jio will be blocked.

    • Pro Tip – Add the Number series “+ 91 140 “ and all tele-marketing callers will be blocked on your phone, who ask for loans, credit cards, insurance etc.
    • Incase, if you have any queries feel free to comment below.


  • How to Play Gamepad Joystick games with Keyboard on Windows 10 / 7 [PC & laptop] | vJoy for PC / Windows 10 Configuration Tutorial

    How to Play Gamepad Joystick games with Keyboard on Windows 10 / 7 [PC & laptop] | vJoy for PC / Windows 10 Configuration Tutorial

    With new gaming hardware coming in each day, the processing capabilities of our PC’s and laptops have reached a new level. So, the gaming graphics experience has increased and this helps to play gaming console games on the Computer. Now, not all of us use Gamepad/Joystick to play games and thus we need a method to emulate joystick input via keyboard. Hence, in this tutorial we will cover How to Play Joystick  or gamepad games with keyboard on Windows 10 , 7 and 8.1 [32-bit & 64-bit]

    Tutorial to Play Joystick games with keyboard on your Computer – 

    Step . 1 – Installing the Joystick emulator Software and virtual Joystick / gamepad 

    • We will use an Open-source software named “vJoy” to map our keyboard inputs to Joystick inputs as required by the game.
    • Please download and install the vJoy app from the link given below –
      Click here to Download vJoy joystick emulator for Windows 10 / 7 / 8.1 [32-bit & 64-bit]
    • Now, we need to install the software. Please note that it might ask you for permissions to install drivers as shown in the figure below –
      Tap on
      Tap on “Install” to install virtual Joystick emulator

      here, click on the “Install” button to install the vJoy software.


    Step . 2 – Enabling the Virtual Joystick 

    • After installing the app, we need to enable the virtual joystick. To do so, launch the vjoy app from the start menu.
    • It will now be minimized by default in Windows 10, hence right click on it and select the open option as shown in the following screenshot to open the vJoy app –
      Open the vJoy App
      Open the vJoy App

      Now, after opening the vJoy app you can see all the gamepad controller or joystick controls which can be emulated by vJoy as shown in the screenshot below . Here “Check” the enabled option to start vjoy emulation.

      Check the enabled option to start virtutal Joystick
      Check the enabled option to start virtutal Joystick


    Step . 3 – Mapping Joystick Input to Keyboard Keys –

    • Now, we need to map the keyboard keys to the joystick inputs required by the game, such as analog and digital controls, x, a, b , y , o,  buttons.
    • To do so, click on the 3 dots icon “…” besides the input you want to emulate as shown below –
      Click on the ... button to assign keyboard key
      Click on the … button to assign keyboard key

      Now, it will ask you to press any key on your keyboard, here tap the button on your mouse or keyboard to assign the function

      Press any key on your keyboard or mouse to emulate the Joystick input
      Press any key on your keyboard or mouse to emulate the Joystick input

      Now once you have pressed the key it will replace the “None” with the key you pressed. Repeat this step until all the controls you want to emulate are done –

      All Joystick Controls Mapped to Keyboard Inputs
      All Joystick Controls Mapped to Keyboard Inputs

      Note – Incase, if you don’t want to waste your time manually assigning keys, you can use my above screenshot mapping “ini” file to load onto the vJoy. Simply, download the below linked “ini” file and use the “Open ini” option to use it on your PC or computer –

    • Click here to Download Pre-configured ini file for vJoy

    Step . 4 – Checking the inputs in Control Panel – Game Controllers

    • Now, once you have configured the virtual joystick . Let’s check the inputs on the control panel Gamepad controller properties.
    • Go to “Control Panel – > Set up USB Controller – > and then select vjoy input and select the “Properties” option as shown in the figure below –
      Select Properties of the vJoy device
      Select Properties of the vJoy device

      Now, simply type or press the mapped keys on keyboard and check whether the buttons are blinked in the “test” tab as shown below –

      If the keys blink the virtual emulation is working!
      If the keys blink the virtual emulation is working!

    If the buttons blink, then the keyboard to virtual joystick emulation is working.

    Congratulations! , you have now successfully emulated virtual joystick using keyboard. Thus, you can now start playing all joystick / gamepad games on your computer or laptop. Incase, if you face any queries feel free to let us know in the comments section.

  • Download Bluestacks + N [Nougat] for Windows 10 / 7 / 8.1 PC & Laptop [Full Offline Setup]

    Download Bluestacks + N [Nougat] for Windows 10 / 7 / 8.1 PC & Laptop [Full Offline Setup]

    The major concern of Android emulators is that many new games and apps are unusable on PC due to old android versions of Emulators.  But not anymore Bluestacks has launched – Bluestacks + N (Nougat Emulator) which is an android Nougat based emulator , thus you can now easily install and play android Nougat on your PC / Computer – Windows 10 / 7 /8.1 . Since its a secret beta version, we will cover here the Direct download of Bluestacks + N for PC / laptop which will let you download Bluestacks N for Windows 10 / 7 / 8.1 for free!.

    Bluestacks N Download
    Download Link Download Link
    Operating System : Microsoft Windows 10, 7 & 8.1
    Type of Installer : Full Offline Installer Setup
    License : Free to use

    Bluestacks N for Windows 10 / 7 / 8.1 Download & Installation Steps  – 

    • First of all in order to install Bluestacks Nougat edition , we need to download the Bluestacks N full offline installer from the link given below –
      Click here to Download Bluestacks N for PC – Windows 10 / 7 / 8.1 (Full 32-bit & 64-bit offline Installer)
    • Now, until the download is done, let’s have a look onto the exclusive features of Bluestacks + N –
      • Install latest Android version – Nougat on your System to test apps and ADB
      • Play Android games on PC / laptop with full screen view (for great graphics experience)
      • Use your Keyboard and mouse to simulate touch, this makes gameplay easier and lot of fun
      • Bluestacks N version uses OpenGL hence, it works smoothly even without Graphics cards or dedicated hardware
      • Multi-player and Google Play support! . Hence download and sync your game progress across devices
    • Click here to Download Bluestacks N Beta
      Click here to Download Bluestacks N for PC/laptop

      Once, you have downloaded the setup by clicking the above link / Bluestacks N logo, double-click on the downloaded file to begin the installation process.

    • It will show you a logo of the new “Bluestacks + N” version. Click on the “Install Now” button as shown in the following image –
      Bluestacks + N Install for Windows 10 / 7 / 8.1
      Bluestacks + N Install for Windows 10 / 7 / 8.1

      Now, it will start installing Bluestacks Nougat on your system, by extracting files, copying binaries and other steps.

    • Please wait while the Engine is Installed and the progress bar turns upto 100% . 
      Bluestacks N Download for PC
      Bluestacks N Download for PC / laptop

      Once the installation is finished , it will ask for your input to complete the installation. Here click on the “Complete” button as shown in the following screenshot –

      Bluestacks N emulator for Windows 10 / 7 /8.1
      Bluestacks N emulator Installation complete

      After clicking on the “Complete” button it will automatically auto-start the Bluestacks Nougat edition for the first time . First boot may take some time , so please be patient until the loading is completed.

      Bluestacks N Loading on Windows 10
      Bluestacks N Loading on Windows 10
    • That’s it ! After this step you can now log on to your Google Games and play account to install games , sync progress and play games more easily !
      Bluestacks + N Google Games Sign In
      Bluestacks + N Google Games Sign In

      Besides, you can even use the Play Store and camera based apps for some fun with photo editing or video calling and chats.Also you can install external APK and apps by clicking on the “Install apk” button highlighted in the above image.

    • That’s it ! you can now seamlessly enjoy the latest Android Nougat version by Downloading Bluestacks N for PC / laptop –
    • Click here to Download Bluestacks N for PC – Windows 10 / 7 / 8.1 (Full 32-bit & 64-bit offline Installer)
    • Incase if you face any problems or difficulties , feel free to let us know in the comment section below. 
  • How to Change Font face in Instagram Bio & Posts on Android – ᔕTᗩᑎᗪ ᗩᑭᗩᖇT on Instagram

    How to Change Font face in Instagram Bio & Posts on Android – ᔕTᗩᑎᗪ ᗩᑭᗩᖇT on Instagram

    Instagram is a platform to show uniqueness, be it the photos, the caption with it or be your profile bio. Since, the photographs are always good with the various filters, what about the text on the caption or bio ? . Yes , you can style that too.. In this tutorial we will show you how you can change the font face or font style on Instagram profile and posts . The fancy fonts will only increase your style and reach to your followers.

    Tutorial to Change Font Style or Font Face on Instagram on Android –

    • This tutorial currently works only on Android, since the font changer app we use is only available for Android.
    • First of all, please download and install the Font Changer App from the link below –
      Click here to Download Font Changer Pro for Android from Google Play Store
    • Once you install the app, launch the app and tap on the “Get Started” option as shown in the following image –
      Font Changer Pro Android
      Font Changer Pro Android

      Now, once you have tap on “Get Started” it will show a blank space to type and select the font style .

    • In the blank space , please type the text you want to be in Style or change the font  as shown in the image below –
      Change font face style
      Change font face style

      To change the “Font” tap on the “3 horizontal lines” icon as shown above and select any of the font style as highlighted by the red box in the above image.

    • Now, once you have typed the bio text or caption text in the Font Changer app. Tap on the “Copy” option as highlighted in the below image –

      Tap on Copy to copy text with font style!
      Tap on Copy to copy text with font style!
    • Now, once we have copied the text, we just need to paste it in Instagram photo caption or Instagram Bio as shown below –

      Paste the copied font face text in Instagram bio / Caption
      Paste the copied font face text in Instagram bio / Caption
    • Now, simply post the photo or Save the changes to your profile. And the magic is done! you have now successfully changed the font style on Instagram.
    • This looks great as visible on my Instagram profile  –
      Font style on Instagram! - Changed font on bio
      Font style on Instagram! – Changed font on Instagram bio

      That’s it! feel free to comment your creativity or incase of any doubts do let us know them too in the comment section below. We have tested this method on Android lollipop, marshmallow, Nougat and even Oreo phones and tablets.

  • How to Download Sony Liv Videos on Android | Download Sony Liv TV Shows & Movies on Android by Liv Downloader

    How to Download Sony Liv Videos on Android | Download Sony Liv TV Shows & Movies on Android by Liv Downloader

    Sony Liv is the streaming platform powered by Sony Entertainment Television (SET) and lets you watch tv shows of all Sony channels such as Sony HD, Sony Pal, and Sab TV . However, it may happen that you missed your favourite show or would like to carry the memories of a particular episode or multiple episodes offline in your mobile to watch it later. Here we bring you the Easiest Method to Download Sony Liv Videos on your Android phone / table by using Videoder : Liv Downloader.

    Tutorial to Download Sony LIV TV Shows Videos on your Android –

    • For Downloading sony liv tv shows we will be using the Videoder app which lets you download the videos of any site you visit, in our case it will be Sonyliv.com
    • Videoder is not available on the Google Play Store directly and hence we need to download its apk file separately to use it. Here’s how you can Download & install liv video downloader on your Android –
    • Click here to Download Videoder App Apk for Android
    • Installation of external apps apk is not available by default on most Android devices ,thus we need to enable “Installation from Unknown Sources” first before installing videoder.
    • To enable the feature, please navigate to “Settings – > Security – > Installation from unknown Sources”  and toggle it “ON” as shown in the Screenshot below –

      Enable Installation from Unknown Sources
      Enable Installation from Unknown Sources
      Now, once you have enabled the installation from unknown sources option. Navigate to the “Downloads” folder and tap on the Videoder apk file.
    • It will now prompt you with a window asking you permissions to install the App as shown in the image below –
      Videoder asking for Permissions
      Videoder asking for Permissions

      Here tap on the “Install” option as shown above.

    • Videoder app will now be installed on your device. Once it is successfully installed, it will show a success confirmation screen as shown in the image below –
      Videoder installation Success Screen
      Videoder installation Success Screen

      Here on the installation success , please tap on the “Open” button as highlighted in the above image. or open the Videoder app from the menu drawer.

    • Now, to download Sony liv videos please visit the Sony Liv website – http://sonyliv.com inside the Videoder app.
    • Here in videoder app, start playing the TV Serial or show which you want to download as shown in the image below –
      Tap on the Red Download Icon to Generate Links
      Tap on the Red Download Icon to Generate Links

      Here , once the video is loaded and starts playing – Tap on the “Red” Download button icon as shown in the above image.

    • Once, you tap on the red download icon, please wait until it generates the Download links for your favourite tv serial.

      Sony Liv Download Links generation please wait
      Sony Liv Download Links generation please wait
    • Please be patient, until the Download links are generated. Once the Download links are generated , it will show you a menu with the Video quality and video sizes available for download as shown below –
      Download Sony Liv videos on Android
      Download Sony Liv videos on Android

      Simply tap on the video size/quality you intend to download!.

    • Congratulations! you have successfully downloaded your favourite TV Show or Video episodes from Sony Liv on your Android. Incase, if you have any queries or face any difficulties feel free to comment . The method has been successfully tested on Android kitkat, lollipop, marshmallow, Nougat & even Oreo too!.
  • How to Download Ozee Videos on Android by Ozee Video Downloader : Videoder for Android

    How to Download Ozee Videos on Android by Ozee Video Downloader : Videoder for Android

    Ozee is the Streaming service powered by Zee entertainment, and lets you watch your favourite Zee Channel TV Shows online. It consists of popular shows, videos and movies produced by Zee Network. However, since the TV Serials are streamed online, Ozee doesn’t allow for offline viewing, or downloading. Also, you might want to download the show, for your collection or to watch during travelling. For the same purpose, we bring you a tutorial on downloading Ozee videos on Android phone without Rooting by using Ozee Video Downloader : Videoder.

    How to Download Ozee TV Shows & Videos on your Android Phone & Tablet 

    • Videoder (Ozee Downloader) is not available on the playstore, and hence we need to externally download the Videoder APK and install it on the phone.
      Click here to Download Videoder App Apk for Android
    • Since, Installation of external app apk is disabled by default on Android , we need to enable “Installation from Unknown Sources” first before installing videoder.
    • To enable it navigate to “Settings – > Security – > Installation from unknown Sources”  and toggle it “ON” as shown in the Screenshot below –

      Enable Installation from Unknown Sources
      Enable Installation from Unknown Sources
      Now, once you have enabled the installation from unknown sources option. Navigate to the “Downloads” folder and tap on the Videoder apk file.
    • It will now prompt you with a window asking you permissions as shown in the image below –
      Videoder asking for Permissions
      Videoder asking for Permissions

      Here tap on the “Install” option as shown above.

    • Videoder app will now be installed on your device. Once it is successfully installed, it will show a success confirmation screen as shown in the image below –
      Videoder installation Success Screen
      Videoder installation Success Screen

      Here on the Success Screen , please tap on the “Open” button as highlighted in the above image.

    • Now Navigate to the Ozee site – http://ozee.com inside the Videoder app.  Here, browse to the video you want to download on your Mobile.
    • Once the video screen is loaded, now simply tap on “Red Down button” at bottom right hand side corner as shown in the image below –
      Tap on the Red Download Icon
      Tap on the Red Download Icon

      Now, once you have tap / click on the Red download icon. It will start generating Ozee video download links on your phone as shown below. Please wait until the links are generated.

      Ozee video download links Generating Process
      Ozee video download links Generating Process

      It will show you direct download links as soon as it is generated

    • Once, the process is over it will automatically show you different download links and their size as shown in the image below –
      Ozee video download quality links
      Ozee video download quality links

      Here simply select the type / quality of video you would like to download. It will start downloading automatically in the background.

    • Congratulations!. You have now successfully downloaded Ozee Videos on your Android mobile without rooting, by single app. Incase if you have any problems or face difficulties feel free to comment below.
  • Download Videoder App for Android [ Latest Apk v14.0 Free Download ] 2019

    Download Videoder App for Android [ Latest Apk v14.0 Free Download ] 2019

    Videoder is an essential app for Android when it comes to download media such as videos and MP3 audio files, as its downloaded media quality is the Best. We say so because it has lots of great features such as ability to Download Youtube videos, convert videos to mp3. Also besides Youtube, videoder can even download videos from sites such as Vimeo, dailymotion, Instagram, twitter, vk, 9gag, ted etc. Thus, we present you the latest videoder App APK link which will let you download & install Videoder app on your Android phone & tablet.

    Videoder App APK Download
    Download Link Download Link
    Operating Systems : Android 4.4, 5.1, 7 & Oreo
    Type of Installer : Full APK
    License : Free


    Videoder App for Android (Kitkat, Marshmallow, Lollipop, Nougat / Oreo) Download & Installation Steps – 

    • Since, Videoder is not available on the Playstore , we need to Download its apk separately from the links below & Install it.
      Click here to Download Videoder App Apk for Android
    • Since, Installation of external app apk is disabled on Android , we need to enable “Installation from Unknown Sources” first before installing videoder.
    • To enable it navigate to “Settings – > Security – > Installation from unknown Sources”  and toggle it “ON” as shown in the Screenshot below –

      Enable Installation from Unknown Sources
      Enable Installation from Unknown Sources
      Now, once you have enabled the installation from unknown sources option. Navigate to the “Downloads” folder and tap on the Videoder apk file.
    • It will now prompt you with a window asking you permissions as shown in the image below –
      Videoder asking for Permissions
      Videoder asking for Permissions

      Here tap on the “Install” option as shown above.

    • Videoder app will now be installed on your device. Once it is successfully installed, it will show a success confirmation screen as shown in the image below –
      Videoder installation Success Screen
      Videoder installation Success Screen

      Here on the Success Screen , please tap on the “Open” button as highlighted in the above image.

    • Videoder app will now load on your phone, please allow sometime until the loading process is completed.
      Videoder App APK Download Loading
      Videoder App APK Download Loading

      Now, simply select the service from which you want to Download videos or music from the various options shown in the following image .

      Videoder Supported Services
      Videoder Supported Services
    • Now, simply use the app as a browser, and once you come across video or audio you want to download . Simply tap on the “Red” Download icon as shown below.

      Tap on Red Download Icon to start Downloading
      Tap on Red Download Icon to start Downloading
    • That’s it !. Thus you can now download videos from any popular websites using the Videoder app.