Author: Chaitanya

  • 3 Solutions to How to Download Torrent in Chrome OS / Chrome books

    3 Solutions to How to Download Torrent in Chrome OS / Chrome books

    Considering the rapid rise in number of Chromebook users & Chrome OS plus the load that uTorrent puts on Windows System & the crapware bundled with it, lead us to think on How to Download Torrents in Google Chrome Browser and we got 3 Solutions in Total for the Same. These 3 Solutions will work on Chromebooks & Google Chrome OS too as we are using chrome’s default extensions for downloading torrent thus are recommended torrent client for Chrome OS-

    Solution # 1 – Using JSTorrent Client Extension for Google Chrome OS 

    JSTorrent is a torrent Client for Chrome

    JSTorrent is a torrent client for Google Chrome written purely in JavaScript, Its Speedy, easier to use and works with Magnet Links too! . Though JSTorrent is a paid app on the Google Chrome Store, you can use the Lite Version which is available for Free . Also, If you want to get the Full-feature JSTorrent Version for Free you can get its code from github and directly load as Unpacked app . We have compiled a tutorial which will explain you on loading the github code –

    Click here to know about How to Load JSTorrent Chrome Extension for Free using Github Or else you can Download the Free Lite Version from this link – Click here to Download JSTorrent Lite from Google Chrome Store.

    How to download Torrents Using JSTorrent on Google Chrome Browser –

    • First of all Download & launch the JSTorrent App on your device.
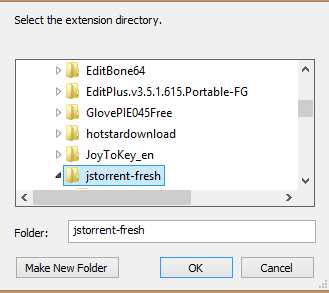
    • Once you have launched the app , We first need to Specify the “Downloads location” where the file is to be saved / Downloaded. Click on “Options” as highlighted in the below image –
      JSTorrent Options
      JSTorrent Options

      Now, Choose the Download location by clicking on the “Choose” button in the pop-up (Specify the location for your torrent downloads) Click here for a sample image .

    • Once, you’ve specified the location, you need to add the torrent to the client, You can add a torrent by either Copy-Pasting the Magnet URl of the torrent, or directly link of the .torrent file  (You can also add your local .torrent file by keeping the option Blank and clicking on the “Add” button . As shown in the image below –If you have pasted the Magnet URL or the link , Click on “Add” to add it to the list, Once your torrent is successfully added it will be added to your list!
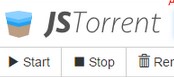
    • That’s it! You can also use the Start / Stop or Remove buttons to perform the corresponding actions .


    Solution # 2 – Using Bitford Torrent Client for Google Chrome OS

    Bitford Client

    Bitford is an alternative to JSTorrent client for Chrome OS which is free! . Though, Bitform lacks functionalities in comparison to JSTorrent, but nevertheless it gets the Job of Torrent download done , Besides that Bitford also lets you Play / Stream torrent data so that you can watch videos even while they’re being downloaded at the background.

    Click here to Download Bitford for Chrome from Google Chrome Store

    To Download torrents using Bitform first download the .torrent locally and then launch the Bitform App , Now Click on “Load File” option as shown below –

    BitFord Load torrent option

    Now, select the local .torrent file which you downloaded and it will start downloading the contents! . Its that easy.


    Solution # 3 – Using Torrent Leech Sites

    This Method is different from the methods we discussed above. Unlike the previous two methods we don’t need to continuously power-up our PC nor download any extension or app for Downloading torrents  . We just need to leech torrents online on Torrent Leech Sites and then we can directly download them via simple http connection .

    Click here for Tutorial on How to Use Torrent Leech sites to download Torrents.

    So, These are the 3 methods which can be used to download Torrents on Chromebooks/ Chrome OS . Infact After using JSTorrent you might use it on Windows , Linux and Mac OS too! . Feel free to comment if you face any issues 🙂

  • How to install & load unpacked Extension in Google Chrome Browser & OS / Chromebooks

    How to install & load unpacked Extension in Google Chrome Browser & OS / Chromebooks

    Many times Google Chrome simply blocks some extension and we cannot use them any further or sometimes we need to install extensions which aren’t present on the Store. In such scenarios, we can test the Google Chrome Extension by loading unpacked Extension & Installing it in Google Chrome Developer mode . In our tutorial we’re going to use JSTorrent Extension which is a JavaScript based Torrent Client for Google Chrome & then install it externally –

    Tutorial to Install & Load Unpacked Extensions in Google Chrome Browser / OS

    • First of all download the .zip or .crx file of the Extension you need to install manually on Google Chrome and extract it to a folder –
      As we are using JSTorrent in our example : You can download the JSTorrent Zip for Free from Github using the below URL –
      Click here to Download JSTorrent .zip from GitHub.com
    • Once you have downloaded the Zip file, extract it to a folder (In case of .crx files, rename the files first to .zip and then extract) .
    • Now Return again to Google Chrome, Navigate to Settings – > Extensions .
    • Here Look for the Option “Developer Mode” and enable it as shown in the image below –.
    • Once you’ve enabled the Developer Mode option it will modify the extensions tab from clear one in the previous image to one which looks similar to the image below “It will reveal Load Unpacked Extension” option –
      Google Chrome Load Unpacked Extension
      Google Chrome Load Unpacked Extension

      Now Simply Click on The “Load Unpacked Extension Option” it will ask you for the Directory from where the extension is to be loaded as shown below –

      Extension Directory

      Here Specify the directory to which we extracted the .crx file of extension or .zip file in the First Step and Click on OK.

    • That’s it your Extension will now be added to Google Chrome , Now Scroll down in the “Extensions” tab present inside Chrome Settings, you’ll see Your Extension in the list (In our example JS Torrent ) Now Simply Click on the “Launch” option highlighted to launch your extension ! –
      JSTorrent

      Voila! You’ve installed as well as launched an Unpacked Extension on Google Chrome . We used JSTorrent in our example because it charges users on Google Chrome Store, although its source code is available for Free on Github. If you face any problem’s while loading extensions feel free to comment.

  • 5 Best Websites to Watch Movies Online legally in India for Free! on PC & Android Mobiles

    5 Best Websites to Watch Movies Online legally in India for Free! on PC & Android Mobiles

    Premium Online Streaming Services such as Netflix , hulu Plus are not available in India, and hence there are very few options when it comes to Online Streaming content providers. Watching movies on these online Streams offer a host of benefits such as they skip the downloading part altogether which helps not only in saving time & disk space required to download them but also from malicious codes which may come with downloading. Also, new movies are speedily added to the Streaming services within a couple of months from movie releases so you can watch the movies at best quality at your leisure! . So, following are the 5 Best Websites to Watch Movies Online Legally for Free in India! these can be used to watch bollywood, hindi, tamil, telugu, bengali and all other regional movies online .

    Website # 1 – YouTube.com

    YouTube

    YouTube host one of the largest movie collection which can be streamed for Free! , You just need to simply search for movie name and most of the time you fill find it uploaded on the Website by the Rights Owner, YouTube is our personal favourite as we could easily find dubbed movies (telugu/tamil/malyalam) dubbed in Hindi , Also as YouTube can be used to watch hindi movies online too and can be used on PC , Laptop & on Android , iPhone too without its own app , We simply love it!

    Click here to Visit YouTube.


    Website # 2 – HotStar.com

    hotstar movies

    HotStar has experinced the largest growth amongst Online Streaming services, as it provides streaming of a lot of content such as TV Shows, Hindi – Bollywood movies, as well as Regional movies for free. You can even watch tv series online . Besides, these the hotstar app too enables you to watch movies online right on your mobile device or tablet if its on Android or iOS platform. Thus, its a welcome addition to this list –
    Click here to Visit Online Movies Streaming on HotStar for PC.
    Or if you’re on Mobile –  Click here to Download the hotstar Android app Now!
    Click here to download Hotstar app for iPhone/iPad from iTunes App Store.


    Website # 3 – ErosNow.com

    ErosNow.com provides live movie streaming

    Eros is one of the World’s biggest Movie Broadcasters, and now it has started its operations in India via its own portal- ErosNow.com . ErosNow provides you free online streaming of Movies, Popular TV Shows, Music and lot’s more. You just need to sign-up for a free account on ErosNow to view the content and that’s it! , Thus you can now easily watch Hindi Movies Online right on your Android / Computer.
    Click here to Visit ErosNow.Com
    Click here to Download the ErosNow App for Android


    Website # 4 – SonyLiv.com

    SonyLiv Movies

    Though, while at the time of writing this article , this feature was in Beta – But SonyLiv had some great collection of movies esp. the Retro one’s 1970-1990s , And we liked the quality too! . You may find out that the movies present on SonyLiv are mostly present on YouTube too! But if Quality is something you can’t compromise upon, SonyLiv is definitely the place to be!

    Click here to Visit SonyLiv Movies!


    Website # 5 – Hungama.com (Free 1 Month Trial)

    Hungama Movies

    Currently, Hungama only provides a free 1-month premium trial for Watching movies, but that’s big enough to watch a large number of movies, Besides that you can always create new accounts and take trials multiple times, so that you can always stream movies online on Hungama.com

    Click here to Visit Hungama.com – movies

    So, these are the 5 Best Websites to Watch Online movie streams legally for free as they are provided by the distributors themselves, if you know of any other such services feel free to comment.

  • How to Efficiently Download torrents using Torrent Leech Sites

    Imagine a situation where you need to download a torrent which has very few seeders or seeds, and hence the torrent will take a large time to download and you simply cannot keep running your PC / Mac or Mobile device running for such a long time Or simply if your ISP has blocked the P2P protocol & client applicatios, In all such scenarios Torrent leeching websites will come to your rescue, These Sites would first download torrents first on their servers or leech them and then you can simply log-on and download from them as if they were simply hosted on their servers as HTTP Download .

    There are many Such torrent leeching Services, and many of them even provide them for FREE! , We have compiled a list of Top 15 such Free Torrent leech sites, we would be using one of them as an example in this tutorial –

    We will be using Zbigz for our tutorial –

    • First of all get Download the .torrent file , or if it doesn’t download you can copy either the MAGNET URL or the .torrent file link which you want to download , The links may look like these depending upon the torrent website –
    • e.g .torrent direct URL – http://releases.ubuntu.com/15.04/ubuntu-15.04-desktop-amd64.iso.torrent

      e.g Magnet URI URL – magnet:?xt=urn:btih:7BD31ADF0B2423EA52E5F09663ACC631387ADA94&dn=ubuntu+12+04+official+iso+file&tr=udp%3A%2F%2Ftracker.publicbt.com%2Fannounce&tr=udp%3A%2F%2Fopen.demonii.com%3A1337

    • Now you can either upload the .torrent file by clicking the “Upload” button or simply copy either of the URLs in the text dield and click on “Go” as shown in the figure below –
      Adding torrent to zbigz

      Once you click on Go, it will start caching the torrent files on its server , caching can take anytime depending upon the size and peers.

    • Not to worry , you can safely turn-off your machine or close the tabs as Zbigz will still be leeching the files in your account , and once its done caching the torrent, it will present you with a zip & download option as shown below –
      Zbigz Caching complete

      Now Simply Click the “zip” button and yo! Your torrent will start downloading! Right in your browser.

    You can also use this method to download torrents on your Mobile , Chromebook or even on iPhone to download torrent.

  • 5 Best Free Download Manager Accelerator Apps for Android Phones to Speed-up downloads!

    5 Best Free Download Manager Accelerator Apps for Android Phones to Speed-up downloads!

    The default download manager for Android isn’t upto the mark as it lacks some basic functionalities such as resume support, multi-threaded downloads and other features. Considering, the limited connectivity of Cellular data and their fluctuating speeds we really should use Download managers on our devices so that we can utilize the resume support on downloads incase of lower speeds and in places where the speeds are higher multiple-download threads by download managers can help us to complete our downloads more quickly and efficiently. So, here are the Top 5 Download Managers & Download Accelerators for Android phones which we can use along with our existing/installed browsers (e.g Google Chrome) to increase downloading speed on Android-

    Top 5 Download Manager & Accelerator Apps for Android Phones –

    Note – Back in Old Symbian days we used to use UC Browser for downloading, but considering the fact that Android devices are much more complex and vulnerable & amidst reports saying UC Browser was leaking user data to Chinese servers, we skipped it and focussed only on “Pure” Download Managers and work easily with any other browsers such as Google Chrome, Firefox for Android etc. To download using these Download Managers simply use Web browsers for surfing and open the Download links in any one of the following as shown in the image alongside –


    No. 1. DMA (Download Manager Accelerator for Android) –

    Download Manager Accelerator for Android

    Not to be mislead by its common name, DMA by Keerby is one of the best Download Manager for Android which we came across, It has the best User Interface (UI) amongst all the download managers, supports resume supported downloads & 3rd Party browsers too.

    Besides, the above option, it has features such as-

    • Auto-retry after download failure
    • Supports manual specifying of number of threads to be downloaded for each download as well as auto-determine option based upon your speed.
    • Feature to download only on WiFi connection so that your cellular data isn’t wasted.

    Click here to download DMA Download Manager Accelerator for Android from Google Play Store


    No.2 ADM (Advanced Download Manager for Android) –

    ADM Download Manager

    If you’re looking for a no-fuss light-weight download manager for Android, that will get your Job done look no further than ADM by DimonVideo . ADM provides features such as –

    • Multi-threading of downloads.
    • Auto-resume after download failures, Supports various themes so that you can customize ADM.
    • It also supports download scheduling and also you can import list of links to be downloaded from a txt file on SD card (you can use unlimited night-pack most effectively by using the Download schedule option)

    Click here to download ADM (Advanced Download Manager) for Android from Google Play Store.


    No.3 Turbo Download Manager – TDM for Android

    Turbo Download Manager for Android

    Though TDM works only for direct download links, but its 3rd Party browser integration is probably the best amongst all the Download accelerators .

    TDM directly provides the “wedge” and “i” icons which you can use to tweak the download settings such as number of threads, etc and ability to change the download location so that handling downloads is much more easier.
    Save button simply starts the file download –

    Click here to download Turbo Download Manager (TDM) for Android.


    No.4 Download Accelerator Plus by rubycell

    Download Accelerator Plus DAP for Android
    Download Accelerator Plus DAP for Android

    Download Accelerator Plus is a compact download manager which is a meagre 1.3 MB in size! , Not to be mistaken by its lesser size it provides all major functions such as

    • Multi-threaded parallel Downloading of Files.
    • Supports background downloading even when the screen is locked.
    • Provides category and time-line sorting of downloaded files so that you can easily locate your downloaded files.
    • Has a small in-built web browser which helps to download from non-resume supported websites.

    Click here to get Download Accelerator Plus for Android from Google Play.


    No.5 IDM Download Manager for Android

    IDM Download Manager for Android

    Not to be confused with original IDM for Windows, this download manager is highly inspired from the real IDM, and copies most of the features from it . Although, the User Interface is really shabby and needs to be worked upon, the Download Speeds obtained are good  and it doesn’t leak user data to servers which makes it enter our list.

    Besides this the Download Manager also supports non-resumable link downloads and whose filesize aren’t shown, and allows some features such as ability to set downloaded music files as ringtone etc.

    Click  here to Download IDM Download Manager for Android from Google Play

    So, these were the 5 Best Download Managers for Android, If you know of some other feel free to comment and let us know about it too 🙂

  • How to change Android ID,SSN & Device ID on Android Phones

    How to change Android ID,SSN & Device ID on Android Phones

    CPI apps, Refer & Download to earn Free Recharge apps or be it any Android app, they track your Identity & Installs on some primary factors like Android ID , Device ID , Sim Serial Number (SSN), and Sim Subscriber ID . So, changing the above parameters may give you extra exclusive benefits with increased downloads. Hence, In this article We will be covering the method to change Android ID, Device ID and SSN easily and securely on Android phones.

    Pre-requisites

    • We highly recommend that your Android device should be rooted, As the rooting methods vary from device to device we won’t be able to cover them up in this article (You can google for your device name + root for available methods for your device) .
    • We will be using 3 apps for this purpose – Xposed Framework , Device ID app (to check whether the changes have been applied to) , and DonkeyGuard app.
    • The method we will be discussing changes the Android ID for a particular app only and hence your original IMEI remains intact thus is perfectly legal too 🙂 .

    Tutorial on How to Change the Android ID , SSN & Device ID on Android Phones 

    • First of all root your android phone , and then Install the Xposed framework from the below URL –
      Click here to Download Xposed Framework v2.7  apk for Android devices .
      Xposed Framework is a set of exclusive tools which add additional functionalities to Android.
    • Now, Once you have Installed Xposed Framework, Open the app if it asks for sudo/su/root permissions tap on Ok to grant it.

      Now, We need to Install/Update the Xposed framework for doing the same Open the Xposed App -> Go to “Framework” -> Tap on Install/Update .
      (As shown in the Figure Below , It may ask you to reboot your phone, allow it to reboot or reboot manually if it doesn’t reboot automatically).

      Installing Xposed Framework on Android


    • Coming to the changing Android ID & Device ID first, you might like to have to have a look on the current Parameters, you can see them by Simply downloading the Evozi Device ID app a which can be downloaded from link below –
      Click here to Device ID app from Google Play Store.
    • Android ID, etc Before Changing

      Once, you have downloaded the Device ID app, Open it to see the existing values for Android ID, Device ID etc (You can take a screenshot which we will use later to verify, for e.g Check the alongside Screenshot for my existing values before changing the mentioned parameters red box).

    • Now, for Changing these values we need DonkeyGuard App, which can be downloaded from the below link –
      Click here to Download DonkeyGuard App from Google Play Store.
    • Now, before Launching the DonkeyGuard App , We need to activate the DonkeyGuard Module in Xposed App , To do so Open the Xposed App -> Go to “Modules” -> CheckMark the “DonkeyGuard” Module , and reboot phone if prompted.
    • Now coming to the Main part , Open the DonkeyGuard App and scroll-down to the app’s for which parameters you wish to change (we will be using the same Device ID app in our example) and now tap on “Settings” option as highlighted in the image below –
      DonkeyGuard Settings

      Now, one you tap on Settings , It will be presenting you with the parameters which can be modified, Tap on “Identity” Option .

    • In the “Identity” pane you will be able to see the different options which can be edited for the particular app , Simply Tap on the “Pencil” icon to edit the values, for e.g we will be changing the “Android ID” as shown in the below Image –
      Changing Android ID

      You can manually type in Android ID or assigning a Random Android ID , tap on “Random” and then tap on “Save” to Save Changes , Click on the “Save” icon on the top-right-hand side corner to save the Changes. (you can do the same for other options as well).

    • Now We will re-open the Device ID app to confirm whether the values have been applied or not , Check the Screenshot below for confirmation –
      New Values

      Thus, as seen from above we have successfully changed the Android Device ID, SSN successfully! on the Android Device .

    Tips for more downloads & Referral app earnings 

    • Change / give the same Android ID , parameters first for Earning App.
    • Give the same parameters for the Google play store app, and to the new app downloaded before opening the new downloaded app!.
    • That’s it ! Your referrals would be successful.
  • Get Instant Free Rs.500 in MakeMyTrip.com to Book hotels & Flights at lowest discounted Prices!

    Get Instant Free Rs.500 in MakeMyTrip.com to Book hotels & Flights at lowest discounted Prices!

    Its raining discounts during this festive season when it comes to Hotel accommodation providers , First with GoIbibo, Second with Oyo Rooms and now its MakeMyTrip.com who is providing Free Instant Rs.500 for each new app download . This Instant money can be used not only for hotel bookings, but it can also be used for domestic & International flight bookings too! , And to top the cake with cherry this instant money can also be clubbed with existing coupon codes and offers. Additionally, you can also earn Rs.1000 per each friend using the Refer & Earn program So, If you plan & utilise this offer wisely enough – You can travel, and stay too for FREE!

    Method to claim your Free Rs.500 Instantly on MakeMyTrip App on Android / iPhone (iOS) –

    • First of all You need to download the MakeMyTrip app from the following link (uninstall the app if its already installed)-
      Click here to download MakeMyTrip app .
    • Now, Simply Sign-Up with a New MakeMyTrip account to get your Free Rs.500 Instantly in your account (No E-Mail or Mobile number verification required).
    • You can also earn more MakeMyTrip Money in your account by using MMT’s refer & earn program , Simply go to app Menu and then select “Refer and Earn” option.
    • Now, copy your referral link and Send it to your Friends to get upto Rs.1000 per each friend referral.

    MMT Money FAQ

    • The Validity of the MakeMyTrip money is for 90 days from the date of issue.
    • The MakeMyTrip money / ecash can be used for booking limits upto –
    • Domestic Flights – Rs.1000 per booking
      International Flights – Rs.2000 per booking
      Domestic Hotels – Rs.2000 per booking
      International Hotels – Rs.2000 per booking
    • UPDATE –  You can also use The Coupon / E-Coupon code : “MMTGO” to get Flat 45% off on Dmestic Hotel Bookings on Make My Trip , thus you can use the coupon + Rs.500 cash combo to get Hotels worth upto Rs.1000 for Free!!
    • Maximum cash that you can earn from the referral program is Rs.10000 , but you can always create multiple accounts so that your complete trip is Free!
    • Hurry! grab the offer before it ends! – Click here to Download the MakeMyTrip app now!


  • How to Download Instagram Photos & Videos on iPhone & iPad using Instagrapp app

    Instagram has its largest user base on iOS or iDevices – iPhone, iPod & iPad . many time we need to download photos from our Instagram feed and there aren’t many easy options except to take Screenshot , but those too don’t give the complete Image resolution. But not anymore, Instagrapp app for iOS allows you to download just any Instagram photo or Video on your iDevice in a very easy manner! Keep reading to know on How to easily Download Instagram photos and videos on iPhone using Instagrapp app.

    Tutorial to easily Download Pics from Instagram using Instagrapp app –

    • Feed in Instagrapp App

      Instagrapp app for iOS not only allows you download photos from Instagram but it also allows you to Repost them –
      Click here to Download Instagrapp app from Apple iTunes Store.

    • Once you have downloaded the Instagrapp app, log-on to your Instagram Account via the app and Authorize the app .
    • After you finish the Authorisation , Instagrapp app will present you with your Instagram feed as shown in the image alongside , Here tap on the image/video you want to Download.
    • After you tap on anImage or video from your feed, It will be shown in full-view as shown below – . Now Simply tap on the “Save” button to download . That’s it!

      Saving in Instagrapp App
      Save option in Instagrapp app
    • The iPhone may ask you a one-time confirmation for allowing “Photos” access to InSave app, Click on “Allow”.
    • That’s it ! All your Selected Instagram Photos and Videos will now be downloaded on your iPhone !

    You can also use the “search” option to browse instagram using Username, and hashtags to search media for the particular search query. The method is really useful for backing up our own photos by searching our own Username as shown below –

    Serching using Username – Instagrapp App

    Besides this method you can also try the Method No.2 and Method No.3 mentioned in the following article to download Instagram photos & videos on your device – Click here to See Method No.2 & 3 for downloading Instagram Content. 

    If you face any problems feel free to comment, Happy Instagraming 🙂

  • 3 Best Ways to Download Instagram Photos on Android or PC – Computer

    3 Best Ways to Download Instagram Photos on Android or PC – Computer

    Instagram is a hub of  outstanding photos and video content, sometimes you might want to download and save a particular photo or video of Instagram so that you can view them later offline on your device. So, here are the 3 Best Ways to Download / save Instagram Photos  on Android or Computer. These methods can be used to Batch Downloads Instagram pics as well, particularly the app method hence we will be discussing the App method first, and then the PC Methods.

    Method – 1 Using InstaSave app for Android

    Tutorial to download Instagram pics InstaSave App on Android –

    InstaSave app – Selecting Photos
    • First of all, Install the InstaSave app for Android from below link –
      Click here to download Insta Save app for Android from Google Play Store.
    • After, you have downloaded InstaSave app, log-in to your Instagram account from InstaSave app.
    • Once, you log-on to InstaSave app, it will show you a feed of your photos which you want to save , just tap on all the photos you want to save as shown in the alongside image. (It allows you to Batch download as well).
    • Now, once you’ve selected the images or photos which you want to download/save on your device , Click on the “Save” icon as highlighted by green color in the below figure – , It will prompt you with the location where the images are to be saved as shown –
      InstaSave icon + Download prompt

      Click on “Yes” and, you have now successfully downloaded Instagram Images on your Android device.

    Method 2 – Download Instagram Photos on PC (Computer) Windows and Android by Instagrabbr.com

    • Instagrabbr.com

      This method works on PC as well as on Android devices, and it doesn’t requires Instagram login too, provided you know the Username of whose photo you want to download.

    • To download Using Instagrabbr, First of all Visit the Instagrabbr.com Website.
    • Now, In the text field enter the Instagram username of whose photos you need to download and click on “Search” as shown in alongside figure.
    • Once you click on search it will display all the public photos associated with the typed in Username as below –
      Click on the photo to open it full-sized

      Now, here in Click on any photo to Open it in full-sized window.

      Save Image button Instagrabbr
    • Here Scroll-down below to the bottom of Image, and Click on the “Save Image” button as shown alongside!. That’s it you have successfully downloaded the Instagram Photos on PC (Windows – Google Chrome in screenshots) or Android.


    Method – 3 Copying Instagram Share URL and downloading via Dinsta.com

    • Getting Share Link in Instagram

      This method requires you to have the Share URL of the Instagram pic you intend to download , you can get The Share URL of an image by simply –

    • Open the photo whose Share URL you want to copy inside the Instagram app, and now tap the 3 dots highlighted by green color in the alongside image, and then by touching the “Copy Share URL” highlighted by blue color in the same image.
    • That’s it Your share URL is now copied, If you’re using Instagram on PC or Computer, simply copy the Image URL from the Google Chrome/Mozilla Firefox address bar, once you open an Instagram.com photo by clicking it –
      Getting Instagram share URL in Google Chrome


    • Now, once you have obtained the Sharing URL , Visit Dinsta.com  on your Android device / Windows PC.
    • On Dinsta, Enter Instagram URL eg. https://instagram.com/p/m7SaJFIhyB/ & Press Go..
    • You’ll see a download button below the Image, click on it and start downloading!!


    That’s it these are the 3 Best Methods which you can use to Download Instagram photos on your Android Phone or PC .