Blog

  • How to Configure any Gamepad / Joystick Controller on Mac OS X Free App

    How to Configure any Gamepad / Joystick Controller on Mac OS X Free App

    Using a Gaming controller or Gamepad on Mac OS X to play games isn’t easy. Mac OS X doesn’t support Xbox 360 (XInput) Controllers, while it does support Direct Input Gamepad & Joysticks PS4, PS2 , PS3 very few games actually support them. So, here’s an easy tutorial which will let you configure any gamepad or Joystick to play literally any game on your Mac OS X (MacBook Pro / iMac / Mac Mini) by emulating keypress (keyboard) and mouse-movements directly from your game controller.

    Tutorial to Configure any Gamepad Joystic on Mac OS X to Play any Game –

    Step # 1 – Downloading & Installing Enjoyable Gamepad controller app –

    • Inorder to play games which do not support Joystick input we need to emulate & map keyboard key press & mouse movements to our Gamepad / Joystick. The best & free app to map joystick to keyboard on Mac is Enjoyable, which lets you perform every bit of button press / mouse – emulation for your controller on Mac OS X .

      Click here to Download Enjoyable gamepad controller app for Mac OS X 

      Since, Enjoyable comes as an external app, you will need to open the .app file by “ctrl+click” on the Enjoyable app file, You can see the following link for more details on How to install external source apps on Mac OS X

    • Now, once you have installed the app , launch or open the Enjoyable app.

    Step – 2 Connecting & Mapping the Joystick controller buttons & analog

    • Now, connect your Joystick or PS2/PS3 gamepad controller once you have launched the Enjoyable app. It will now automatically detect your Joystick or Gamepad controller as shown in the image below –
      Gamepad detected in Enjoyable App
      Gamepad detected in Enjoyable App

      Now, once your gamepad is detected – You will see all the available buttons & analog controls available on your gamepad as shown in the image above. Now we need to map keystrokes & mouse movements to your gamepad.

    • To assign Keyboard keys & mouse movements to your controller
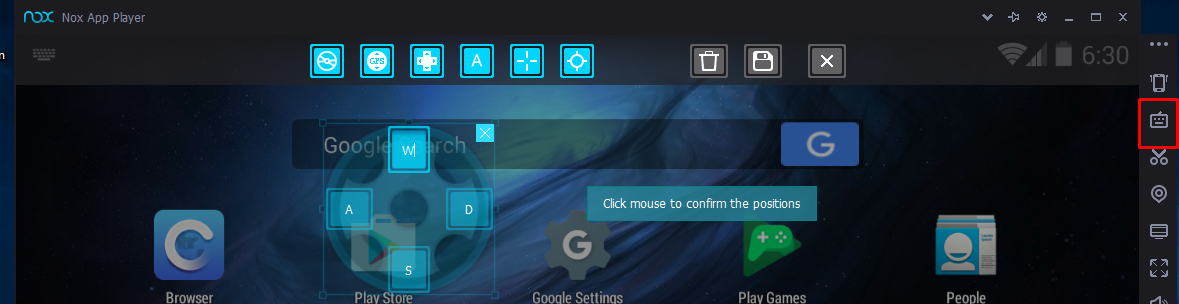
      1.  First press any key or button on your gamepad , The corresponding button pressed will now be reflected inside Enjoyable app as shown in the below image –
        Button Pressed highlighted in Enjoyable
        Button Pressed highlighted in Enjoyable

        Now, in the corresponding right hand side pane, By default “Do Nothing” option is selected , Change it to “Press a Key” for Keyboard key assignment , or to “Move the Mouse” for mouse movement. We will be using Press a Key option in our example for mapping joystick buttons.

      2. Now, after changing the option from Do nothing, to Press a key – The box will be highlighted by blue color as shown in the above image. Here, simply press the keyboard key you want to assign to the joystick button on your keyboard. In our example, we assigned the “S” keyboard input from W, A, S , D to our joystick button which looks like below –
        S key input assigned to Joystick button
        S key input assigned to Joystick button


      3. Similarly, press a new different button on your joystick or gamepad controller and assign the corresponding keyboard keys to emulate. Repeat the Steps for all joystick buttons except the analog controller.
    • To  Mouse pointer movements to Controller – Analog
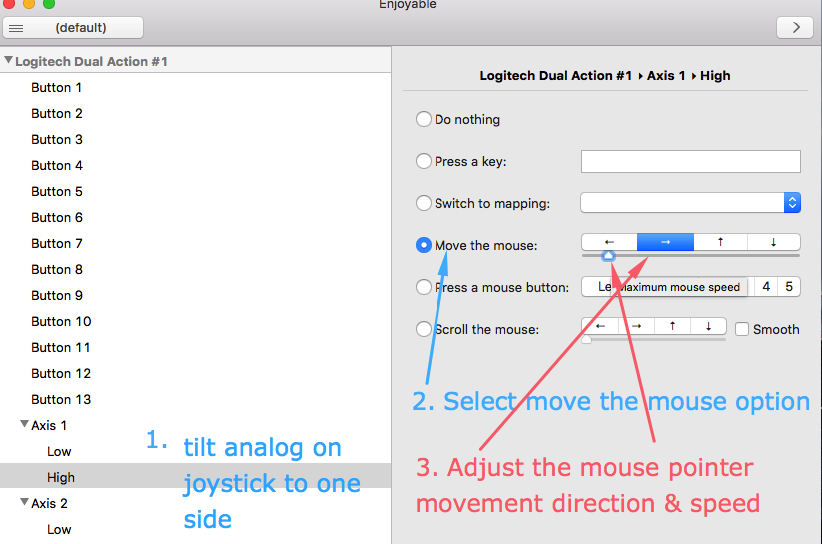
      1. Now, to assign movements to analog controller, simply start by tilting your analog stick on your gamepad joystick to one side. The corresponding high or low value will now be shown on the Enjoyable app as shown in the below image –
        Configuring mouse using Analog input Enjoyable on Mac OS X
        Configuring mouse using Analog input Enjoyable on Mac OS X

        Here again change the value from “Do Nothing” to “Move the mouse” as shown in the above image.

      2. Now, give the direction you want the mouse pointer to move, when you tilt the corresponding analog stick, (Shown as step 3 in the previous image).
      3. Adjust the speed with which you want to move pointer.
      4. Now, repeat the steps 1,2,3 again but remember to tilt the the analog in different direction to map the inputs.
    • Once, you have finished assigning all the inputs , Simply press the ” > “ sign as shown in the below image (highlighted by red color) to start the mapping emulation –
      "Start
      button” class=”size-medium” /> Start the Joystick mapping by clicking > button

      Once mapping is started it will show a bold joystick sign on the topbar as highlighted by “blue box” in the above image.

    • That’s it! You can now enjoy any game with your gamepad controller or joystick even if the game doesn’t support it . The app and method works for all Mac OS X versions such as Mavericks, Mountain Lion, Snow Leopard , Yosemite , El Capitan as well as Sierra too!
    • Feel free to comment if you face any issues or encounter any problems
  • Nox Player HD: Best Way to Play Android Apps on PC – Windows 10,7 & 8.1

    Nox Player HD: Best Way to Play Android Apps on PC – Windows 10,7 & 8.1

    There are many softwares available on the internet, which let you run & execute android apps on your Computer / PC known as Android emulators. Though, these emulators work very efficiently in running android apps, but when it comes to “Playing Android Games” or playing apps on PC – Nox Player is the best one. Its due to the fact that Nox Player allows you to simulate touch input via your keyboard , which very few do.. and other features combined with these make Nox Player a perfect emulator for gaming purposes.

    Salient features of Nox Player HD : Best Emulator for gaming purposes for Windows 10, 7 PC

    Nox Player HD for WIndows 10 / 7
    Nox Player HD for Windows 10 / 7
    • Easy to install & start using immediately .
    • It comes pre-loaded with Play Store, so that you do not need to hunt down for apps.
    • incase you have built your own app, or have your own apk – its still easy to install apk on Nox Player as all you need to do is drag & drop the apk file into the Nox Player HD window to install the apk.
    • One-click root enable or disable. Thus, you can switch to rooted or non-rooted mode just on the click of a toggle! . (Its pre-rooted so no need to root it again)
    • Besides, that you can even assign keyboard keys , to simulate touch on specific areas of screen as shown in the image below –

      Touch Simulation on Nox Player using Keyboard
      Touch Simulation on Nox Player using Keyboard
    • Thus, the touch simulation by keyboard makes game playing on Nox a very pleasant expeience. To Simulate Touch press, all you need to do is to click on “keyboard icon” on the right-hand bar side of Nox player – > Select the type of input to emulate -> done.
      Simulate touch input on Nox App Player
      Simulate touch input on Nox App Player

      Besides, these touch & gyroscope simulation, you can even simulate your GPS location , enabling you to play GPS based games too on your computer .

      This is perhaps our most loved feature, as it gives a GPS remote as shown in the following image – which made our lives easier and lot more comfortable to play games like Pokemon GO on Windows Computer

      GPS Remote control Nox Player
      GPS Remote control Nox Player


    • Thus, these features combined with the fact that Nox Player is totally free of cost! makes it a really good recommendation for all the Power gamers & Android users out there.
    • Click here to Download Nox App Player for Windows 10 / 7 /8.1 (32-bit & 64-bit)
  • How to Easily Install & Use Turbo C / C++ on Android for Programming (Phones & Tablets Supported)

    Turbo C or C++ is the oldest & the first IDE or C, C++ compiler used by a student while learning or trying to learn C Programming. Though, Turbo C++ is quite old and not much used now, it still is a big part when it comes to learning programming. Here’s a simple tutorial which will show you How to easily install & use Turbo C  / C++ on your Android phone or tablet so you can code & execute programs on the run.

    Tutorial to install & use Turbo C / C++ on Android KitKat , lollipop, Marshmallow & Nougat (4.4 , 5.1 ,6.0 , 7.0)

    Pre-requisites –

    Tutorial – 


    Step . 1 – Configuring Dos Box & Turbo C (Only a one-time setup process) – 

    • First of all download & extract the turbo c binary zip files into a folder on your device as shown in the image below –
      Extract Turbo C zip into a folder on your phone
      Extract Turbo C zip into a folder on your phone


    • Now, once you have downloaded & installed Magic Doxbox free app , launch the app  it will show a welcome screen , click on ‘x’ to close the message screen.
    • In the next black screen – click on the “+” icon to add new game, then select the “New game” option as shown in the image below –
      Magic DosBox add New Game
      Magic DosBox add New Game


    • The Configuration screen will now ask for the title, and the path of the game (which is Turbo C in our case). Here, we need to specify the path where we have kept our binaries. On this screen Click on “choose” as shown on the following photo –
      Select Choose Option on the Configuration screen
      Select Choose Option on the Configuration screen

      Now, navigate using the folder view until the choose folder option shows the folder “TC” in the location where you extracted the Turbo C.zip files.

    • Once you see the folder “TC” as shown in the below image , simply tap on “Checkmark” or “✓” sign. Do not click or open the TC folder , as shown below –
    • The Turbo C icon will now be shown in the black screen as shown below – That’s it you have now completed the one-time set up process .
      One-time turbo c set up process completed
      One-time turbo c set up process completed


    Step.2 – Running Turbo C & launching directly for subsequent uses –

    • Now, for running Turbo C for subsequent uses , simply click on the Turbo C icon inside Magic Doxbox app. Here, you will see the dosbox black screen as shown in the image below .
    • Here, we need to type the Turbo c binary path to execute turbo c, incase if your keyboard doesn’t appear – Please press the back key of your Phone! & select the keyboard as shown in the image below –
      Select Keyboard after back-button if keyboard doesn't appear automatically
      Select Keyboard after back-button if keyboard doesn’t appear automatically


    • Now, on the black screen we need to type in the Turbo C path to execute it , to execute Turbo C file please enter the following commands one by one on the black screen –
      1. Type in “cd tc”  (hit the enter or return / new line key on keyboard)
      2. Now type in “cd bin” (hit the enter or return / new line key on keyboard)
      3. type “tc” (hit the enter or return / new line key on keyboard)
      4. It will look like below –
        Commands to open Turbo C on dosbox black screen
        Commands to open Turbo C on dosbox black screen


    • That’s it!! your Turbo C will now be launched & opened! 🙂 .. You can now access all functions of keyboard , mouse & start programming of C or c plus plus right on your android device as shown below –
      Turbo C on Android with Mouse & Keyboard
      Turbo C on Android with Mouse & Keyboard

      It feels really awesome & geeky to do program on your android, and is pretty smooth too! , especially the mouse pointer area and mouse movement as shown in the image above Also the best part is that this works totally without SD card or memory card, so will work on all android phones!

    • Rest all functions of Turbo c including graphics too work really smoothly! . Incase if you face any issues or encounter any errors feel free to contact us! Happy Programming!
  • How to Clear Cache,Cookies for all Browsers on Mac OS X for Free using CCleaner App

    How to Clear Cache,Cookies for all Browsers on Mac OS X for Free using CCleaner App

    Browser Cookies, Cache & app caches start accumulating in the System as soon as you start using respective app or Browser. The Cookies & cache files not only decrease the available free storage on your system, but also slow down your system causing the app , browser or system to hang many times. The browser cache also contains your saved sessions “remember me” Thus, periodically clearing browser cache files & cookies is highly recommended for security purpose too. Here’s a complete tutorial on How to Clear cache files & cookies for all browsers for free on Mac OS X using CCleaner app

    Tutorial to Clear Cache & Cookies for any Browser on Mac OS X by CCleaner –

    • CCleaner is a leading app for windows to clear cache & temporary files. Besides, it can also be used as an uninstaller app for Mac OS X. Thus, we will be using it to clear cache & cookies.
    • First of all, Please download & install CCleaner app for Mac OS X from the link below –Click here to Download CCleaner app (.dmg) for Mac OS X .
      Here’s a simple tutorial on How to install .dmg app on Mac OS X.
    • Now after you have installed CCleaner app by dragging and dropping the CCleaner app by dragging & dropping icon on Applications folder, please launch the app.
    • Make sure that the “Cleaner” option from the left menu app is selected, app will show a window with the “Mac OS X” & “Applications” tab as shown in the image below –
      Mac OS X App Cache Clear
      Mac OS X App Cache Clear

      Now, select the app name & options which you want to be deleted – e.g Browser Cache, Browser Cookies & tap on the “Analyze” button

    • The app will now analyze the system for temporary cache files & cookies for the previously selected app which can be deleted to free up space, without any compromise on the system performance and functioning.
    • After the analysis is completed, it will now show a list of files which can be deleted and the amount of space which can be freed up as shown in the image below –
      CCleaner for Mac OS X (Browser cache & cookies)
      CCleaner for Mac OS X (Browser cache & cookies)

      Here on the analysis complete page , Click on the “Run Cleaner” button as highlighted in the above button to start the cleaning process.

    • That’s it! You have now successfully cleared cookies, & cache files for any browser or app on Mac OS X for Free!
      Successful Cleaning of Browser Cache & Cookies on Mac OS X
      Successful Cleaning of Browser Cache & Cookies on Mac OS X

      Making your system faster and even increasing available free storage!

    Thus, CCleaner is a very utility free app to clean cache, cookies on Mac OS X. Though there are many such clear cookies app but very few are free & are as functional as CCleaner. Enjoy a faster Mac OS X (Sierra, Mountain Lion, Snow Leopard,Yosemite, El Capital etc)

  • 3 Best Free Uninstaller Apps for Mac OS X for Software Removal

    3 Best Free Uninstaller Apps for Mac OS X for Software Removal

    Mac OS X is very neat when it comes to uninstalling or removing apps – Simply dragging an app icon to trash bin icon uninstalls the app. However, not all files related to an app are deleted or removed when you uninstall an app.

    This results in waste of storage space and may reduced speed for your Macbook / iMac mini. In order to avoid these problems, it is recommended to uninstall apps from Mac OS X using app uninstaller or software removers.

    So here are the Top 3 Best Free Uninstaller apps for Mac OS X to uninstall all type of apps – .dmg, .pkg apps & remove the softwares.

    Top 3 Best Free Uninstaller apps for Mac OS X to uninstall apps for Software Removal


    App Uninstaller for Mac # 1 – CCleaner App 

    CCleaner by Piriform is a very neat app to free-up storage space on your Mac OS X device by deleting and clearing cache & temp files.

    CCleaner comes in with app uninstaller too, to remove an app via CCleaner –

    1. Navigate to “Tools” option from left hand menu pane.
    2. Select the “Uninstall” pane.
    3. Here select the name of Application which you want to install from the app list , and then click on the “Uninstall button”.
    4. That’s it you’re app will be uninstalled.

    This is perhaps the most convenient way to clean up storage on your Mac OS X and uninstalling apps –

    Click here to Download App (.dmg file) CCleaner Free Version for Mac OS X  .
    Here’s an easy tutorial on How to install app from .dmg file on Mac OS X


    App Uninstaller for Mac # 2 – App Cleaner (Free)

    App Cleaner for Mac OS X
    App Cleaner for Mac OS X

    App Cleaner is perhaps the most oldest of mac uninstaller apps and is available for all Mac OS X versions 10.4 & later. It has been tested and found to be working on Mavericks, Snow Leopard, Mountain Lion, El Capitan, as well as Sierra too.

    To uninstall any app using App Cleaner – simply launch AppCleaner app and then drag & drop the icon of app you want to install into App Cleaner window to Uninstall app!.

    That’s it! you’re app and all its traces of files will be uninstalled.

    Click here to Download App Cleaner free for Mac OS X 10.10 & later.

    Click here to Download App Cleaner free for Mac OS X 10.6 – 10.9.

    Click here to Download App Cleaner free for Mac OS X 10.4 & 10.5.


    App Uninstaller for Mac # 3 –  App Trap for Mac OS X 

    App Trap for Mac OS X
    App Trap for Mac OS X

    Instead of classifying as a stand-alone uninstaller , App Trap for Mac can be categorised into a useful uninstaller plugin.

    App Trap attaches itself into “System Preferences” – > Users – > “Login Items” , and needs to be enabled.

    When enabled from the settings , the next time you try uninstalling an app from Mac OS X by dragging app into Trash bin. It will ask you to delete additional trace files which are not necessary as shown in the alongside image.

    Thus, effectively completely uninstalling the App from your Mac OS X device – MacBook Pro/Air / iMac (Mini) etc.

    Click here to Download App Trap for Mac OS X


    So, these are the Top 3 Best Free Mac Uninstaller apps which will help you to completely uninstall or remove an app from Mac OS X. If you know of any other such app or encounter any problems while using these feel free to comment. Working fine on Mountain Lion, El Capitan, High Sierra, Mavericks


  • How to Merge or Combine Multiple PDFs for Free on Mac OS X (Join Many PDFs into a Single One)

    How to Merge or Combine Multiple PDFs for Free on Mac OS X (Join Many PDFs into a Single One)

    Many times we need to combine or merge multiple PDFs into a single one, but are unable to do so due to the different PDF page orientations or types of PDF Files. Here’s an easy tutorial on How to combine or merge Multiple PDF files into a single one on Mac OS X for Free using PDF Merger Mac . The app is small , easy to use and works on all Mac OS – Mountain Lion, Snow Leopard, Mavericks, El Capitan & Sierra too!

    Pre-Requistes : 

    • Although, you can use Preview app to merge multiple PDFs on Mac, but it doesn’t work all the time. So, we use a small free app – PDF Merger Mac :
      Click here to Download PDF Merger Mac app for Mac OS X ( .dmg file) 
    • Now, install the .dmg file of app by opening, it & dragging the PDF merger Mac icon onto Applications icon as shown in the image below –
      PDF Merger Mac OS X
      PDF Merger Mac OS X

      Alternatively, you can check out this tutorial on How to install .dmg app file on Mac OS X , if you face any problems while installing app on your MacBook Air / Pro or iMac.

    How to Merge multiple pdfs into one using PDF Merger App –

    1. Once, you have successfully installed and launched the PDF Merger App, first of all we need to add the PDF files we need to Merge or combine.  To Add files –  You can either drag & drop the PDF files to Merge  or Click on “Add” button and then select the PDF files to merge as shown in the image below –
      Step 1 - Add Files to PDF Merger Mac
      Step 1 – Add Files to PDF Merger Mac


    2. Step 2 –  Now, after adding the files to the App – We need to decide the order in which we have to combine. Inorder to decide the order, select the file which you want to move & click on the Move Up / Move Down” button to decide the order as shown in the image below –
      Decide the Order of Merge by Move Up / Move Down
      Decide the Order of Merge by Move Up / Move Down

      Thus, you can even customize the order for combining the PDFs.

    3. Step 3 – Deciding output path & file name – Now, we need to decide the file name & output path of the PDF by using the “Combine PDFs to”  option as shown in the image below –
      Combine PDFs to Option for PDF Merge Mac
      Combine PDFs to Option for PDF Merge Mac


      1. First specify the path & file name of PDF file as shown in the above image.
      2. Then click on the “Save” button to save the path.
    4. Now, once you have entered the filename & location after clicking on “Save” button , Simply click on “Start Now” button as shown in the image below –
      Click on Start Now button to Start Combining PDFs
      Click on Start Now button to Start Combining PDFs

      That’s it ! you have successfully Combined multiple PDFs into one on your Mac OS X . If you face any problems or encounter any issues feel free to comment.

  • How to easily Edit PDF files on Android using Xodo PDF Editor Free

    How to easily Edit PDF files on Android using Xodo PDF Editor Free

    PDF or Portable Document Format (PDFs) though are made for transferring documents without loss or edits from source to destination, its however possible to edit them. Though no data can be deleted from existing PDF document, but additional data can be added which is really useful for filling forms and adding signatures. Here’s a small tutorial which will help guide on How to easily edit PDF files on Android using Xodo PDF Editor for Free , besides you can even use Xodo use to add signatures on PDF documents or even annotate them.

    Tutorial on How to Edit PDF Files on Android using Xodo PDF for Free

    • Xodo PDF Editor Homescreen Android
      Xodo PDF Editor Homescreen Android

      First of all , we will need to download Xodo PDF Editor (Free Version) app which we will be using for editing the PDF –

      Click here to Download Xodo PDF Editor for Android from Google Play Store.

    • After installing, and running the app you will be shown a list of PDFs present on your device as shown in the Xolo PDF Homesceen as shown in the image alongside.
    • Now, tap on any PDF which you want to Edit or add text to.
    • Once, you tap on the PDF it will open it , To proceed forward to editing the PDF & adding text click on the “pencil” icon as shown in the image shown below –
      Xolo PDF Edit Option
      Xolo PDF Edit Option

      Tapping on the icon will now open the Edit mode of PDF.

    • The PDF Edit mode of Xodo PDF looks like as shown in the image below –
      Xolo PDF Edit Mode Android
      Xolo PDF Edit Mode Android

      Here in order to edit the PDF click on the corresponding icons as per your desired functions –

      1. Add Text – Click on the “TI” icon as highlighted by the Red Box, You can even select the font size & face as shown by green box.
        Here simply tap on any blank area of the PDF / Form and start typing the text , to add text to PDF as shown below –

        Add Text to PDF on Android
        Add Text to PDF on Android


      2. Highlight / StrikeThrough / Underline Text – Select the Option which you want to perform from the same top ribbon. Now, casually select the text where you would like the operation you selected to be performed on the text from PDF document. After you select option and try to select the text, the correct application of effect should look like as shown in the image below –
        Highlight / Strikethrough on Xodo PDF Android
        Highlight / Strikethrough on Xodo PDF Android


      3. Adding Custom Signature / Sign PDF Documents on Android – Select Signature option from the top ribbon as shown below –
        Signature option - Xolo PDF
        Signature option – Xolo PDF

        Now, tap on any blank space or location where you want to sign, It will open a signature drawer box as shown in the image downside –

        Signature Box on Xodo PDF Android
        Signature Box on Xodo PDF Android

        Once you have drawn your signature , Tap on the “Add” button.

        That’s it! your signature will be added to the document as shown below –

        Signing PDFs & Editing PDFs on Android
        Signing PDFs & Editing PDFs on Android


    Thus, you can now easily Sign PDF Documents, Edit existing one, Perform text manipulation such as Highlighting, Strikethrough all for free in split seconds on your Android. Xodo PDF Editor supports all android versions for editing PDFs such as Kitkat (4.4) , Lollipop (5.0) , Marshmallow (6.0) and even Nougat too. Happy editing!

  • Top 7 Free Indian Live TV Apps for Android to Watch Live TV Channels Online (Streaming + Catch Up)

    Top 7 Free Indian Live TV Apps for Android to Watch Live TV Channels Online (Streaming + Catch Up)

    With the advent of 3G, 4G High-Speed data services the video consumption & demand for live tv channels streaming is high. Also with services such as Jio Play or Jio TV coming up, many other such free services have also come up. The following Live TV apps not only provide online live tv channels streaming, but they also provide previous days catch-ups. So, if incase you missed any episode, you need not worry again. So here are the Top 7 Free Indian Live TV Apps for Android to watch live HD TV Channels online –

    App # 1 –  Ditto TV

    Ditto TV For Android
    Ditto TV For Android

    Ditto TV is owned by ZEE Entertainment, which is the reason it has the most number of channels and is a good alternative to Jio TV to watch Indian tv channels live .

    Ditto TV provides live tv channel streaming for all major channels such as  Colors HD, Sony , SAB , & (and tv),  Zee TV + streaming guides too so that you can easily check which channel is trending and tune in to the currently trending program.

    Note – Ditto TV doesn’t has any Star network – hindi channels as their rights are solely held by Hotstar.

    Besides, these Ditto TV also provides catch-up of your favorite shows of upto 7 previous days, so incase if you even miss an episode or two you can directly stream the Episode via Ditto TV app.

    Whatsmore? Ditto TV is free to use for Airtel Subscribers and is bundled with My Airtel app, while all other subscribers too can watch non-HD channels for Free!

    Ditto TV worked really well for us without buffering even on our slow Wifi connection.

    Click here to download Ditto TV for Android from Google Play Store.


    App # 2 – Jio TV

    Jio TV on Android
    Jio TV on Android

    Jio TV is perhaps the most youngest & dynamic entry in this list. If it wasn’t just restricted to Jio users then probably it would have been on the first place!. Jio TV works on Jio 4g and provides live TV channel streaming of over 300+ Indian TV channels.

    The app not only includes live streaming of number of channels but it even includes an unlimited catch-up of channels unlike the 7 day limit in Ditto TV. Thus, its practically a library of a complete streamable tv serial season right in your pocket.

    Jio TV provides live tv channel streaming & catch-up even for local language channels, however the recorded catch-ups aren’t available for Movie Channels & Sports channels.

    Also , Like Ditto – Jio TV does not stream any Star Network – Hindi Channels :  Star Plus HD, Life Ok , Star Sports 1 , 2, 3 as it doesn’t hold rights for them which are solely held by HotStar

    But, Jio TV won’t let you get bored even an inch considering the vast number of channels it has –

    Click here to Download Jio TV app from Google Play Store 


    App # 3 – HotStar

    HotStar on Android
    HotStar on Android

    There is No Alternative to Hotstar when it comes to Streaming Star network channels on Android. Indian TV Channels such as Star Plus HD, Star Sports 1, 2, 3 or Life OK etc are owned by Star India .

    No App except HotStar provides either free or recorded streaming of the above Star India channels – Star Plus , Life OK etc.

    Thus, in-order to watch Star India channels or to watch live Sports match streaming from Star Sports Premium – HotStar is the only alternative.

    HotStar is free to use, with a delay of one day to watch tv serials and a delay of 5 mins in case of live sports streaming. The premium version of Hotstar is free of all such limits.

    Thus, this makes it really unique and helps HotStar occupy the third position.

    Click here to Download Hotstar app from Google Play Store


    App # 4 – Yupp TV

    Yupp TV for Android
    Yupp TV for Android

    Yupp TV gives a neck-to-neck competiton to Ditto TV & Jio TV when it comes to offering Live tv streaming and catch-up services.

    Like Ditto TV & Jio TV Yupp TV gives online live tv channel streaming of over 200+ channels, and provides catch-up or recorded tv shows of previous episodes.

    The only reason we kept it at the 4th position is due to the lesser number of free channels as compared to the first 2.

    Besides, these Yupp TV does a fine job indeed of streaming live channels and providing streaming of recorded catch up of previous episodes on your Android.

    Tip – If you download Yupp TV via our download link – You Get Free Rs.50 Bonus & a Free 14-day Subscription !

    Click here to Download Yupp TV app for Android from Google Play Store.


    App # 5 – Ozee

    Ozee app for Android
    Ozee app for Android

    Ozee is yet another online live tv channel streaming app made by Zee Entertainment Ltd. Though Ozee & Ditto TV both are owned by Zee – OZee only concentrated on “Zee Channels group – Zee Tv, & TV (and tv) ,Ten Sports , Ten HD etc” while Ditto TV is an omni-channel one.

    Ozee does a great job in providing live streaming of channels such as Ten HD , Ten Sports which are a bit rare on other apps.

    Besides, these Ozee even provides live & recorded tv shows of Zee TV HD , Zee Regional channels .

    It even provides the Streaming of Movies & Music Owned by Zee Entertainment and thus is a good companion .

    Click here to Download OZee TV app for Android from Google Play Store.


    App # 6 – SonyLiv

    SonyLiv app for Android
    SonyLiv app for Android

    SonyLiv is typically concentrated on providing streaming of Sony Entertainment Television Ltd or (SET) Contents .

    However, the number of contents which can be seen live for free on Sony Liv is very limited (Sony Wah & Sony Mix only) , however a paid subsciption opens all Sony channels.

    The Best part of SonyLiv is that it provides all recorded catch-ups of its hosted shows & events – Thus, you can watch all Episodes of The Kapil Sharma Show from start or the latest La Liga match you missed from the catch-up.

    Thus, this makes it a better deal than Voot but the absence of live sports push it on a lower position than Hotstar or Ozee.

    Click here to Download Sony Liv app from Google Play Store.


    App # 7 – Voot by Colors

    Voot Live TV for Android
    Voot Live TV for Android

    Voot at the time of writing this article seems to be in a beta stage. It tries to do a lot of things but lacks a bit in the power of content.

    Voot provide Catch up of all shows of Colors TV (Big Boss etc), provides live streaming of Big Boss on Android, but the app is only limited to content sponsored by colors.

    The app also has many number of movies, English shows and Cartoon (Anime’s) for kids available for live streaming but the content being in English, doesn’t attract a majority of the common Indian TV using Crowd.

    However, the Buffer free streaming of Voot Videos once loaded even on 2G connections, and the number of app updates hold a good promise.

    Click here to Download Voot App from Google Play Store.


    So, these are the Best or Top 7 Free Indian live tv apps to watch live tv channels on Android phones. If incase if you think we missed out on any app or have any doubts or queries regarding any of the app mentioned above Please feel free to comment.

  • How to use Kronymous to access Tor Network on Chrome Browser & Google Chrome OS (Chromebooks)

    There is no official Tor bundle released for Google Chrome Operating System or Chromebook, neither does the Tor bundle for Windows, or Mac OS X officially supports Google Chrome Web Browser. Many times we might need to access Tor network either to remain anonymous, or to bypass censorship & access .onion sites. Here’s a simple tutorial on How to use Kronymous to access Tor Network & .onion websites on Google Chrome OS or Google Chrome Web Browser –

    Kronymous Tor Client for Google Chrome OS / Browser
    Kronymous Tor Client for Google Chrome OS / Browser

    Pre-Requisites – 

    Tutorial on How to access Tor on Google Chrome OS / Browser using Kronymous – 

    Step # 1 – Adding a Proxy Profile to Google Chrome for Kronymous

    • After you have installed Kronymous and Proxy Switchy Omega, we must create a proxy profile for Chrome to tunnel through Kronymous. We will be creating a proxy profile using Proxy Switchy Omega for the same –
    • Now , lets create a proxy profile using the following steps –
      1. Click on the “O” icon of “Proxy Switchy Omega” and select “Options” from the drop-down menu as shown in the image below –
        Select Options from the drop down menu
        Select Options from the drop down menu

        Now, in the Proxy options which appears make sure the URL in the address bar is –
        chrome-extension://padekgcemlokbadohgkifijomclgjgif/options.html#/profile/proxy

      2. In the above Proxy Settings profile page, please make the following changes as required –
        1. Change Protocol from “HTTP” to “SOCKS 5”.
        2. Change the server to “127.0.0.1”
        3. Change the Port to “9999″.
        4. Thus, your Proxy settings for Proxy profile must look as shown in below image –
          Proxy Switchy Omega Kronymous Tor Settings for Chrome
          Proxy Switchy Omega Kronymous Settings – Click on Apply Changes


        5. Now Click on “Apply Changes” button as shown in the above image.
      3. Now, the Proxy Part is done. Now lets look onto the Step.2 that is connecting to Kronymous.

    Step # 2 –  Connect to Kronymous

    • Launch the Kronymous app from the Google Chrome App Page or new tab page.
    • It will now show a new window saying “Tor Proxy is not running”etc as shown in the image below – . Click on the “Start Tor Proxy” button to start the Tor Proxy connection as shown below –
      Kronymous - Start Tor Proxy Chrome
      Kronymous – Start Tor Proxy Chrome

      It will now, start connection to the Secure Tor Network.

    • Now, Please wait until the image shows “Bootstrapped 100% : done” as shown in the image below –
      Kronymous Successful Tor Connection
      Kronymous Successful Tor Connection

      The 100% mark indicated that the connection is successfully done.

    Step # 3 – Enabling the Tor Proxy

    • Now, Once you have connected to Tor Network, simply open a new window , Select the “O” Omega  icon as shown in the image below , and select the “proxy” profile which we saved in the Step . 1 –
      Select Proxy profile from Omega icon
      Select Proxy profile from Omega icon

      That’s it , now once you have selected the proxy profile simply enter the website address of any .onion site or you can check the status of your Tor connection by visiting the following URL –
      https://check.torproject.org

    • Voila! you will see the message that you have successfully connected to Tor Network as shown in the image below –
      Successful Tor on Google Chrome OS & Browser
      Successful Tor on Google Chrome OS & Browser

      Thus, you can now securely access .onion websites or bypass censorship while remaining anonymous using Tor on Google Chrome