Category: Useful Tools

  • Easily Create Setup / Installer for any Software using InstallSimple Setup creator

    Easily Create Setup / Installer for any Software using InstallSimple Setup creator

    Hey Guys, we at TechApple, post alot of setups and installers for many softwares, ever wondered how to create setup/installer for any software.? in this post, i am going to cover the same Let’s Check out how to easily create a setup / installer for any software.[Windows] and that too without any scripting involved thus no programming language involved! 🙂

    Prerequisites

    • A simple tool / Portable Software – InstallSimple  , which we are going to use for Creating Packaged Software.
    • The Folder/Software of which you want to create Software.
    • This Tutorial 🙂 that’s it 🙂
    • You can download InstallSimple from here . Click here to download InstallSimple Setup Creator [Just 355kB].

    Method to Create/Setup using InstallSimple

    • Open InstallSimple.exe from the Downloaded zip file, you will be greeted with an image as follows , Click on Next to Continue.
    • After Click on Next you will be shown a window asking you to Enter the Window Title and Project Name, Fill in The Window Title – The text you want to show on title bar and the Name of the Software in Project Name and click on Next.
    • Now a dialog box will appear with a Message Text Label and a textbox , in the textbox enter the Custom Text/Greeting text which you want to show when setup starts and click on next.
    • Now a dialog Box will appear with label License Agreement, enter the type of license agreement for your software and click on next.
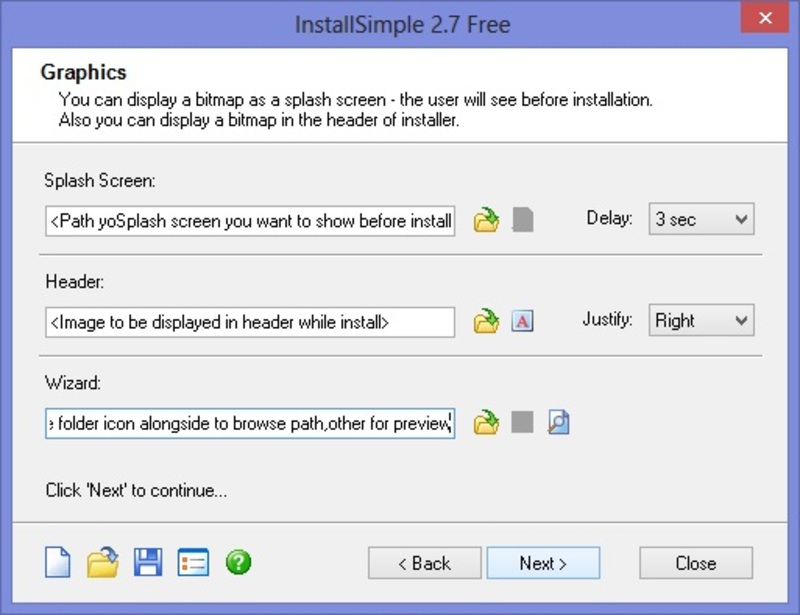
    • Now in this window “Graphics” we can specify the splash screen we want to display before the execution of the setup as well as the header image of the setup window, Click the Folder icon as shown in below figure to specify the path., CLick on Next
    • Now a window “Files to Distribute” / asking you to select source folder of your setup and setup path for your setup will appear, in source folder option click on “Browse” and navigate to the software folder of which installation you want to create and click “ok” , its generally the folder which contains your .exe setup file,and .dll files etc.., select the root folder which contains your software for source folder, and for setup path, enter the folder and location where you want to install your software ex “Program Files”,”Local user drive” etc as shown in the figure –>
    • Now a Window Labelled “Shortcuts” will appear, here select the Files of which you want to create shortcuts and the locations where you can place the shortcut can be selected on the right side pane such as “Start Menu”,”Desktop” etc, after you click on the file of which you want to create shortcut , a yellow/green color mark will appear as shown in the next figure –> After selecting the files for shortcut click on Next., select the Windows Versions and .NET framework check if you want to add., click on next..
    • Now a tab “Windows Registry”  will appear , Enter here any regitry changes you want to make e.x adding PATH variable with setup etc and click on next,
    • Now a Window  labelled ‘Build Setup” will appear! , Simply Click on Build and your Setup will be Ready!! 
    • The Build WIndow looks like this — >
    •  Congratulations!! you have successfully created your Setup! The Setup.exe can be used on Any Machine..

    The Setup itself creates the program registry,control panel and uninstaller inbuilt, so no headaches / extra efforts whatsoever!

    I hope you liked this tutorial, Do share it with your friends, and if you have any doubts/queries feel free to comment! Thanks!

  • Turbo Pascal 7 for Windows 7 /8.1 & Windows 10 [32bit-64bit] FullScreen Single Installer

    Turbo Pascal 7 for Windows 7 /8.1 & Windows 10 [32bit-64bit] FullScreen Single Installer

    Hello Friends, recently while searching on the internet i came across this thing called as Borland Turbo Pascal 7.0 which is an IDE cum Compiler for running and compiling Pascal language .pas files, Although pascal is taken to be one of the dead programming languages, Pascal is still used widely for education purposes due to its similarities with C and easier to understand programming structures and flows.  but as Turbo Pascal 7 doesn’t work on 64bit OS such as Windows 7/8/8.1 and it works small window in 32bit OS , i have created this installer — >  Turbo Pascal 7 for Windows 7|8|8.1 by TechApple.Net

    Salient Features of this installer are

    • Easy to use , and user friendly Borland Turbo Pascal 7 is used and that too runs fullscreen!
    • World’s most preferred Simple Pascal Language Compiler..that too on a single click installer !!
    • Works On All Versions of Windows, Windows 98,Windows 2000,Windows XP,Windows 7 [64 bit as well as 32 bit] As Well as Windows 8 and 8.1 too [both 64bit and 32 bit]
    • No need of installing DoSBoX and configuring or mounting anything! Everything right from DosBox to running turbo Pascal is built-in and the installer processes it automatically!
    • Thus , everything is automatic bundled in a single installer!
    • Useful For Students as well as Teachers and Professionals.
    • You can save the program directly within it,and open it next time From the Software itself for editing/Use.
    • You can Change the Units and TPDU Directories from the IDE if you want to..
    • Easy and Efficient Pascal Programming.

    Download it here –

    Click here to Dowload Turbo Pascal 7 for Windows 7 | Windows 8 |8.1  32bit and 64bit by Techapple.Net

    Mirror Link #1  Click here to Dowload Turbo Pascal 7 for Windows 7 | Windows 8 | 8.1 32bit and 64bit by Techapple.Net

    UPDATE – Now you can even enjoy your favorite Turbo Pascal compiler on your Android phones , check out the below tutorial – Click here to Install & run Turbo Pascal for Android phone or tablet

    Installation Guide :

    Its rather pretty simple,Just Open the installer and simply keep on clicking Next, Just Don’t change the default installation directory “c:\TP7\”

    Screenshots — >

    Successful Installation and Full Screen Working of Turbo Pascal 7 –>


    Successul Compilation of Sample HelloWorld Pascal Program in Turbo Pascal 7 –>


    .


    Support :

    • Double click the Turbo Pascal icon on the Desktop for Execution
    • If it Doesn’t run Full-screen simply give the command “Alt + Enter” To Open in Full-screen
  • Trick to Obtain Direct Download Links for Dropbox Files | Dropbox Direct Link maker Tool – CloudLinker

    Trick to Obtain Direct Download Links for Dropbox Files | Dropbox Direct Link maker Tool – CloudLinker

    In my last post i wrote about Generating Direct Download Links for Files from Copy.com Cloud Storage.
    Direct Links are links which you can simply share through email/blogs/websites on clicking which file download begins without any landing Page. UbuntuOne used to provide this feature earlier bydefault [Now its closing down] and as Copy.Com is not as popular and user-friendly as DropBox – World’s No 1 Cloud File Storage . Many readers asked me if such thing was possible for DropBox..? snd the answer is Yes! Its possible to Dropbox Direct Link  and i coded a simple tool – CloudLinker for the same !  well you can even do it manually , Just keep on reading to get this exclusive trick!

    Trick to Generate Direct Download Links of Files stored on Dropbox.com Simply follow the Steps Below –

    • Get the Dropbox Sharing URL of the file/s which you want to share,it would look like this “https://www.dropbox.com/s/…..”  , if you don’t know how to get the sharing URL , refer the following steps below..Step 1 . Right Click on the Filename which you want to share and now a dropdown menu will appear , as shown in the figure below 
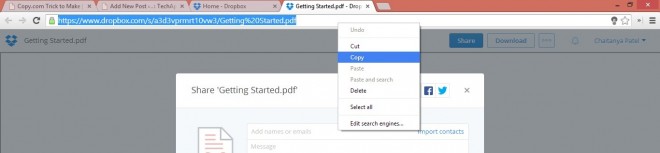
Now Simply Click on “Share Link” Option before the Download Option you’ll get the File Sharing Link which would look like the string discussed above or shown in Picture below –
       This “https://www.dropbox.com/s/…./<filename>” is your sharing URL ..Now Comes the Main Step /Method… 
    • Now , Simply Replace the String “www.dropbox.com” with “dl.dropboxusercontent.com” And your Direct Download Link is Ready!
    • for e.g the Sharing URL looks like “https://www.dropbox.com/s/…../<filename>” now after replacing “www.dropbox.com” with “dl.dropboxusercontent.com” the link becomes “https://dl.dropboxusercontent.com/s/…../<filename>” this link starting with “dl.dropboxusercontent.com” is your direct download link!
    • Pretty Easy isn’t it 🙂

    And For Users who want it readymade, i have created a simple tool – CloudLinker : Direct Link Maker for Copy.com And Dropbox.com
    Features —

    • Simply Enter your Copy.com and Dropbox.com Sharing URL and the Tool Will Provide you / Generate the Direct Download Clickable Links for you.! as shown in the figure —

    CloudLinker Works Nicely and Sound for both – Copy.com as well as DropBox.com Shared URL’s , it will be getting other cloud supported soon

    Update – CloudLinker v3.0 has been launched Online – Click here to Start Generating Direct Download Links using CloudLinker tool

    (The Online Version is based on a new Exploit if you want to use the Old Exploit, you can use the manual method )

    You can Download CloudLinker v1.0 By Clicking this Link


    Do Comment and share your views on this 🙂 and if you liked this post, Please Do Share so that your friends too can enjoy this Awesome Trick!

  • 3 Ways to use Telegram on PC! | Run Telegram on PC/Windows/Linux without any Android Emulator !!

    3 Ways to use Telegram on PC! | Run Telegram on PC/Windows/Linux without any Android Emulator !!

    A new instant messaging app has hit the Smartphone market recently,and is making great news especially after Whatsapp was bought by Facebook, The Name of the Instant Messaging app is Telegram.

    What is Telegram/how is it different?
    Telegram may be defined as a clone of Whatsapp,with enhanced features,more security and privacy settings and more facilities as compared to whatsapp.

    Features :

    • Familiar Simple User Interface inherited from Whatsapp.
    • Group Chat can be done simultaneously with 100 people. [Whatsapp maximum limit is 50]
    • Allows sending of Documents and files. [Whatsapp doesn’t allow any documents/files sending]
    • Photos and Video sending size upto 1GB. [whatsapp limit 512MB]
    • Open Source and Cloud Based.
    • Allows you to change your privacy settings,last seen,etc.
    • Messages are encrypted with highest standards and no logs are saved on the server so your chats are completely private!
    • Still, if you are not happy you can even send Encrypted QR messages which only can be decrypted by the Receiver..
    • And All these features are Ad-Free and Free to Use forever,unlike Whatsapp which charges Subscription Fees…

    So, Now 3 Ways you can install and Use Telegram on PC

    Way – I

    1.  TDesktop [Telegram for Windows] [Windows/Linux] :  tdesktop is unofficial Telegram Client for Windows, it comes with a simple setup file, which you can download and setup as any other windows software by specifying directory and clicking next,next!, your telegram for windows [tdesktop] will be installed ,and you can now put number and register. Linux users can use it directly in Wine! it works on all versions of windows 7/8/8.1/XP

    Click here to Download the Telegram for Windows Client / TDesktop

    Instructions :
    now you can locate the shortcut on your desktop. Open the telegram PC app, and..
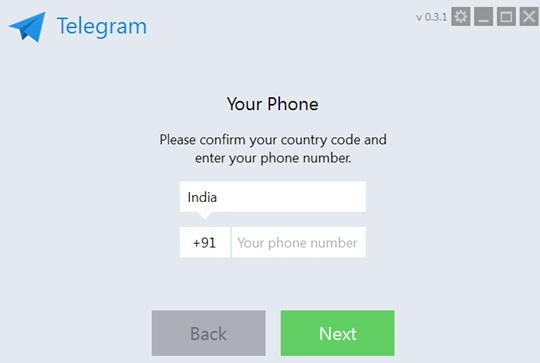
    Now, Enter your Country Code and Mobile Number and Click on Next, you will receive verification code on your number, now put it inside the tDesktop App and yo!  you can start chatting using Telegram

    Way – II

    2.Google Chrome Extension/ App  [Windows/Linux/MAC/Chrome OS] :  If you are not interested in installing the tDesktop client and want to use Telegram in Google Chrome, you can do it too, just install the Webogram Chrome extension from here and follow the same mobile number verification steps to use Telegram.

    Click here to Download/add Webogram [Telegram] Google Extension/App

    Way – III

    3. in your browser Direct/Simple URL  [Window/Linux/MAC/Chrome OS] : Now if you feel lazy and don’t want to install neither Windows client nor Google Chrome Extension , you can Simply type or Go to this Online Webogram URL to load Telegram directly in your Browser!! Simple and efficient isn’t it ?

    Go to this URL to load Webogram right in your Borowser

    http://zhukov.github.io/webogram

    or you can CLICK HERE to load Telegram in your Browser itself!

    here’s a glimpse of Telegram in my Browser : Google Chromewebogram

    So, Lets Enjoy this New,and Opensource Messaging app 🙂 Do like and Share this post if you liked this, else if you have any complaints/suggestions or require any help Feel free to comment 🙂

  • StarCron Browser v1.0 For Windows – Free Unlimited StarSports.Com Streaming !!

    StarCron Browser v1.0 For Windows – Free Unlimited StarSports.Com Streaming !!

    Hello Guys,
    well most of you must have heard about starsports.com : the leading online service for worldwide Sports Streams, well it provides an Official Free Preview of its Streams to the Users for First Ten Minutes Only 🙁  later on,to view the streams we either have to subscribe premium packages or have to go for unofficial and risky streams which may contain malware and such things 🙁

    So,in order to overcome these limitations of StarSports.com We introduce the StarCron Browser for Windows..!!

    Now, lets have a look on the features of StarCron Browser –

    Features

    • In Built Ad-Blocker to Fight and Block those Nasty Ads.! you don’t love them,we don’t love them either 😀
    • ‘Unlimited Sports Events Streaming through StarSports.Com such as
    1. Cricket
    2. Football
    3. Hockey
    4. Lawn Tennis
    5. Table Tennis
    6. Golf
    7. and Many more through StarSports.Com
    • Can,be perfectly used as a Normal Browser too,thus serving the purpose of 2-in-1 🙂

    You can Download The StarCron Browser v1.0 from here–>

    Click here to Download StarCron Browser v1.0 For Windows

    Procedure / Method for using Unlimited StarSports.com Streaming Matches

    • Install StarCron Browser v1.0 For Windows
    • Now Navigate to The site www.StarSports.com and select the live stream which you want to view. [Note : The stream must be available in your country for you to view,if it ain’t available try changing your IP address to get your desired stream]
    • Now once you start with your live stream you will be Given “FREE PREVIEW OF 10 MINUTES” We are Going to increase these 10 minutes to unlimited using StarCron Browser..!
    • Now,after your free preview of 10 minutes is end,or done over with simply right click in any blank area of the WebPage of your Stream and select the option “Apply hack for StarSports.com by TechApple.Net” which is the fourth option as shown in figure..

    starcron

    • After clicking it will display a message “Hack Successfully Applied”,in bottom left corner of your screen..!
    • Now Simply Reload the Page!! and voila!! 🙂 Your Free Preview has been Extended !! 🙂 😉
    • Repeat these steps to get Unlimited High Quality Streaming of your Favourite Sports Videos! on starsports.com!

    You can Download The StarCron Browser v1.0 from here–>

    rp_large-downloadnow.png

    Click here to Download StarCron Browser v1.0 For Windows

    Mirror Link #1 Click here to Download StarCron Browser v1.0 from Mirror #1

    Mirror Link #2 Click here to Download StarCron Browser v1.0 from Mirror # 2

  • TiCTeX – All in One LaTeX Bundle-installer with inbuilt Compiler and IDE/Editor | Easy install LateX on Windows/Linux/Ubuntu

    TiCTeX – All in One LaTeX Bundle-installer with inbuilt Compiler and IDE/Editor | Easy install LateX on Windows/Linux/Ubuntu

    Hello Guys, recently i had to submit a seminar report in my college, but it was to be written in LaTeX.. Now what is LaTeX ?

    • LaTeX is a document preparation system and document markup language,used for preparing standard documents,which are preformatted , in an efficient and easy manner..

    So Now for installing LateX on windows it was quite difficult as it required a separate latex compiler,a separate IDE etc,and also the information regarding which compiler to be used,which IDE/editor should be used etc,is very scarce..so using the Best LaTeX Compiler available : MiKTeX,   Best LaTeX editor : TeXMaker  and various other simple tools required for Preparing LateX, we created TiCTeX : An All in One LaTeX Bundle cum installer with inbuilt MiKTeX,TeXMaker IDE/Editor TiCTeX has the following Components inbuilt in it

    • MiKTeX : The Best Compiler with all the Libraries required for LateX Document creation.
    • TeXMaker : The Best,efficient and most widely used editor cum compiler for writing and creation of Latex documents,with inbuilt PDF Viewer.
    • Asymptote : used for photoand diagram related functions and viewing.
    • GhostScript : An Engine for rendering and viewing .ps and .pdf File formats.
    • GSViewer : A viewer for viewing the .ps and .pdf File Types.

    All this have been bundled up in a Single Package cum Bundle :-> TiCTeX so you can just install TiCTeX and start using and creating documents in LaTeX as simple as 1…2…3.. Everything is included in TiCTeX..so it will run on basically any Windows Operating Systems : Windows 98 / XP / as well as Windows 7 / 8 /8.1 that too on both the 32 bit and 64 bit Variants.. as well as on Linux Too!! UPDATE!! Fixed a Critical Bug in the Previous Version which was causing Compilation errors 🙁 Please Download the New Version From Below Links.. Also Launched a Linux Version of TiCTeX LateX at this LInk CLick here to go on Linux Version – TopLinuxApps.com   Click here to Download TiCTeX For Windows ..one click one bundle solution for LaTeX on Windows OSs

    Click here to Download TiCTeX for Windows

    Mirror Link # 1 Click here to Download TicTeX from Mirror 1. Mirror Link # 2 Click here to Download TicTeX from Mirror 2. More Mirror Links will be added soon..! if you have any doubts/queries/request do comment..and if you liked this post Do share 🙂 Thanks!

  • Installing and running Microsoft Visual Basic 6.0 On Windows 7/Windows 8 [x32-x64 : 32bit-64bit] with all features!

    Installing and running Microsoft Visual Basic 6.0 On Windows 7/Windows 8 [x32-x64 : 32bit-64bit] with all features!

    Hello Friends,recently i had to do some college Project in Microsoft Visual basic 6.0 + Oracle SQL Connectivity, but the hell Microsoft Visual Studio wasn’t simply installing on my Lappy, so after a few hit and misses at the goal, i have found the Foolproof Method for installing Microsoft Visual Studio on your Windows 7 and Windows 8,Windows 8.1 installations that too on both the 32 bit and x64:64-bit releases of Windows 7 and Windows 8 There are a lot many reasons which are responsible for installation of Visual Studio/visual basic 6, prominent of which are

    • Compatibility Issues
    • Microsoft Java Machine issues
    • Installer/Setup run-time issues
    • and some problems which ares pecific like unable to use visual Basic components such as ADODC,OLEDB,ADODB,RDO Connection problems etc

    Lets solve each of them one by one in Detail.. 🙂 but before that , there are some prerequisites which we must implement so as our setup will be much smoother… Prerequisites

    • During visual studio 6 Installation, it may ask you to install Microsoft Virtual Machine For Java,etc..and it may restart your computer continuously..so as a fix, simply Download the Following Ms-Java.bat file,and simply right click on it,and “Run it as administrator”,it will ask you for a confirmation,please select yes,it will open a box,and close that’s it!
    • Now,The visual Basic 6 Setup wont prompt you to install virtual machine for Java,thus removing a hurdle!
    • Click here to Download Ms-Java.bat  file for bypassing Microsoft Virtual Machine For Java..
    • Now lets look at the Setup! The link to torrent file of vb6 setup if you do not have it is here..>

    The First Problem which we encounter during setup is compatibility issues

    • This Problem can be solved by running the setup.exe of the visual basic 6 setup,by right click and selecting “Run as Administrator”  option..
    • it may show a dialog box like this — > fortunately,this Problem will Be Solved by simply clicking the Run Program and the Setup Started.. 🙂 , as you are running the setup,its possible that setup might become too very slow on places such as “searching for installed components” , “finishing installation” etc..dont worry its,totally normal! just wait for the setup interface to come up 🙂
    • Now you may simply Enter Serial Number,and Follow Next,Next Method of Installation and install Microsoft Visual Basic/Miscroft Visual Studio on your computer..BUT!!  if you follow this Method your Installation of Visual Studio will work,but on 64-bit (x-64) OS,Windows 7 64 bit,Windows  64-bit when you try to use Visual Basic components such as Data Grid,Active X controls,ADODC Connections,ADODB Connections for VB-SQL Connectivity it will give error..
    • The errors vary to a wide range depending upon the components selected and will be something as — ” failure to initialize provider,error 420,error 482,as well as the printer errors ” blah blah blah
    • So, in order to Make Visual Basic- Oracle SQL Connectivity we must do the following steps..
    • Please Make sure while installation/setup your Visual Basic installation directory is” C:\Program Files\Microsoft Visual Studio 6\common\” or  “C:\Program Files\Microsoft Visual Studio 6\” and NOT“C:\Program Fiiles (x86)\Microsoft Visual Studio 6\common\” or “C:\Program Files (x86)\Microsoft Visual Studio 6\common\”

    Steps for Visual Basic – Oracle SQL Connectivity on Visual Basic 6 For 64 bit OS..!

    • The (x86) suffix at the end of Program files is responsible for the failure of various visual basic components such as data grid,ADODB,ADODC,OLEDB,Active-X,RDO,Printer Connectivity,windows common controls etc..

    you can check this figure–> if it isn’t you may change the installation directory by clicking “Change Folder” or “Change Directory” as shown in the figure –>

    • Thus,we can make it Function Properly By Installing it to Default Program Files Folder..And All the Data bound controls,standard controls,added components to VB such as ADODB,OLEDB,Data bound grid control etc properly,Windows Controls,MAPI Controls Properly..!

    Also if you already installed Visual Basic To Program Files (x86) just dont uninstall Please.. simply Perform the Following steps

    • Copy the Complete Microsoft Visual Studio Directory From c:\Program Files (x86)\ to C:\Program Files\
    • Now Go,to the Folder C:\Program Files\VB98\ andtry to run VB6.exe , it will give error as “Failed to register extension and blah blah”
    • Now simply run the “VB6.exe” from the non-x86 folder in “Run as Administrator” mode,. and voila!! Visual Basic Will Start Working,and all the Default Connectivity,Data Components which can be added from tools->components menu such as ADODB etc will start working!! thus , the VB-SQL Connectivity too will start Working!! 😉

    If you Encounter Sluggishness in IDE do the Following Steps 🙂

    1. Using Windows Explorer, browse the location where you installed VB6. By default, the path is:
      C:\Program Files (x86)\Microsoft Visual Studio\VB98
    2. Right click the VB6.exe program file, and select properties from the context menu.
    3. Click on compatibility tab
    4. Check the following check boxes: For Windows 7:
      • Run this program in compatibility mode for Windows XP (Service Pack 2)
      • Disable Visual Themes
      • Disable Desktop Composition
      • Disable display scaling on high DPI settings

      For Windows 8

      • Run this program in compatibility mode for Windows XP (Service Pack 2)
      • Reduced Color Mode (16-Bit Color)
      • Disable display scaling on high DPI settings
    5. After saving open up VB6, It should work normally

    That’s all! a quite-lengthy tutorial indeed! 🙂 But Totally Working! if any Doubts/Problems Just drop a Comment below 🙂 thanks!

  • ByteBX Zip And Download Trick! Enable Premium Zip And Download Feature your free account using this Script 🙂

    Hello All,

    You Must be Knowing ByteBX, The Online torrent leech/torrent caching,remote url uploading service ,
    its a great service to say,but its free account has some limitations 🙁
    like 100kB/s speed limit,which literally sucks ! 🙁

    so to overcome the same,we launched Bytzo Browser Series,and they are working too perfectly!
    but unfortunately some jealous and unehtical guys copied our script and were re-distributing the same,with changed browser name/rebranding it under their name..that really hurted me 🙁
    so am deciding to publicly share the script atleast the users will come to know what kind of hack it is,as well as they could enjoy it on their own personal browsers google chrome,firefox,internet explorer etc, and you can use them on any os e.g linux,windows,mac unlike bytzo browser which was windows specific…

    Prerequisites :

    Now After you have installed these extensions simply Navigate to this URL of Userscripts.org

    And install the extension ByteBX Premium userscript,

    Now after you install the userscript,simply Go to www.bytebx.com and  log-on to your free account,The Zip and Download Option will be enabled for full-speed on your browser! 😀

    Enjoy This ByteBX Zip and Download trick and do share our page with your friends too,so that they too will Enjoy ! 🙂

  • GNU Octaves Installer For Windows XP/7 And Windows 8/8.1 [32bit and 64bit variants]

    Hello Guys, You must be knowing about GNU Octaves – A High Level Programming Language Generally Used For Numerical Computations, it Provides a Command Line Interface so that Mathematical Functions can easily be performed..
    But Alas! The Recent packages of the gnu octaves are only built For Linux,and when it comes to windows, there isn’t an installer Package available,but Rejoice.! We have Created one Gnu Octaves installer for Windows with Inbuilt MinGW libraries required for the Soft : GNU Octaves For Windows

    You Can Download it Here —>

    Click here to Download GNU Octaves For Windows Installer

    Alternative Link : To Download GNU Octaves For Windows Installer

    Features Of The Installer : – >

    • Works On All Versions of Windows – Windows XP,Windows 7,and Windows 8 too [Both 32 bit and 64 bit Variants of all Windows 🙂 ]
    • All the MinGW Libraries inbuilt 🙂 so no need of any installation of Linux/cygwin to run GNU OCtaves
    • In-built GNU Plotter, so that the you can plot automatically Graphs,Waves And Functions
    • in-built Notepad++ as Default Text Editor 🙂
    • Notepad++ provides a colorful GUI so that you can type the program with ease,and silly mistakes are reduced…
    • Provides Command-Line Interface same as Terminal in Linux 😀


    Instructions For Use :

    •  If You are using Windows 7 or Windows 8  Please run the Executable as “Run as Administrator” by right -clicking on the program icon and selecting run as admininstrator option in the menu,it is shown in below figure
    • Now you will see a black terminal as shown in the below figure,now for writing the program in gnu octaves, simply type as”edit <your program name.m>”
      without quotese.g if i want to create a program ucos.mi will write –> edit ucos.m
    • Now Hit Enter, you’ll see Notepad++ firing Up on your screen, Now You can type your program between the function name and enfunction tag, it as shown below — >

      Writing A Program in GNU Octaves
    • The GNU Plotter too works so that you can view,Graphs And Waveforms of Functions.. it is as shown below –>

      GNU Plotter inbuilt
    • Hope,This Works For you too, It worked For Me on Windows 8!!
      Do Keep Commenting and Sharing this post To Your Friends 😀
    • Any Problems/Doubts Do Comment here 🙂
    • You Can Download it Here —>Click here to Download GNU Octaves For Windows InstallerAlternative Link : To Download GNU Octaves For Windows Installer