Category: Linux Tutorials

  • Tutorial – Install/Setup Genymotion Android Emulator on Linux [Ubuntu/LinuxMint/Fedora/ArchLinux]

    Tutorial – Install/Setup Genymotion Android Emulator on Linux [Ubuntu/LinuxMint/Fedora/ArchLinux]

    In our previous post, we had discussed about the Best 5 Android emulators for Linux . Many asked us for installation instructions for installing Genymotion on Linux, so we have come up with this tutorial to install Genymotion – the present-best Android emulator for Linux. I have tried and tested this tuorial for Ubuntu and LinuxMint but it should work for all Linux distributions

    Tutorial for Installation/Setup of Genymotion on Linux –

      1. Genymotion requires VirtualBox to be installed on your Linux System for it to run , To learn/install VirtualBox on your machine, you can read the post about it present here . Procedure to Install VirtualBox on Linux .
      2. Now, for Deploying Android Machines on Genymotion we need an account on genymotion cloud, which can be freely obtained by signing up at this Genymotion Cloud Sign-up URL.
      3. Now , first we have to download Genymotion , After Signing up, please logon to the Genymotion site and Download the Genymotion machine renderer from here , depending upon the Linux distro and build you are using [32 or64 bit].
      4. Now go to the Terminal on your Linux by menu or by typing “Ctrl+Alt+T”.
      5. Now in the Terminal , Navigate to the Directory where the downloaded Genymotion image is present [Let’s consider the image downloaded is present in the Downloads folder] , Now type these commands in the terminal.
      6. cd ~/Downloads/

        chmod +x genymotion-2.1.0_x64.bin

        ./genymotion-2.1.0_x64.bin
        
        
      7. Now, Genymotion will be installed as shown in the figure below
      8. Now , run Genymotion from the VirtualBox or from the Menu. Alternatively, you can run it from the terminal by executing
        /home/handbook/Downloads/genymotion/genymotion


    1. Now Genymotion pops up, there login with the Genymotion account we registered earlier,and click on Create New Virtual Device or the “Add”  button.
    2. You will see various Android Images listed as follows , select the one you want to emulateand click Next
    3. The Android image , will now be downloaded to the machine and saved for future use, after its downloaded , Just select the Android image which is present on your system and click the “Play”  button.
    4. Your desired Android Image will be implemented , Now you can Play Games, Install Whatsapp etc and do anything with your Own Linux Device right on your PC :).

    I hope , the tutorial was clean and clear, however if you face any issues/encounter any problems, Please do comment we would be glad to help :).

  • 3 Best Apps to Record Screen in Linux|Capture Screen Videos / Screencast in Linux easily! Ubuntu,Fedora,LinuxMint,ArchLinux etc

    3 Best Apps to Record Screen in Linux|Capture Screen Videos / Screencast in Linux easily! Ubuntu,Fedora,LinuxMint,ArchLinux etc

    Recently, i had to record some tutorials on my linux machine, but i found out that there are only a few rare options to record screencasts [screen videos ]in Linux / Ubuntu [LinuxMint is based on Ubuntu] , hence i came up with these three Best and Awesome apps to record screen linux . These apps are easy to use and easy to  install as well plus they work on all major linux distros such as Ubuntu/LinuxMint/Fedora/ArchLinux etc. Let’s have a look on each one of them one by one.

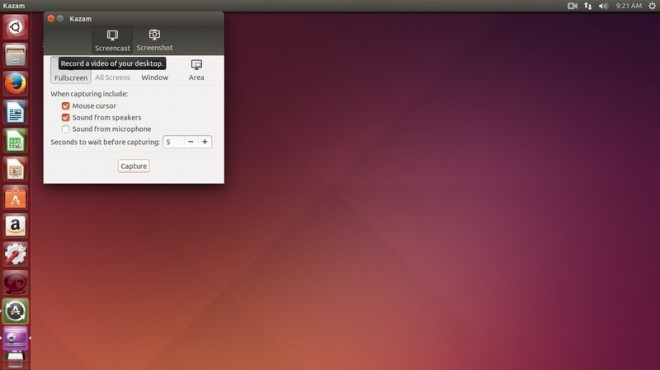
    App 1 . Kazam Screencaster


    This app may be called as the best screencast recorder or Screen video Recorder for Linux ! I  found out some really interesting features of the app such as

    • Kazam is really very easy to install and setup .It is available on almost all linux repositories i tested it from Ubuntu 11.04 to Ubuntu 14.10 . Simply type the “sudo apt-get install kazam” if you are using Ubuntu based distro such as Ubuntu/LinuxMint/etc or “pacman kazam” or any package get command according to your distro , kazam will be surely there!
    • It also enables to select the area to be recorded be it a particular window/particular screen area or complete screen! Kazam allows it all.
    • Its really lightweight and works superbly on my Virtual Machine too.
    • You can check out the Download Instructions[Steps]/Working Demo / Tutorial for Kazam here.

    App 2. Simple Screen Recorder


    SimpleScreen Recorder is yet another fantastic App for recording screencasts on Ubuntu , it allows easy recording and is based on qt , thus works very smoothly , some of its unique features include

    • Record OpenGL apps directly, without any extra required codecs/filters.
    • Automatically reduces frame rate on slow computers.
    • Pause/Resume the Video recording anytime.
    • Optional audio recording , if audio is not the Priority.
    • Specify the Codecs / Encoding to be Used for Recording the video.
    • Not only this, but the main app lets you keep an eye on the increasing file size, memory size,frame rate,time,thus enhancing the usability !

    To install SimpleScreenRecorder on your Linux/Ubuntu enter the following commands in the Terminal

    sudo add-apt-repository ppa:maarten-baert/simplescreenrecorder
    sudo apt-get update && sudo apt-get install simplescreenrecorder


    If you are using Fedora or any other distros you can get the Pre-built builds from here .

    App 3 . RecordMyDesktop


    This app “RecordMyDesktop” is yet another Free Screen Recorder / Screencasting app for Linux , It also supports recording the Screen in various Video Formats and sizes as well as window recording . The App also supports pausing and resuming the recording of Screencast ., but the only drawback was its lag on the Virtual Machine, thus indicating its more hardware dependent , but overall its another small size tool which can be used for Recording Screen.

    RecordMyDesktop can be downloaded from the Default app Directory / App Center of Ubuntu/Arch/Fedora. If not available,you can use the command
    “sudo apt-get install recordmydesktop” from the terminal to download and install RecordMyDesktop

    Besides these three you can also use tools such as “DemoRecorder – Linux”[Adware], “Xvidcap” [Works on 32bit Distros Only],”VLC”,”ffmpeg”[lag in UI] to capture the ScreenVideos or Screencasts but because of the Bracketed Cons i don’t recommend them,If you encounter any problem while downloading/installing/using any of the apps mentioned, feel free to comment 🙂 and also if you know of another screencaster app for Linux, Do let us know !

  • 5 Best Android Emulators for Linux | Run Android Apps on Linux Ubuntu,LinuxMint,Fedora,ArchLinux,OpenSUSE,Mageia,CentOS etc

    5 Best Android Emulators for Linux | Run Android Apps on Linux Ubuntu,LinuxMint,Fedora,ArchLinux,OpenSUSE,Mageia,CentOS etc

    Hey Guys, as you know the Smartphone market is dominated by Android OS – which itself is an operating system designed / based on the linux kernel , but unfortunately the Android Emulators for Linux itself are quite less as compared to windows counterparts 🙁 . so let’s have a look on the 5 best  Android Emulators for Linux to run android apps and play android games on Linux -Ubuntu,LinuxMint,Fedora,ArchLinux etc

    1. Genymotion 


    Genymotion – This is probably the Best Android emulator when it comes to Linux Platform due to some unique abilities present only in genymotion, Features of Genymotion are —

    • It allows us to easily Download pre-configured Android Images of various Android Versions and various Android device images such as Nexus 7,Galaxy S2,Galaxy S3 etc directly on our emulator.
    • It also allows us to configure the amount of resources e.g RAM ,harddisk to be allocated to the Android device / Emulator. Great feature if  limited on hardware resources.
    • Genymotion directly supports networking through ethernet /Wi-Fi , emulates your connected connection directly so it use internet directly in the emulated android.
    • ADB Support and it also supports OpenGL hardware acceleration so  your Android device works fullscreen and thus enhancing your experience while playing android games on your Linux!
    • It Also supports drag and drop file transfer to the emulated SD Card 🙂 , supports Gyroscope,Light and accelerometer sensors too.
    • You need an account on Genymotion Cloud – to Download and deploy Genymotion android device —
    • Click here to register on Genymotion site and download Genymotion for Linux [32 bit as well as 64bit].Note – Oracle Virtual Box must be installed on your Machine for Genymotion to work! , installing Virtual Box On Linux is covered at the end of this post 🙂
    • Installation instructions for installing Geanymotion on Ubuntu/Archlinux are available here.

    2.Andro VM


    AndroVM is the Parent Project of genymotion – nevertheless it still works and works awesomely! and the best thing about Andro VM is that the android machine is deployed offline on your PC unlike Genymotion where it is deployed on your PC through cloud, thus you can use Andro VM to install Android Emulator on your linux even offline

    • another striking feature of Andro VM is that it supports hardware OpenGL rendering through Virtual Box.
    • Virtual Box must be installed on your Linux OS for Andro VM to run , check end of the post for Virtual Box installation tutorial .
    • AndroVM supports Net Sharing from guest to host , the internet sharing as well as Installation tutorial for Andro VM is available here at their blog — > Click here for AndroVM installation tutorial
    • AndroVM can be downloaded for both 32bit and 64-bit Linux Kernels from here –> Click here to download Andro VM Virtual Box image for Linux.

    3. Andy Android Emulator by Andyroid.net – Andy OS

    • Although, yet in Beta at the time of writing this article – ANDY OS Android Emulator is pretty much exciting and the best Android emulator for Linux ., being a beta tester i have the access to pre-release features of ANDY , hence i have given it the 3rd place, it  could easily been the first one though!
    • Features of ANDY emulator include Google Play Store support inbuilt, none of the emulator has this feature inbuilt even for Windows builds!
    • Multi-Touch support 🙂 the word explains it all !
    • Use your phone as a controller for controlling / playing the games, the picture alongside explains it 🙂
    • Access the installed apps directly from the Desktop environment!
    • OpenGL hardware acceleration, Camera and Microphone all features supported!
    • You can download the beta version for Linux or the Windows build for Andy from here –> The link will automatically redirect you depending on your OS —
    • Click here to download / Get ANDY OS!

    You might want to check out this new emulator which runs directly inside Google Chrome BrowserARChon! Android Emulator.


    4. Official Android SDK – Android Emulator / AVDs

    • The  Official Android SDK/ Android emulator by Google, has a lot of fans though not me 😛 and is used by default by mostly anyone who wants to develop apps for Android
    • This Android emulator supports all the functions including SD Card support, file transfer et
    • It also supports physical keypad which none of the Android emulators support !!
    • Being developed by Google Engineers you are assured of the quality of product and safety!
    • The Setup of this emulator is the thing which doesn’t impress me much though 🙁
    • An easier setup guide to install the Official Android Emulator can be read here .
    • The required SDK / ADT bundle for Android emulator and plugins can be downloaded from this Google’s Official Page .

    5. Jar of Beans – Wine Compatible!

    • Although Jar Of Beans was developed as an Android Emulator which was Portable for Windows ,it can be run through Wine.
    • It has all the basic support such as APK install, SD Card supports and supports installation of Play Store too..
    • but already Wine being a kind of Emulation environment we wont encourage usage of Jar of Beans on Linux
    • For using Jar of beans for Linux, extract the exe contents of the Jar of Beans.exe file which can be downloaded from here –> , and then by runnint the jarofbeans.exefile with wine .
    • Click here to download Jar of Beans from Google Drive

    Installing VirtualBox on Linux

    • As, we mentioned we need to install virtual box on linux before using Genymotion/AndroVM/ANDY , the eaiest method to install virtualBox on linux is
    • Installing the dependencies by executing  “sudo apt-get install dkms”  in terminal , and then by executing
      sudo apt-get install virtualbox-4.3″ in the terminal! that’s it virtual box will be installed !
    • If it doesn”t get installed you may want to check out this Article.

    Update : You might love it to check out the New Firefox OS on PC – Click here to Configure Firefox OS Emulator on your Linux 

    If you have any doubts/queries/suggestions  Feel free to Comment , we will try our Best to Please you Thanks!