Blog

  • Dreem – The Revolutionary Sleep Solution to Get Quality Sleep

    Dreem – The Revolutionary Sleep Solution to Get Quality Sleep

    We humans are too busy in our daily routine that we hardly get enough time to sleep. Sometimes, too much stress and anxiety don’t let us sleep properly. Often, our sleep gets break in between and then there comes a situation when we have to take the sleeping pills to get a good sleep. But, these sleeping pills can damage our nervous system. A good sleep is really important for a healthy body. If you sleep less, then there is a dire need to find a good sleep solution to improve your sleep.

    Is there any solution to improve sleep?

    The Science & Technology has made a huge progress over the passing years. From an automated human like machine to control over the human brain, everything has been made possible. A neuro-technology company named Rythm has launched has a revolutionary product – Dreem. This product can help you induce sleep without any therapy or sleeping pills. Let us have a brief insight about this stunning product to improve sleep quality.

    dreem asleep

    Dreem – An Introduction

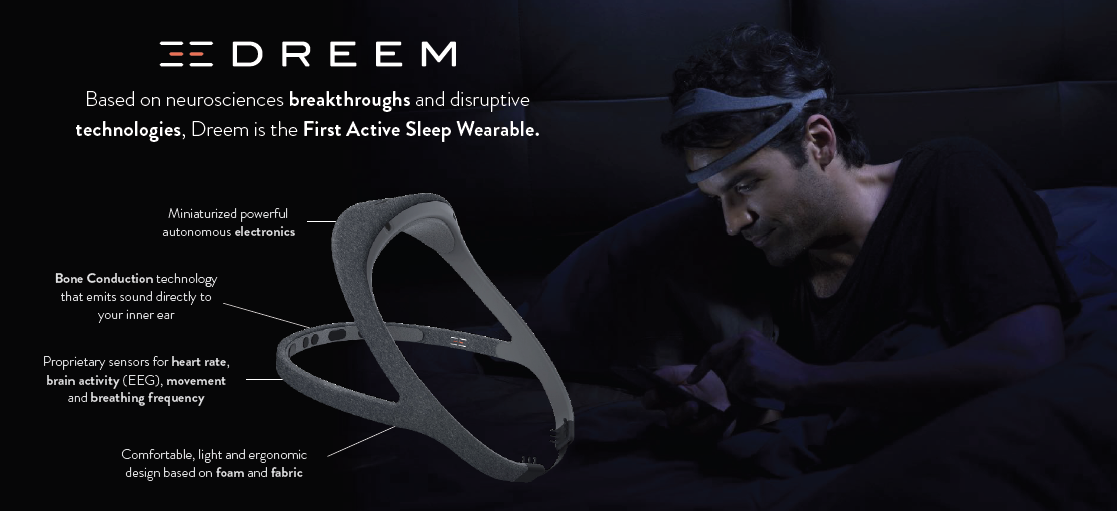
    Dreem is a revolutionary, miniaturized, and autonomous headband that can be used to improve our sleep. It acts as an ultimate sleep solution that analyzes the brain activity and uses the sound stimulation to enhance the quality of sleep in a non-invasive manner. The BETA version of this product has been tested by 500 people and their feedbacks are positive so far.

    sleep header

    How Dreem Works?

    Dreem is a comfortable headband which comes with a smartphone app. It collects the data and influences the behavior of the user in real time according to the data it has collected. This headband is well integrated with different sensors including accelerometer, ECG, and Pulse Oximeter for monitoring and analyzing the brain activity.

    The user just needs to wear the Dreem headband and go to the bed. This device uses the mobile app and Rhythm’s sophisticated algorithms for tracking and analyzing the brain waves while sleeping in real time. When the sleeper is in deep sleep, this device stimulates the sound that improves the sleep quality. There is a huge library of audio programs and exercises which are synced with your psychological state for reducing your sleep onset latency.

    dreem

    The deep sleep usually improves the physical and cognitive performance during the day. You can stay cool throughout the day if you wear Dreem headband while sleeping. The sleep quality has deep connotations on your overall well being.

    well being

    Ultimate Features of Dreem Headband

    The complete Dreem package (Hardware + Software) come up with an exclusive range of features. You will be stunned to use a headband like this one. Let’s learn about some of its powerful features.

    comfort night

    Lightweight and Comfortable

    Dreem headband is light in weight and totally comfortable. It uses the sound stimulations to enhance the sleep quality of the sleeper by closely tracking and monitoring the different sleep stages and activities happening in the body. It uses advanced sensors and electronics for tracking and monitoring. You don’t need the earplugs as the sound waves are transmitted using the bone conduction technology.

    Interface & Wireless Design

    Dreem has got a simple and intuitive interface. It automatically monitors every activity of your body and records them as well. It is a wireless device that can be connected to its smartphone app through Bluetooth. This helps the users to see the history, quality, pattern, and brainwaves of their sleep in the app.

    clocks

    Alarm Clock

    All you have to do is enter the desired wake up time in the app interface. Dreem will wake you up at the optimal sleep stage which is closest to the entered time. It ensures that you are not jarred awake during the unsuitable stage. You can witness the happy mornings avoiding the sleep inertia.

    returing dreem product

    Free Return Policy

    Rythm offers you 30-days free return guarantee. You can but it and try for next 30 days. If you feel the need of returning it, you can request the return within 30 days of making the purchase and get your money back.

    Availability

    Dreem will be made available later this year at a price of $499. It will come up with 1-year warranty and will work with iPhone 5 and above versions and also with Android 4.3 and later versions. You can pre-order it at $399.

    bottom line

    The Bottom Line

    A good quality sleep is really important for human mind to function properly. It promotes overall well being. Dreem Headband by Rythm has emerged as a powerful sleep solution for the sleepers. It enhances the quality of sleep and leverages everyone to live a healthy lifestyle.

  • How to Shoot Background Blur(Bokeh) on Single Camera Phone Android

    How to Shoot Background Blur(Bokeh) on Single Camera Phone Android

    Bokeh Mode or Background blur got more popular with the iPhone 7 Plus which allowed users to focus on the subject with a blur on the background in its Portrait mode. With the New Dual Camera lens Smartphones coming around like Honor 8 Pro, OnePlus 5, the bokeh effect is becoming even more popular. There’s literally no need to purchase a new phone just for the sake of getting the Background Blur effect, in this tutorial we will show How you can Capture Dual Camera-like Bokeh effect photos with Background Blur on your existing single lens / single camera Smartphone.

    Tutorial to Capture Bokeh Effect / Dual Camera like Photos on Single Camera Phones Android –

    • To simulate Bokeh effect or lens blur, we will be using the Google Camera App for Android. We cannot capture Background blur or Portrait mode photos with the Stock camera app.
    • To Install, Google Camera app on your Smartphone you can install it from the links given below –
      Click here to Download & Install Google Camera app from Play Store
      or
      Click here to Download Google Camera Apk for Android
    • Once you have installed the Google Camera app from the above links, launch the app. It will now show a shoot mode screen as shown below –
      Swipe from left to right to bring the Options panel
      Swipe from left to right to bring the Options panel

      Here Swipe from left to right to show all the shooting options available, as shown in the image above. In the options, available Tap and select the “Lens Blur” option as shown in the image below –

      Select the Lens Blur Option in Google Camera
      Select the Lens Blur Option in Google Camera
    • Once, you select the Lens Blur Option , it will show you a small tutorial on How to use the Lens Blur option to capture Bokeh effect photos as shown in the following image – Google Camera Lens Blur Tutorial
    • Here click on the “OK, Got It” button. Thus, basically all you need to do is select the Lens Blur Options, and then shoot the “Object” you want to focus on while raising your phone in an angle. Let’s see how it works –
    • In the Lens Blur capture screen, first tap the capture button as shown in the figure below –
      Click on the Capture Button
      Click on the Capture Button

      Now , Keep on raising your phone until the indicator shown below is full. Be as slow as possible while raising the phone, so that your focus on the object remains constant. Try not to be too fast neither too slow . Check the below screenshot for Indicator –

      Indicator Box of Google Camera Lens Blur
      Indicator Box of Google Camera Lens Blur

      Slowly raise the phone until the above image highlighted box goes upwards as shown in the next image –

      Indicator Box going upwards
      Indicator Box going upwards

      This takes a lot of time to get used to, hence we recommend practicing it on a stationary object before moving onto moving objects. We tried this on our Deodorant can and once we finished the tilt mode. It started focusing our captured photo as shown below –

    • Processing the Captured Tilt Image
      Processing the Captured Tilt Image

      At first, you might think that it hasn’t captured the bokeh background blur, but please wait until the image has been processed. Wait until the “Processing image” marker finishes.

    • Wow! You’re in for a surprise, the Google Camera will now display your captured Bokeh and it will look absolutely stunning as shown in the following image
      Bokeh Effect on Single Lens Redmi Note 3 ? Done!!
      Bokeh Effect on Single Lens Redmi Note 3 ? Done!!

      As seen in the above image the image looks stunningly beautiful and at par with the OnePlus 5 Depth effect or iPhone 7 Plus mode! . Besides, you can even change the refocus by the highlighted option.

    • So, this is how your Normal Single camera phone also can take beautiful bokeh background blur pictures just like Dual lens camera phones. Incase, if you have any queries or are unable to use the app feel free to comment below!
  • BonkLive Review: Free Social Streaming App For Your Android And iOS Mobile

    BonkLive Review: Free Social Streaming App For Your Android And iOS Mobile

    If you love to do online live video chatting sessions with your followers, then you are going to love BonkLive as through it you can earn while doing your favorite thing. Through it, you can make money just by run ads commercials on your live video sessions, or you can also earn while reading out some ads related phase. BonkLive is one of those few platforms which gives its users a chance to earn while doing social networking. Anyone can join it for free using his/her email account or other social networks account through any iOS and Android based device, and it is also available for desktop.

    Concept of BonkLive

    bonklive

    Before moving on to features, part let us clear the concept of BonkLive here. Let us tell our readers how they can earn from it and how it is a better option.

    1)    As we mentioned above users can earn money just by running ads on their live videos. They can also earn just reading some jingles or some lines regarding any brand. Only Bonkified users are eligible to do so, and for that, ordinary users have to clear some levels to become a Bonkified user.

    2)    It is the best way for an influencer to cash his/her popularity.

    3)    As influencers are earning through it, they will spend more time on it, and because of it, followers will get a chance to know more about their favorite star.

    4)    BonkLive uses the concept of virtual money( BonkLive coins, Diamonds) instead of real cash. These coins can be bought from an online BonkLive shop.

    5)    Followers can send virtual gifts to their favorite star to grab special attentions, and these gifts can be exchanged for real money.

    6)    Users with get the virtual debit card with MasterCard facilities.

    Features of BonkLive

    If we leave the concept of money making behind the BonkLive comes with plenty of exciting features which are as follow:

    1)    Through it, users can connect with his/her followers with live features and some amazing filters and stickers options are also available to make live sessions more engaging.

    2)    To increase interaction levels with fans chatting option is also available through which broadcaster can interact with his/her viewers through the chat box.

    3)    Users can buy virtual gifts to their favorite star while the live session is taking place and can grab special attentions like special mentions, etc.

    4)    Followers can connect with their favorite stars through direct message option available in the app.

    Close View

    Let us give a quick close look to the interface of the BonkLive android app.

    1) Here is the snap of login screen have a look at below snap to get an idea about the various login options available.

    login screens

    2)    And from the home screen only you can start the live session to entertain your followers.

    followersfollowers

    3)    You can also follow other users if you want. You can search for your favorite broadcaster from easy search option available.

     broadcasting

    4)    If you want to check total diamonds, coins, etc, then you have to check your profile option. You will get something like this.

    users

    Final Words

    Let us wrap up here with some pros and cons which we noticed while using it, read the below pros and cons carefully and take action accordingly.

    Pros:

    1)    The concept of the BonkLive is very good, it is beneficial for both celebrities and their followers.

    2)    The idea of the virtual gift is also outstanding as by paying a small amount a person can get a chance to talk with his/her ideal.

    3)    Users can share their live session on other platforms which is also a very good thing.

    4)    The interface of Android app is very interactive and smooth.

    Cons:

    The only thing which we didn’t like is that there is no desktop client app for Windows 10 laptop and PC users, its desktop client tool should be available so that its users can use it smoothly from their desktop.

    We hope you have read all the above points carefully and will take action accordingly. As it is a free app which doesn’t ask for any bank info, there is no harm in using it. Try it and earn from it.

  • Download Andy OS for Mac OS X | Android Emulator to Install Android Apps & Play Games

    Download Andy OS for Mac OS X | Android Emulator to Install Android Apps & Play Games

    There are only a few working emulators for Mac OS X right now , and one of them is Andy OS Emulator. Andy is based upon VMware and hence can work even on older mac’s such as Macbook Pro 2011 , iMacs with even 4gb of ram and Intel HD Graphics. Thus, if you intend to play android games on your macOS device Andyroid is a good option. In this tutorial, we will cover how to Download & install Andy OS for Mac OS X .

    Tutorial to Download & Install Andy OS on Mac OS X | El Capitan, Mavericks, Yosemite, Sierra, Mountain Lion supported!

    • The first step to Install Andy Emulator on your Mac is to download the Andy OS emulator .dmg file on your Mac –
      Click here to Download Andy OS Emulator for Mac (.dmg file)
    • Once you have downloaded the .dmg file, click on it to open. The installer will now ask you to start the installation by double-clicking the “Box” icon as shown in the figure below –
      Double click on the installer box to start installation
      Double click on the installer box to start installation

      Once you have double-click on the box icon, it may ask you for account password to finish installation as the android drivers require admin privileges.

    • In the new Installation window, Click on “Continue” to proceed with the Andyroid installation as shown –
      Click on Continue to Start Installation
      Click on Continue to Start Installation

      Once you click on “Continue” , Andy will now download the necessary android libraries from the internet, this is done to ensure that the android version has latest security patches installed .

      Wait until the Android libraries are being Downloaded
      Wait until the Android libraries are being Downloaded

      Once the latest Andy files are downloaded, it will start installing the Android emulator as shown below, please wait as this process may take some time –

      Andy Installation on Mac
      Andy Installation on Mac


    • Once Andy is successfully installed, it will show “Installation Completed” message as shown in the following image –
      Andy Installation Successful on Mac OS X
      Andy Installation Successful on Mac OS X

      Click on Finish to complete the installation.

    • Now, launch Andy via the launchpad to Enjoy playing Android games and apps on your Mac OS X device – mac mini, iMac , Macbook Air / Pro . Andy also has inbuilt Google Play Store so you can easily install Android apps from Andy emulator itself!
      Macbook running Andy OS Android Emulator
      Macbook running Andy OS Android Emulator
  • mysimpleshow: Best Explainer Video Creator

    mysimpleshow: Best Explainer Video Creator

    The video creation is always a big hassle. For creating something really out of the box, you need to be a master in this field. But with the advent of technology, it has become really easier for the people to create their own illustrative videos without any prior knowledge. A number of software tools are made available to the people these days which have made the things simpler. If you are looking for an extraordinary tool to create illustrative videos then mysimpleshow can turn out to be the best option available. Let’s put a brief insight over this tool.

    simple video

    About mysimpleshow

    mysimpleshow is an awesome tool that allows you to create bizarre explainer videos using few video editing tools. You can make use of inbuilt storyline templates to create your own script and depict its using the video maker tool. Its powerful Explainer Engine comes handy in suggesting you different illustrations to conceptualize the story. You can start creating your first video with just a single click.

    Creating Explainer Videos – The 4-Step Guide

    mysimpleshow has made video creation really simple. You can easily start with your first explainer video with these 4 easy steps.

    • Draft: It suggests you the best storyline for your video on the basis of your answers to few questions asked by this tool.
    • Write: A user can practice different examples and utilize the practical advice to create a marvelous script for your first explainer video.
    • Visualize: Its Explainer Engine automatically generates the Storyboard for the user so that the user can easily fine tune with his/her story.
    • Finalize: Once you have done everything, it is the time to select the voiceover and the video speed. After this step, you are ready to publish your first explainer video on YouTube.

    final cut

    Creating Video with mysimpleshow

    • Firstly, open the tool interface using the login id and password details and then click ‘Create New Video’ option.

    video creation

    • You can either upload the PowerPoint presentation or can choose the script by your own. It’s totally your choice. Here, we have chosen ‘Write your own Script’ option.

    script option

    • Now, click the ‘Let’s Start’ option.

    start option

    • The storyline will appear on the screen which appears next. Find it according to your subject.

    story line

    • Click on the ‘Type Away’ option.

    typing option

    • Now, you have to enter the desired script to impress your audience through your video. Fill in the details with utmost care.

    filler details

    • Click the ‘Choose Visuals’ option below.

    visuals option

    • Click on the ‘Sounds Great’ option.

    sounds great option

    • mysimpleshow’s Explainer Engine will suggest you the pictures/images according to the script decided by you. If you have your own images, you can upload them as well.

    explainer engine

    • To select the voiceover, click on the ‘Choose Audio’ option.

    audio option

    • You can either select the voiceover from mysimpleshow’s interface or can even upload it by your own. Click on the ‘Alright’ option to move to next step.

    alright

    • You must play the video to check if everything is working fine. Click on the ‘Finalize Video’ option, once you are satisfied with the video.

    video rendering

    • An email will be sent to your registered mail id after this tool has completed creating the video. You are allowed to share, edit, or delete the video once it has been created.

    video done

    This is how a user can create the stunning illustrator videos with mysimpleshow. Its user-friendly interface helps the users to make videos in minimal time adding the best features to it.

    Pricing

    pricing option

    It offers a number of different plans to the users along with the free plan. Each plan comes with unique features along with a few common ones. A user gets enhanced features with a higher-valued plan.

    Pros

    • Thousands of illustrations are provided by this tool.
    • Videos can be previewed.
    • User-friendly.
    • Share videos with your YouTube audience.
    • Both male and female text to speech voices are available.

    Cons

    • Lacks emotions in text to speech.
    The Last Words

    mysimpleshow makes it really easy for this tool to create stunning looking videos. It has a great collection of images and storylines providing plethora of choices to the users to pick the best one. Its easy to use interface helps the users to customize their video proficiently. Go for it!

  • [Guaranteed] Download & Install Jio TV for PC / Windows 10 / 7 / 8.1 [Laptop & Desktop]

    [Guaranteed] Download & Install Jio TV for PC / Windows 10 / 7 / 8.1 [Laptop & Desktop]

    Reliance Jio TV has changed the way we use our mobile phones. Jio TV lets you use your mobile phone as a live TV without requiring a DTH Connection. In addition to streaming live Indian channels , Jio TV also lets you watch catch-ups or previous episodes of your favorite TV Serial (series) and live sports channels too. Now, using your mobile phone as TV has few issues such as inability to chat and watch live TV together, or the small screen issues which don’t give the feel of a TV. But not anymore, in this tutorial we will show you How to Download & install Jio TV for PC / Windows 10 / 8.1 / 7 so you can watch your favorite Jio TV on Laptop / Desktop.

    How to Download and Install Jio TV for Laptop / Desktop –

    Update – Incase if you do not have a Jio Sim or Jio Username / Password – You can even use Nush TV as its perhaps the best alternative to Jio TV – Click here to Download Nush TV App

    Tutorial –

    • First of all, install the Nox App player by double-clicking the installer file. Click on “Install” as shown in the image below –
      Click on Install to install Nox
      Click on Install to install Nox

      Now, after we have installed the Nox Player, we need to install / add Jio TV to it as it is not pre-built. To install Jio TV there are 2 methods –

    • Method 1 – 
      • Click on the “APK” icon in the right hand side menu of the Nox Player , and in the dialog box – select the Jio TV Apk we downloaded before and click on OK. If you haven’t downloaded the APK , you can download it here –
        Click to download Jio TV apk for Nox.

        Jio TV Apk Install on Nox
        Jio TV Apk Install on Nox

        After selecting the APK file , click on Open to install Jio TV as shown in the above image.


    • Method – 2 – This method will work only when No Other Android Emulator is Installed except Nox (incase if you already followed Method 1 skip this step –
      • Simply drag and drop the Jio TV Apk onto Nox Player window, or double-click the “.apk” file to automatically install it in Nox App Player as shown below –
        Double APK or Drag and Drop inside Nox Player to Install Jio TV
        Double APK or Drag and Drop inside Nox Player to Install Jio TV


    • Once, you have finished installing Jio TV , it will automatically launch as shown in the image below –
      Jio TV Sign in on PC / Windows
      Jio TV Sign in on PC / Windows

      Jio TV will now ask you to sign-in to use Jio TV App . Here enter the details as follows –
      “Jio ID” field  – enter your Jio Number without + 91
      Password” field – enter your My Jio account password.
      Skip Sign In won’t work even if you’re on Jio Network.

      Click on “Sign In” button, to log-on to Jio TV.

    • Incase, if you don’t remember the password, or have forgotten it. Simply use the “Forgot Password” option to get a new password for your jio mobile number.
    • Now, it will redirect you to Jio TV interface, simply tap on any channel icon to start your live stream of channel as shown –
      Jio TV for PC Menu
      Jio TV for PC Menu

      You can watch streaming of your favorite live channel or serial in either Portrait mode –

      Jio TV Live Streaming on computer Vertical Portrait mode
      Jio TV Live Streaming on computer Vertical Portrait mode

      Or you can even Go Full Screen as shown in the image below –

      Jio TV Fullscreen live on PC / Laptop
      Jio TV Fullscreen live on PC / Laptop

      Congratulations! You have now successfully Run Jio TV fullscreen on your PC / Laptop or Computer. In case of any queries/difficulties feel free to comment below.

    • Click here to Download Nox Android Emulator (Jio TV for PC / Laptop) Offline Installer
    • Click here to Download Jio TV Apk for PC / Windows (Nox Installation Required)


  • Tutorial to get Discount on Uber for Existing & Old Users in India

    Tutorial to get Discount on Uber for Existing & Old Users in India

    Uber and Ola with their incentive based marketing have changed our habits of travel . Now, we mostly prefer calling Cabs at our places and then travel. The companies with their lucrative offers such as “First Ride Free”, “Refer a Friend and get free ride” have got us hooked to discounts. With the recent drying up of offers especially for Regular users – we are now left searching for Promo codes or Offer codes for old users. Not anymore, in this tutorial we will show – How to get Cashback & Discounts on Uber using Promocodes for Old and existing users in India!

    Tutorial on How to get discounts for Uber Rides for Old and existing users –

    We will be using an all services aggregator app – Tapzo for the same. Tapzo allows you to book Cabs, Movie tickets, order food all features in one app! and it even provides you Tapzo Cash in cashback for each services you order. The tapzo cash thus again can be used to do Recharges, Cab booking, Order food etc.

    How to use Tapzo App to get Cashback for Uber Rides (Existing User)

    • First of All Download the Tapzo app from the link given below –
      Click here to Download Tapzo App from Google Play
    • While you can download the Tapzo app directly from Play Store, doing via our link gives you directly 25% cashback on your first 3 Cab bookings as shown in the image below –
      Tapzo Cashback for Uber Existing Users
      Tapzo Cashback for Uber Existing Users

      Here’s our Tapzo Referral Link for getting the Cashback Offer – Click to Download Tapzo via Referral link

    • Now, once you have downloaded Tapzo, getting Cashback on your Uber rides is really easy. First on the homescreen , select the “Cabs” option. You will now be navigated to a screen as shown below –
      Uber Screen on Tapzo
      Uber Screen on Tapzo

      On the screen please enter the Destination, Source and time of the pick-up / cab . you will then see a list of all available options right inside the Tapzo app!

    • Select the type of Cab, you want to book. Once you have selected the type of Cab to book you will be redirected to a Confirm Booking Screen! as shown below – (Important Step!)
      Confirm Booking Screen
      Confirm Booking Screen

      On the confirm booking screen shown above, tap on the “Apply Coupon” section.

    • It will now show you a list of all available coupons for your Uber rides and the best part being all the coupons can be used even by existing or Old uber users as shown in the following image –
      Uber Coupon Apply Existing Users
      Uber Coupon Apply Existing Users

      After tapping on the coupon , select the apply button as shown –

      Apply Tapzo Uber Coupon
      Apply Tapzo Uber Coupon


    • As soon as you click on Apply you will be redirected to the Cab Booking Confirmation page with the coupon applied message as below-
      Coupon Successfully applied!
      Coupon Successfully applied!

      Voila! you will now earn discount / cashback on your Uber rides , which you can use not only for next cab rides , but even for Food, Recharges etc. Great isn’t it!

    • Click on the Book Now button and Enjoy the ride!.


  • How to Sniff URLs or Capture Network Packets on Android without Root

    How to Sniff URLs or Capture Network Packets on Android without Root

    Capturing Packets or Sniffing URLs may sound a bit of hacking related stuff, but it isn’t. Capturing Network Packets may help you analyze why is your Data Pack running out, or which apps keep sending data in the background without your consent so that you can stop using them and enhance your Phone Security. Besides, Capturing packets will also help you get that streaming link of a stream, download links which again open up more possibilities to optimize your Cellular or Wifi data usage on your phone. So in this tutorial, we will show you How you can Sniff URLs or Capture Packet Data on your Android with No Root Priveledges required.

    How to Capture Packet Data  Network Packets on Android

    Pre-Requisites :

    Tutorial :

    • After downloading the Packet Capture App from the above Play Store link, install and Open it.
    • It will now ask you for permission to install SSL Certificate as shown in the image below –
      Packet Capture Install Certificate SSL
      Packet Capture Install Certificate SSL

      Here tap on “Install Certificate” option, it will now ask you permissions to save the certificate . Click on the “OK” button in the pop-up box that prompts out as shown in the following image –

      Click on OK Button
      Click on OK Button


    • Now, the SSL capture Certificate will be successfully installed to your Phone. It will now redirect you to the main app screen.
      Note – The Certificate Installation is only a one-time step required, until you uninstall the app. So no need to install certificates multiple times!
    • To start the Packet capture, Simply launch Packet Capture app and tap on the “Triangle (green) icon” as shown below –
      Tap the icon to Start Packet Capture on Android
      Tap the icon to Start Packet Capture on Android

      Now, it will ask you to set-up a VPN (If its your first capture), here simply tap on “OK” to allow it to create a VPN connection –

      Allow VPN Connection to Packet Capture Android
      Allow VPN Connection to Packet Capture Android

      It will now start capturing Packets in a date_time format on the main screen. To stop capturing packets simply tap on the “Stop” red square icon as shown –

      Press to Stop Packet Captures
      Press to Stop Packet Captures

      Phew! You can now access the captured packets data by tapping on the filename on mainscreen –

      Listing out the Captured Packets Data
      Listing out the Captured Packets Data

      Simply tap on the file name to reveal the packet data. It will show you a list of all the packets data sent or received by your device.

    • To reveal more information about the data e.g URL, type of request, Hex etc click on the logged packets as shown in the image below –

      Packet Capture Logs Android
      Packet Capture Logs Android
    • Thus, you can now successfully capture packet data, sniff URLs on your Android phone . Plus, it will also help you keep a track whether the recently installed apps are causing more data usage etc.
  • Top 5 Nintendo 64 N64 Emulators for PC & Windows 10 with Joystick Support

    Top 5 Nintendo 64 N64 Emulators for PC & Windows 10 with Joystick Support

    Nintendo 64 or N64 is the first gaming console with 3D Graphics Rendering and 64-bit architecture. It is considered as one of the best gaming consoles ever produced by Nintendo.  

    Nintendo 64 has many great games such as Legend of Zelda, Super Mario 64 which are playable even today. Now, since the console is discontinued ; the only way to re-play the old game classics is by emulation.

    Thus, we present you the Best 5 Free N64 Nintendo 64 Emulators for PC and Windows 10 which will let you play N64 games on your Windows PC or Laptop.

    Note – All the emulators below do not come with any game (ROMs) as those are copyrighted. however, a simple google search with game name + n64 rom will give you the game ROMs which can be used to play games in any of the below emulators.

    Top 5 Best N64 Emulators for PC – Windows 10/7/8.1

    1. Project 64

    Project 64 Nintendo 64 or N64 Emulator for Windows
    Project 64 Nintendo N64 Emulator

    Project 64 is perhaps the most actively developed N64 emulator , and also is the most easiest to use too.

    Project 64 has fast and speedy Nintendo 64 emulation as well as it contains unique features such as –

    • Gamepad / Joystick Controller Support.
    • One-click installer (Either install and run or Run Portable version)
    • Ability to Load & Save Game States
    • Cheats Support

    2. Nemu 64

    Nemu 64 Nintendo 64 Emulator for Windows 10
    Nemu 64 Nintendo 64 Emulator for Windows 10

    Nemu 64 is another compact yet unknown N64 Emulator for Windows OS. It didn’t require any installation and ran smoothly with good emulation. Besides, that Nemu 64 has some salient features such as –

    • Multi-player support (Offline)
    • Net based Online Multi player support.
    • Gamepad & Joystick Compatible
    • Save & Load game states anytime

    3. 1964

    1964 Nintendo 64 Emulator for PC
    1964 Nintendo 64 Emulator for PC

    1964 is a popular Nintendo 64 emulator for PC , which is available for Android as well. 1964 has all the standard features like the previous two, but it also has support for additional ROM customization, and custom ROM support. Thus, you too can create your own cheats and customization for games while using 1964.

    However, the User Interface sometimes stops the game and causes the played game to crash unexpectedly , however it can be resumed by clicking the pause button from the menu bar, and then tapping the play button.

    4. Supra HLE

    Supra HLE N64 Emulator for PC / Windows
    Supra HLE N64 Emulator for PC / Windows

    While the above emulators are easy to use for general public, the Supra HLE and Ultra HLE are for the pro users.

    HLE – High Level Emulators offer advanced Configuration options, right from the Video plugin, audio plugin to be used to RAM and buffer size. However, we failed to get any game running on both the HLE emulators on Windows 10, but they worked smoothly on Windows 7

    Note – Use the packaged application – Supra Configurator 2.o to configure Supra before running the emulator.

    5. Ultra HLE

    Like mentioned above, Ultra HLE is another High Level Emulator with advanced options. Infact Ultra HLE also comes with in built debugger to debug game errors. But like Supra, it too failed to work on our Windows 10 system due to absence of old gfx video plugins which are absent in newer versions of Windows.

    Click here to Download Ultra HLE N64 Emulator for PC & Laptop

    Thus, these are currently the latest Best free N64 Emulators for Windows Systems (PCs & Laptops) which will let you play your favorite Nintendo 64 (N64) games on PC with Joystick and save / load game support. If you know of any better emulator or encounter any issues while using them feel free to comment.