There are many Screen Recording tools available for Android, and so are Screenshots / Screen capturing tools. Recording Videos on Android become too bulky due to their bigger file size & sometimes Static screenshots aren’t enough especially when you are using them for writing tutorials. Its cases like these where GIFs come to the rescue, their ability to loop static images creates an easy to understand video illusion simultaneously using lesser file-size as that of images. So, here’s a tutorial on How you can Easily Capture Animated GIF Screenshots on Android Phones –
Tutorial to Capture Animated GIF Screenshot on Android Mobiles –
Pre-requisites –
Quickly Grab some static Screenshots whose images you would like to combine into a GIF (You can capture multiple Screenshots using the Volume down key + Power key and save them in Gallery).
Creating GIFs
Graphica App
First of All Download & Install the Graphica Live Photo Maker app from Google Play Store by Clicking the below Link –
Now Open the Graphica app & select the “gallery live photo” option as shown in the image alongside .
Once you click on the Gallery Live Photo, it will open a preview and will ask you to select the photos with which you want to create the GIF as shown below –
Select Photos to create GIF in Graphica Gallery
Here Select the photos using which you intend to create GIF and then click on “Next” button as shown in the above image.
Now, Once you click on Next, it will show you a preview of the GIF , with a Slider attached to it as shown below (Move the Slider button to your right side to slow down the GIF , and to the left incase you want to speed it up)
GIF Slider
Once you are done with adjusting the Speed of GIF, Click on the “Save to Gallery” button.
That’s it! You have successfully captured Animated GIF Screenshot on your Android phone, the GIF is lesser in Size and works very smoothly. If you face any problems while creating GIF feel free to comment, you can also check out the GIF demo below to see how smoothly it works –
GIFs are back again! Their ability of being able to animate like videos & to be less in size like normal static photos always make them useful for conveying information, plus their ability to loop-continuously makes them even more usable for tutorials. Basically, Windows Operating Systems capture screenshots in normal image (jpg/png) format, and there arise questions such as How to Capture Animated GIFs Screenshots on Windows? So, as a answer – Here are 3 Best Free apps which will help you capture Animated GIF Screenshots on Windows 7 / 8.1 & even Windows 10 (32-bit as well as 54-bit support)
Top 3 Free Apps to Capture Moving GIFs Screenshots on Windows –
App No.1 – Gyazo
Gyazo Icon
Gyazo tops our list due to multiple features – It not only allows you to create or creates GIFs but it even instantly uploads them to the Gyazo Server, this helps in saving the time required to save the GIF Screenshot and uploading them separately – improving productivity. Besides this, Gyazo has the rare ability to record complete screen into GIF format which is perhaps the missing feature in the other two apps present in this article.
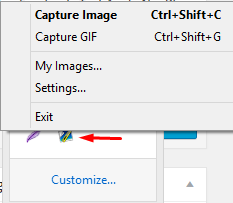
Now, Once you have installed Gyazo simply navigate to your Taskbar and look for the Gyazo icon as shown in the alongside image.
This shows that Gyazo is running now to capture GIF simply “right click” and select “Capture GIF” option , else you can press the keys “ctrl+shift+g” to capture GIF anytime.
Now, once you press the Key combination, it will show you a plus ‘+’ sign, asking you to select the area to capture – Now select the rectangular area whose GIF is to be recorded, by clicking the left mouse button until you draw the rectangle as show below –
Selecting Rectangle for GIF
Now, it will start recording the selected area for actions (moving pointers,images etc) as shown below –
Gyazo Recording
Once the blue bar is filled, it means that your GIF is ready and it will start uploading your GIF to their server.
That’s it! Now once the upload is done (5 seconds) it will open a URL with your recorded GIF link which is ready to be used anywhere. Congratulations! You have successfully uploaded your Animated GIF Screenshot.
App No.2 ScreenToGIF
ScreenToGIF
ScreenToGIF is a very easy, neat and simple to use utility to capture your Screenshot in GIF format in the most efficient & easy way. It also provides functionality to apply various filters to the GIF like Sepia etc, as well as it even lets you add text to the GIF . Following is the method to record GIF using ScreenToGIF –
Now, its a single .exe file, which on execution directly gives you a window with a transparent body as shown below –
ScreenToGIF Window (Drag to place) and resize using Corners
Here, drag the window to the location you want to record into GIF using the Title bar, you can also re-size the recording window using the “maximize” button or by extending the window by its edges.
Once, you are onto the area you want to record simply hit on the “Record” button as highlighted by blue box in the previous image, the app will now start recording the screen within the app’s frame into GIF. Once you are done with taking the Screencast simply click on the “Stop” button to stop the Recording. It will now show you a preview window as shown below –
Screen To GIF Editor Window
You can now Play your GIF Preview, or simply Click on “Done” as highlighted by the blue box to save your GIF! .
That’s it, you have successfully captured another Animated GIF Screenshot on your Windows PC ( Computer) or Laptop.
App No.3 LICEcap
LICEcap is just 220kB in size, but packs a big punch in it features. The method to use LICEcap is similar to that of Screen To GIF and their UI too are similar. Inorder to capture Moving GIF Screencasts using LICEcap you need to perform the following actions –
Facebook has now started supporting & playing GIFs animations , but the GIFs don’t move if uploaded directly to the Facebook website. There’s a particular simple method which needs to be practiced to ensure that your GIFs always animate on Facebook – So here’s a small tutorial on how you can Add or Upload & Post animated GIFs on Facebook PC & mobile Website as well as Facebook Mobile App for Android & iPhone-iPad (iOS). This method even lets you post GIFs as Facebook status update, or in comments, or in Private Messaging as well!
Tutorial to Upload / Add Animated GIFs on Facebook –
Getting the Direct URL of GIF from another host , That is uploading GIF on some other server and copying its Direct Link.
Pasting the Direct Link of GIF into the Facebook Text Window (Status / Comment / Messaging) and Posting it! That’s it! (You have successfully added an animated GIF on Facebook – Now let’s have a look onto each step in detail)
Pre-Requistes –
A GIF You can use the existing GIFs or you can even create a new one using the respective methods – Creating GIF on Android – UseGraphica App for Android . Graphica even lets you create GIFs using frames, and has an inbuilt direct facebook share option which you can directly use to share Andimated GIFs on Facebook. Create a GIF on iPhone – Follow this linked tutorial to Create & View GIFs on iPhone (Uploading GIFs to facebook will require some additonal methods) .
Method –
Now, considering you have your GIF files ready, First of all Upload the GIF files to an image-hosting site which supports hotlinking , (for e.g You can use Giphy.com , UltraImg.com to upload your GIFs and get the direct links . for example in our tutorial we will be using Giphy.com as our image host.
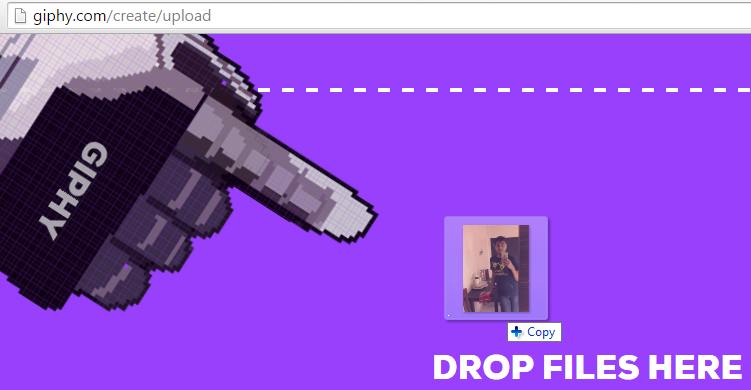
Navigate to http://giphy.com/upload and Upload your Existing GIF by drag and droping your GIFs onto the upload Window as shown in the below image –
Drag and Drop GIFs onto Giphy.com/upload
, now it will start uploading your GIF onto the Giphy server. Now you need to agree to their Terms of Service and then click on the “Upload GIFs” button. –
Upload GIFs button
Now once you have uploaded your GIF onto Giphy, it will load a preview window , Now scroll-down to the bottom of the GIF image preview and select “Advanced” option.
Once you select “Advanced” option it will present you with various links, Now simply “Copy” “ctrl+c” the GIF Download Link as shown in the image below –
Copy the GIF Download link from Andvanced Tab
Note – Giphy does notes that Giphy links preview in Facebook &Twitter but Giphy Links do not animate by default and hence we are using the GIF Download Links.
Now , Open Facebook.com – And Paste the GIF Download Link into the “Update Status” field , and wait until the preview loads as shown in the image below –
Facebook GIF Preview
Note – If the preview doesn’t load even if you pasted the correct link, Please reload the page and try again until the preview appears. (If you’re using the Facebook mobile app – The same method applies for Facebook app as well , paste the direct link into Update Status field and work for the preview to load.
Once the preview is loaded , Simply Click on “Post” and voila! you will see the GIF is animating and moving, thus you have successfully posted Animated GIFs on Facebook!
Quick Tip – You can even remove the pasted link, once the preview is loaded so that no one can guess how you did it 🙂 , If you face any problems while using this method feel free to comment.
We highly recommend using Graphica App for Android for posting the GIFs on Facebook, as it automatically does the complete job of creating GIF,uploading, and copy-pasting the URL for you, and besides it also provides awesome Frame Live GIFs option so you can style your GIFs as well!
There are many Online Flight ticket booking providers in India which makes it confusing for a Customer so as to which service should be used for Booking their flights. Many times, the initial prices shown in the search are later on increased with attributes such as extra taxes, convenience fees etc and then the rates simply don’t remain and in many cases are even higher than other flight ticket providers. So, here is the collection of Top 5 Websites to Book Cheap flight Tickers in India along with their reviews of – ClearTrip, MakeMyTrip , Via , Expedia , Yatra / GoIbibo & a word on Musafir as well . We made a large sample of queries on the operators for rates on holiday days, weekdays, weekends, festivals etc of domestic flights before writing these reviews .
ClearTrip stays true to its name which itself its greatest virtue. Unlike many major Flights ticket providers which levy hidden extra charges on the search fare – ClearTrip imposes no extra charges in the name of such hidden costs, and the flight ticket Insurance too is an optional add-on which the passenger can remove to reduce the ticket costs . Some, of the Unique features of cleartrip are –
No hidden extra charges / convenience fee on Flight Bookings.
While booking for SpiceJet tickets we found that their rates were the lowest! Infact they were lower than the rates on Official SpiceJet website too , and it seems they have some sort of tie-up with them.
So, we highly recommend to check the rates first on ClearTrip.com for any flight booking and if its SpiceJet look for no other operators!
MakeMyTrip is one of our favorite Domestic flights booking service providers due to its partnership with Payback! & a large number of banks . Now, the rates on MakeMyTrip may not always be lesser than that on Cleartrip, but the Cashbacks provided by virtue of their tie-ups with banks + Payback sometimes make it an even better deal than ClearTrip. And like cleartrip, makemytrip also doesn’t has any convenience charges and thus you can get the ticket at the same rate shown in search provided you unselect the travel insurance which is present on the payment page whose cost is around (Rs.249). Below are some of the Salient features of MakeMyTrip –
No hidden convenience fees on Flight Bookings (What you see in search is what you pay).
Tie-Ups with major bank’s credit cards & payback enables you to get Extra Cashbacks!
Via.com simply surprised us by its booking rates and its ease of use. Not to be mistaken by its Websites and a little out-of-date UI , Via.com has some of the best flight booking rates especially if your flight is from either GoAir or JetAirways. Besides, lower rates Via also leads on –
No additional convenience fee charges whatsoever.
No automatic addition of Insurance.
Easy availability of coupon codes which are valid on all books without any minimum fare or minimum booking policy.
We used Via.com coupon code – VIADOM to get discounts on even the lowest flight fares amongst its competitors.
Expedia.co.in is the Indian part of the Global travel services provider – Expedia . The flight rates on Expedia were on par with all the operators especially in the economy flights but the additional Convenience Fees charges of Rs.200 on each booking imposed by Expedia harms the ticket fare in the economy flights. But in the Business class flights the Cashback offers provided by Expedia steal the show. We recommend Expedia if you’re looking to Book IndiGo Air Tickets. Though, they give Best Price guarantee else get double the difference as refund, no one simply has the time to claim refunds after the travel.
Now, we would purposely club Yatra & GoIbibo in a single review as there’s literally very little to differentiate between the two. Considering the amount of hype & promotions they do, we expected better deals from both of them, But it seems, they spend more on promotion instead of satisfying the passengers by giving best rates. Coming to the point, both Yatra as well as GoCash may give the same rates as any other travel agency but they again levy the Rs.200 Convenience fee on all the tickets .
GoIbibo = ?
And to fool the users come up with offers of Yatra eCash cashback & GoCash cashbacks – Both of the virtual cash being completely useless when it comes to domestic flights bookings.. You can just use a meagre 5% of booking amount to pay via eCash or Rs.500 limit (whichever is lower) , When it comes to economy class bookings the rates of 5% virtual cash carry no value as simply it cuts off the convenience fee which itself was additional charges levied by these two. Incase of Business class tickets, their extra bloated fares on the sites along with kinda forcing users to buy hotels leaves a Bad Taste. We would highly recommend you to use the previous options before considering these. However, we would gladly change our reviews if the fares & services improve.
Update – You can even get additional CashBacks from CashKaro.com if you are trying to Book either via ClearTrip, MakeMyTrip or Expedia (This Cashback is sponsored by CashKaro and is above and is extra cashback exclusive of coupon discounts , credit card & wallet discounts! . Thus making your travel even sweeter! – Check out this tutorial on How to use CashKaro for getting Flight Discounts.
So, here’s a table which would help you to Book Cheapest Domestic Flights in India
Recently, Facebook announced an update which will let you upload or set short videos or GIF Images as Profile Pictures or we can say Profile Videos. It announced this update along with other major new features such as ability to set temporary profile pictures (which expire after a certain period) , Also allowing users to Select upto 5 featured photos which can showcased at the top of profile. Besides, this there’s also an option to write short one-line bio’s for public in the new update. So here’s a method on how you can Add / Set Facebook profile Video or set profile picture as video or GIF on Facebook !
Method to Set Profile Videos or Video Profile Pictures on Facebook –
Note – Please Note that this feature is currently launched only in specific regions (U.K & California) & Facebook is gradually rolling out this feature across all its users . Also the Method currently works only on the Facebook App (iOS – iPhone / iPad & Android ) and the PC Website currently doesn’t has this feature (We will be updating this article as soon as the updates are available) .
Tutorial to Set Facebook Profile Video on iOS (iPhone / iPad App) –
First of all log-on to your Facebook account on Mobile app , Now in the bottom-right hand side bar you will find an option “More” as shown in the image below –
Tap on the More Option
Tap on the “More” option.
Once you Tap on the “More” option, it will redirect you to your profile (If you can see your profile picture aligned at the centre, it means you are the lucky one to get this Creative update 🙂 ).
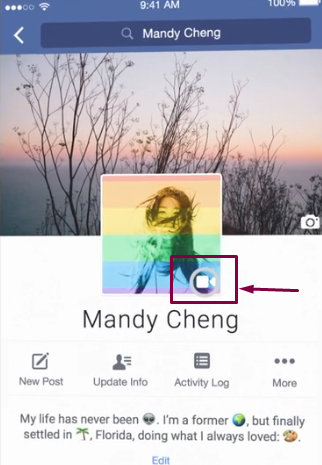
Now tap on your current profile picture , If Facebook Video is activated for your profile you’ll see an icon (flashing between camera & video on your profile pic) as shown in the figure below (highlighted by maroon color) –
Flashing Icon on the Profile Picture
Now, Simply tap this “Camera/Video flashing icon” .
Now, in the menu that appears you will either see a message “Coming soon” or a message to “Take/Upload Profile Video” as shown in the image below –
Upload Profile Video Option on Facebook
If you can see the message to Take / Upload Profile Video, Tap on it to Record or Select the Video depending upon the choice you selected.
Note – If you see the Coming Soon message, it means you need to wait a little more… Till then you can show your creative side, by Uploading an Animated GIF which will automatically animate or play on Facebook using the Graphica App for Android , or else if you are on Desktop / Computer – You can check out this tutorial to upload a GIF on Facebook.
Now, you can either record a new Profile Video (Upto 7 Seconds length) or select & upload an existing GIF Image or a Video which is to be set as Profile Video.
That’s it ! You have successfully updated your new Creative Facebook Profile Video.
Observations –
Currently, you can Set/update Profile Video only from the Facebook mobile app, however the changes are visible on the Facebook desktop / PC website version too!.
Gratitude –
We Specially Thank & Hat-Tip to Molly McHugh and her Wired.com Tutorial for giving us the permission to link and use her image in our article! .
The Facebook profile Video will be loading automatically for Desktop Users and it will appear to them as shown in the following figure –
Profile Video View on Facebook PC Version – Molly McHugh
Recently, Facebook has started autoplaying Videos & GIFs without user content in its news feed which is a bit odd, considering your feed suddenly stops playing videos resulting in distractions. Not only does the facebook autoplay distracts from the news feed, but it also consumes your Data/bandwidth which is precious. But to our choice, We can disable & stop Facebook autoplay of Videos by the following easy methods –
Steps to Disable AutoPlay of Videos on Facebook PC Version –
Now,you will see many options, Select the tab “Auto-Play Videos you will see the a drop-down box with label as”Default” activated, Click on it and Select the option “Off” as shown in the option below –
Disable Facebook Auto-Play Videos
That’s it once you Click on Off (It will be highlighted and when active it will replace the earlier “Default” option which was highlighted earlier) return to your news feed, Your Facebook Auto-play will be stopped!.
Method 2 – Manual Fix
Facebook Down Arrow – Settings
First of All Log-on to your Facebook account and then look for the “Down” arrow at the Top-Right Hand Side (The arrow which you use to log-out from Facebook). Click on the “Down” arrow.
Now, Select or click on the “Settings” option which is right there above the Logo-out option.
Once you Enter the Settings Page, Look out for the “Videos” option in the right-hand side pane , Its present right at the end as shown in the Image below –
Facebook Videos Settings
Click on the “Videos” option to enter its settings, and there you’ll find options such as Video Default Quality, and Auto-Play Videos .
Now, in the Option “Auto-Play Videos you will see the a drop-down box with label as”Default” activated, Click on it and Select the option “Off” as shown in the option below –
Disable Facebook Auto-Play Videos
That’s it once you Click on Off, return to your news feed, Your Facebook Auto-play will be stopped!
Steps to Disable Facebook Autoplay on Facebook App / Mobile Site (The Method will work to disable Facebook autoplay on Facebook Android app as well as iPhone / iPad app too!)
First of all Open the Facebook App, and click on the “Hamburger” icon at the right hand side as shown in the image below –
Facebook Hamburger icon
Now Scroll-down among the options until you find the “App Settings” option as highlighted above.
Now tap on “App Settings” to enter it , And now Tap on the “Videos Play Automatically” option shown below (By Default its On, We need to Disable it) Tap on the Videos Play automatically option —
Videos play automatically
Now, it will show a pop-up with options such as “On”, “Wi-Fi only” and “Off” as shown below – Please select the “Off” option –
Tap on the Off option/select it
That’s it! You have successfully stop facebook autoplay of videos.
Many times, we lose the photo we uploaded to Instagram may be due to loss of device or some other reason. And hence you may want to download & save your own uploaded Instagram photos & videos to a local drive, or Back-Up your Instagram account and its data . Here’s one of the most easiest methods on How to Backup & Download your own Instagram account data using Instaport.me. This method can be used to back-up your Instagram account and downoad own photos on Android phones, iPhone , iPad as well as Computer / Mac too
Method to Back-Up & Download your own Instagram Photos using Instaport.me
Instaport.me allows you to back-up your Instagram account on Android, iPhone & Computer too
Instaport.me is an online service which will automatically fetch all your uploaded Instagram photos & videos so that you can easily download them from your browser on any device. Thus, instaport.me can be used on any device – Android, iPhone & any Computer / Mac too.
To use instaport.me First of all Sign-in with your Instagram account and authorize the app as shown in the image below –
Instaport.me before login
Once, you log0n to Instaport, the option 2 will turn active as shown below –
Successfully Sign-in from Instaport.me , Now here select the “Export Options” like all my photos, or the Last xyz photos and click on “Start export” button. Instaport.me will now start downloading your photos in Step.3 and once it has fetched all the photos & videos from your account it will present you with the Download options as shown below –Download Option- Instaport.me
Simply Click on either the “Donate & Download” button or the “Download only” button to start your Download —
That’s it! You have now successfully downloaded & back-up your own Instagram account photos & Videos.
GIF or Graphics Interchange Format images are great fun because they show motion as in Videos but actually are animated Images and hence have a lesser time too. Besides, this unlike Videos gif’s are looped continuously in Browsers and don’t have any Play & Pause button thus giving an infinite loop feeling which makes them even more funny. So, here’s a simple tutorial which will reveal how you can create your own moving photos- GIFs right in your iPhone & iPad –
Tutorial – How to Easily Create Animated GIFs in iPhone & iPad –
GIFMaker App iOS
We will first need an app which will take our photos / images and convert them into GIFs or some which will directly shoot the pic into the GIF format, We tried GIF Maker App by Smuzzal for iOS as its free and it really worked great! Click here to Download GIF Maker App by Smuzzal from Apple iTunes Store.
Once, you have downloaded the GIF Maker App It may ask you permission to access photos & camera – Please “allow” the access to the same to GIF Maker App.
Now, Depending upon your choice Select the GIF Creation Mode – For example, If you want to created moving photos from existing Gallery pics select the normal “GIF” option as highlighted by blue box in the alongside image.
Or, If you want to create a new moving photo / animated GIF from the camera Simply Select the “Shooting GIF” option.
Now, we will be first covering Normal GIF Creation mode & then we will be covering Shooting GIF Option –
Method to create new GIF from Existing Photos –
Once you have selected the normal “GIF” option it will present you with all the photos within your gallery as shown below –
GIF Maker Gallery (Select Photos and tap on Right hand top side)
Now, Select the Photos which you want to have in GIF (You need to select atleast 2 different photos to create a GIF) , Once you’ve selected the Photos , Tap on the “Film man” icon present at the top-right hand side as highlighted by Orange color box in the above image.
Tip – If you select Multiple Photos from a Burst you can use the “Video” Effect in photos else you can select totally different photos e.g – black one & white one to create a Ghost effect.
You can skip forward to Method to Save GIFs as we will just be having a look onto alternate method of getting pics from Camera
Method to create GIF from Camera –
Camera method – The bottom left hand side indicates the number if of pics required
Now in this mode, please allow the app the access to Camera, in the bottom right hand side corner you’ll find a number as highlighted by red box in the alongside image – It indicates the number of Images to be clicked for GIFs . Press on it to adjust the “bear” slider to adjust the number of photos to be taken.
Now, tap on the “blue finger-camera icon” multiple times untill the photo counter becomes zero, then you’ll be shown an option to Save GIFs as shown below – Follow the below Method to Save GIFs from GIF Maker app –
Method to Save GIFs From the GIF Maker App (Common to Gallery photos + camera method) –
Now, once you have clicked on either the man, or camera icon(depending upon the method you selected) it will redirect you to “Edit GIF” pane .
Here you can reduce the speed or photos to be shown per second(frame per second) by using the Edit GIF option present at the bottom highlighted by the Green color, or you can Save the GIF by the “Save”option present at the top-right hand side corner highligted by blue color in the image below –
Edit GIF Pane
Once you’ve tapped on “Save”your GIF will be successfully saved in the Gallery and you’ll be presented with an Image as shown below –
Successfull GIF save by GIF Maker App
Now, Your Gallery will be having a new image –
Please Note – that unlike when you view the GIF in GIF Maker App, The GIF Image in the gallery won’t animate or move and are static, And hence , to make GIFs move you will need to E-Mail and Send the Image to your E-Mail ID and then You can use the animated image on any site as you want.
Uploading the GIF through Safari browser didn’t work in our tests so we used the Default Mail App and it did work as shown below –
Mail GIF on iPhone
You can also view your GIF in your iMessage by sending the GIF to your own number by the Messaging option – and then always visiting the messages to view your favorite GIF being saved and animating in the background as shown below –
Saving GIFs on iPhone by sending to own number
That’s it ! Now you have Successfully created and saved as well as viewed or watch GIFs images in your iPhone! & iPad. Feel free to comment if you face any issues.
Considering the rapid rise in number of Chromebook users & Chrome OS plus the load that uTorrent puts on Windows System & the crapware bundled with it, lead us to think on How to Download Torrents in Google Chrome Browser and we got 3 Solutions in Total for the Same. These 3 Solutions will work on Chromebooks & Google Chrome OS too as we are using chrome’s default extensions for downloading torrent thus are recommended torrent client for Chrome OS-
Solution # 1 – Using JSTorrent Client Extension for Google Chrome OS
JSTorrent is a torrent Client for Chrome
JSTorrent is a torrent client for Google Chrome written purely in JavaScript, Its Speedy, easier to use and works with Magnet Links too! . Though JSTorrent is a paid app on the Google Chrome Store, you can use the Lite Version which is available for Free . Also, If you want to get the Full-feature JSTorrent Version for Free you can get its code from github and directly load as Unpacked app . We have compiled a tutorial which will explain you on loading the github code –
How to download Torrents Using JSTorrent on Google Chrome Browser –
First of all Download & launch the JSTorrent App on your device.
Once you have launched the app , We first need to Specify the “Downloads location” where the file is to be saved / Downloaded. Click on “Options” as highlighted in the below image –
JSTorrent Options
Now, Choose the Download location by clicking on the “Choose” button in the pop-up (Specify the location for your torrent downloads) Click here for a sample image .
Once, you’ve specified the location, you need to add the torrent to the client, You can add a torrent by either Copy-Pasting the Magnet URl of the torrent, or directly link of the .torrent file (You can also add your local .torrent file by keeping the option Blank and clicking on the “Add” button . As shown in the image below –If you have pasted the Magnet URL or the link , Click on “Add” to add it to the list, Once your torrent is successfully added it will be added to your list!
That’s it! You can also use the Start / Stop or Remove buttons to perform the corresponding actions .
Solution # 2 – Using Bitford Torrent Client for Google Chrome OS
Bitford Client
Bitford is an alternative to JSTorrent client for Chrome OS which is free! . Though, Bitform lacks functionalities in comparison to JSTorrent, but nevertheless it gets the Job of Torrent download done , Besides that Bitford also lets you Play / Stream torrent data so that you can watch videos even while they’re being downloaded at the background.
To Download torrents using Bitform first download the .torrent locally and then launch the Bitform App , Now Click on “Load File” option as shown below –
BitFord Load torrent option
Now, select the local .torrent file which you downloaded and it will start downloading the contents! . Its that easy.
Solution # 3 – Using Torrent Leech Sites
This Method is different from the methods we discussed above. Unlike the previous two methods we don’t need to continuously power-up our PC nor download any extension or app for Downloading torrents . We just need to leech torrents online on Torrent Leech Sites and then we can directly download them via simple http connection .
So, These are the 3 methods which can be used to download Torrents on Chromebooks/ Chrome OS . Infact After using JSTorrent you might use it on Windows , Linux and Mac OS too! . Feel free to comment if you face any issues 🙂


![How to- Disable Facebook AutoPlay of Videos on PC & App Site [Disable AutoPlay on Facebook App / Website]](https://techapple.net/wp-content/uploads/2015/10/BJ85Gju.png)


![How to- Backup & Download own Instagram Photos/Account [Back up Your Instagram Account]](https://techapple.net/wp-content/uploads/2015/09/rGH1hgV.png)


![How to Easily Create & View GIF in iPhone & iPad [Animated Images GIFs in iPhone / iPad ]](https://techapple.net/wp-content/uploads/2015/09/tpnMgCg.png)


 If you have pasted the Magnet URL or the link , Click on “Add” to add it to the list, Once your torrent is successfully added it will be added to your list!
